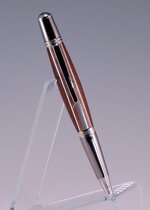
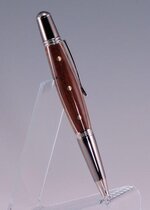
My Version of a Faux Knife

Signed-In Members Don't See This Ad
See more from JD Combs Sr

JD Combs Sr

Member
Joined
Jan 30, 2010
Messages
767
Location
Owingsville, KY
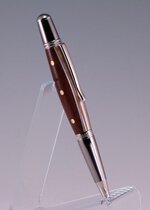
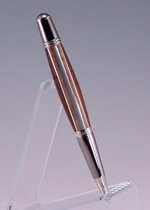
Timothy Wise(AKA "wiset1") posted a full sized Majestic dressed in Cocobolo and Brazilian Cherry the other day(01/01/12). The wood was in the form of knife scales giving the pen the look of a very nice pocket knife. I asked Tim if I could copy it and this is the result. Thank you Tim for the inspiration. The only kit I had to try it out on was a Black Titanium/Chrome Sierra. I think it came out good but I think it would have looked better if the Sierra had had some gold on it. I am thinking I will order me a Gold/Chrome kit and move the barrel to it and see how it looks.
IMG_3763.jpg

IMG_3764.jpg

IMG_3765.jpg

IMG_3767.jpg

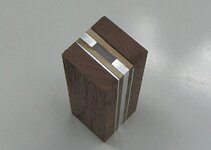
As shown here I did use the method that I mentioned in his thread (the two piece center). That's a scrap piece of 1/8" UHMW in the center cut to the same width as the tube diameter. It drill real easy.
IMG_3750.jpg

Edit: Forgot to detail the material
Black Walnut Outer scale, 1/64" aluminum sheeting separator, BLM Burl, and the Center rib is 1/2"x1/8" aluminum. Finish is 10 coats of CA polished to 6000mm(purple), I wanted it shiny but not glassy.
 
Last edited:
Signed-In Members Don't See This Ad

wiset1

Member
Joined
Aug 25, 2010
Messages
2,222
Location
Florida
JD,

This turned out amazing! So from what you say it was much easier to drill with the segmented middle? Well, I think you did a really great job here and it just goes to show the talen here on the IAP. You've got really clean lines and the faux rivets look spot on. You really did an outstanding job with this. Now think big and let's see what kind of twist you can put on it. :biggrin:
 

JD Combs Sr

Member
Joined
Jan 30, 2010
Messages
767
Location
Owingsville, KY
JD,

This turned out amazing! So from what you say it was much easier to drill with the segmented middle? Well, I think you did a really great job here and it just goes to show the talen here on the IAP. You've got really clean lines and the faux rivets look spot on. You really did an outstanding job with this. Now think big and let's see what kind of twist you can put on it. :biggrin:

Thanks Tim, I am trying to come up with a switchblade version.:biggrin::rolleyes:.
 

wiset1

Member
Joined
Aug 25, 2010
Messages
2,222
Location
Florida
That will be something different to see...lethal pen!

When I'm in your area you can teach me how to turn bowls and all the other cool things on your site...
 
Last edited:

JD Combs Sr

Member
Joined
Jan 30, 2010
Messages
767
Location
Owingsville, KY
That will be something different to see...lethal pen!

When I'm in your area you can teach me how to turn bowls and all the other cool things on your site...

I sure hope no one holds their breath until I get one made or your right it would definitely be lethal.:redface:

You are welcome anytime just send me a PM if you plan on being in the area and I will reply with my phone and address then you can give me a call once you are in the area. I am retired and here 80%(got to shop with the LOML on occasion or it would be 100%) of the time.:cool:
 

JD Combs Sr

Member
Joined
Jan 30, 2010
Messages
767
Location
Owingsville, KY
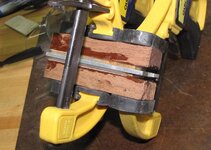
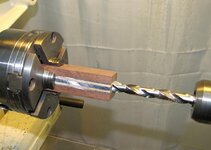
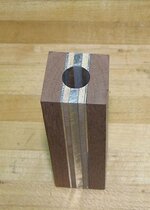
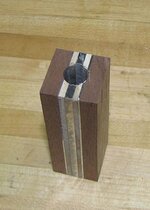
Here are some in process pics I took while making the pen.

This is the initial glue-up of the blank.
IMG_3749.jpg

Drilling the tube hole after sizing/squaring the blank on the table saw.
IMG_3756.jpg

Where the drill went in.
IMG_3757.jpg

The drill exit hole.
IMG_3758.jpg
 
Last edited:

wiset1

Member
Joined
Aug 25, 2010
Messages
2,222
Location
Florida
Great looking pictures...

What steps did you use to insert the brass rods?
 

JD Combs Sr

Member
Joined
Jan 30, 2010
Messages
767
Location
Owingsville, KY
Great looking pictures...

What steps did you use to insert the brass rods?

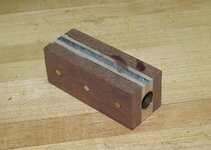
The faux "rivets" are supper glued in, everything else is epoxied. The rivets are 1/8" brass brazing rod initially cut to about 1/2" long. After drilling the hole for the tube I laid out the location of the rivets on one side of the blank and using my cross slide vice on my drill press I drilled the blank all the way through both sides creating all six holes in three drillings. I then installed/glued-in the tube. The cut pieces of the brass rod were ground flat on one end and sanded(scratched to accept the glue). I then glued them into each of the holes on both sides using the tube as a depth stop. I poured a little medium CA in the hole, picked up the brass rivet with pliers and pressed it in until it bottomed against the tube. After the glue was dry I ran the blank through my table saw to remove any excess brass(using and old blade). I got so wrapped up doing this part I fogot to take any pics of it.:redface:

IMG_3762.jpg
 
Last edited:

wiset1

Member
Joined
Aug 25, 2010
Messages
2,222
Location
Florida
Great looking pictures...

What steps did you use to insert the brass rods?

The faux "rivets" are supper glued in, everything else is epoxied. The rivets are 1/8" brass brazing rod initially cut to about 1/2" long. After drilling the hole for the tube I laid out the location of the rivets on one side of the blank and using my cross slide vice on my drill press I drilled the blank all the way through both sides creating all six holes in three drillings. I then installed/glued-in the tube. The cut pieces of the brass rod were ground flat on one end and sanded(scratched to accept the glue). I then glued them into each of the holes on both sides using the tube as a depth stop. I poured a little medium CA in the hole, picked up the brass rivet with pliers and pressed it in until it bottomed against the tube. After the glue was dry I ran the blank through my table saw to remove any excess brass(using and old blade). I got so wrapped up doing this part I fogot to take any pics of it.:redface:

View attachment 66542

Thank you for posting that! You know I'm aware, but it's great for others to read to help them along as well and everyone has a different way of doing things. Truly fantastic take on it!
 
Top Bottom