My Second fountain pen

Signed-In Members Don't See This Ad
See more from duke851

duke851

Member
Joined
Apr 27, 2013
Messages
32
Location
Grayslake, IL
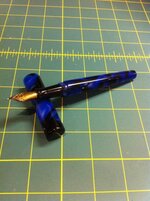
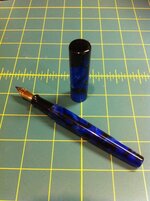
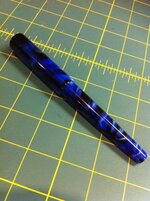
After finishing my first pen which I made from Ebonite (pictures in the advanced pen making section if you want a look) I wanted to try a different material so I used AA-05 Iridescent blue and black from Exotic blanks. It needed more care than the Ebonite but was also very nice to work with. Nib is a Jowo #6 broad with a Schmidt #5 converter. One of the things I tweaked from my first attempt was the thread sizes on the cap. I am much happier with the balance of this pen when it is posted.

Threads are as follows
Nib M7.4 x .5
Section M10 x .75
Cap M14 x .75

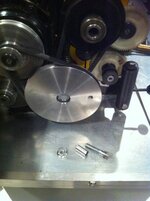
I also had my first attempt at a finial which I made from the same Woodcraft black acrylic I made the section. The Woodcraft acrylic gave me fits when I tried to thread it using a die but it worked well machine cutting the threads.

Since I took theses pictures I put the cap back on the mandrel and reduced the thickness by about 1/32" and I am much happier with the look. I also ordered a polished nib instead of the two tone which I think will work better.

Okay next! I think I want to try adding an accent band to the cap or maybe silver bands.

Colin
 

Attachments

  • photo1.jpg
    photo1.jpg
    41 KB · Views: 180
  • photo2.jpg
    photo2.jpg
    39.8 KB · Views: 158
  • photo3.jpg
    photo3.jpg
    44.9 KB · Views: 161
Signed-In Members Don't See This Ad

John Den

Member
Joined
Mar 21, 2012
Messages
416
Location
Bideford, Devon UK
The Woodcraft acrylic gave me fits when I tried to thread it using a die but it worked well machine cutting the threads.
It doesn't take long really does it? Did you just turn the chuck by hand with the gearing engaged? That's what I do if it gets scary!

Lovely choice of Blank. Lovely shape for the pen.
Regards,
John
 
Last edited:

duke851

Member
Joined
Apr 27, 2013
Messages
32
Location
Grayslake, IL
Thank you all for the kind words.

It doesn't take long really does it? Did you just turn the chuck by hand with the gearing engaged? That's what I do if it gets scary!

John, I think part of the reason I am enjoying this so much is it's in the Goldilocks zone, long enough to have me fully engaged and is just short enough to keep me there. This really is incredibly satisfying.


I started off trying to cut the threads using the power feed on the lathe but it was just too quick even at the lowest speed so I ended up drilling a hole in the large pulley and tapping it for a bolt to make it easy to turn by hand. What a difference, I feel so much more in tune with the materials now and haven't had any chipping problems. I would highly recommend anyone who is having issues persisting with learning to cut the outside threads using the lathe, after the initial learning curve it is far easier. Now a triple start thread that might be a different story!!!!

Colin
 

Attachments

  • 1.jpg
    1.jpg
    31.6 KB · Views: 122
  • 2.jpg
    2.jpg
    29 KB · Views: 122

John Den

Member
Joined
Mar 21, 2012
Messages
416
Location
Bideford, Devon UK
Be careful! Once you start making pens it lasts for ever - there really is so much to learn from this site!!!

If I want to stop cutting precisely I power drive to a safe position then use a tommy bar for the last few turns inserted in the collet chuck's provided radial hole and if I'm using the 3 jaw scroll chuck (for tapping etc.) the same tommy bar fits quite conveniently into the square key orifice.
Now a triple start thread that might be a different story!!!!
No it's not! I use this method more for making taps & dies in Steel which is harder material. With Multi Threads though I'm very careful not to turn back very much at all (backlash).

What I've found is that Multistart threads need to be very precise in where, angularly, they start. Very small discrepancies in the horizontal start position results in quite horrendous angular errors. So I tie everything down. I tighten up the end Gib screw on the top slide and don't touch it till I've finished all three threads.(using the "set the top slide over" and advance top slide for the cut and withdraw cross slide to track back to the start resulted in threads that just weren't quite right!

I get much better results by using a collet chuck with all its fixing screws present for triple threads:-

1. Locking the top side solid with its end Gib screw.
2. Set the cut depth with the cross slide. (5 thou first cuts to 15 thou then 2 then 1 for the final cuts)
3. Lock the cross slide with its last gib screw.
4. Cut the first cut of the first thread
5. Unlock the cross slide and withdraw the tool
6. Reverse the motor and go back to the start.
7. Repeat 2 to 6 above
8. Cut to the correct depth of thread.
9. Repeat the last cut 5 times to allow for spring of the tool.
10. Undo the fixing nuts and remove collet chuck with the job still in situ.
11. Move the chuck around to the next position of the 3 holes.
12. Repeat 1 to 7 for the next thread
13. Repeat 8 and 9 for the 3rd thread.

Cutting 2 start and 4 start threads becomes a bit more difficult but after some thought I arrived at this method that, maybe surprisingly, does work:-

1. Remove 2 of the 3 fixing studs from the collet chuck and set them aside.
2. Using the collet chucks one remaining stud insert it into one of the 4 fixing holes in the headstock back chuck mounting plate.
3. With a Sharpy mark this as number one and the others likewise to 4
4. Proceed to cut the multi threads 2 or 4 as 1 to 13 above using every other hole for a 2 start and all holes for a four start.

I Loctite the single stud into the chuck so that it is solid and make sure the slop in the hole is taken up by twisting the chuck in the right direction ( more important as there is only one fixing/register.)

Hope all this encourages you to continue on your Goldilocks way
Regards
John
 
Last edited:

duke851

Member
Joined
Apr 27, 2013
Messages
32
Location
Grayslake, IL
Thanks for all the information John, it will be a huge help. I am going to sit down tonight and try and get my head around cutting a triple start thread on the lathe.

Colin
 
Top Bottom