My latest segmented pen

Signed-In Members Don't See This Ad
See more from Jayman72

Jayman72

Member
Joined
Aug 19, 2015
Messages
103
Location
Tampa, FL
Hey all,

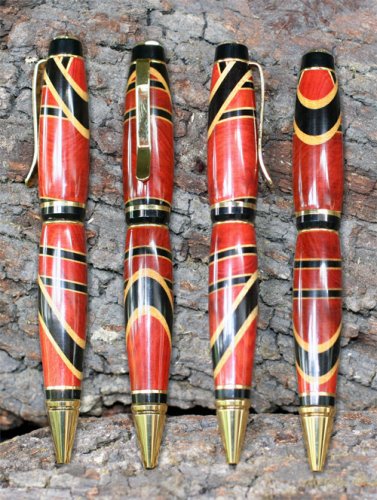
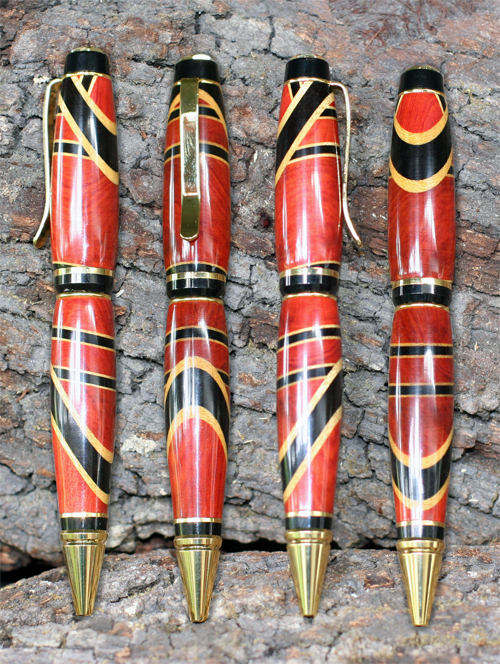
This is a Cigar Pen with a segmented blank from my second series of segmented blanks.

It is made from Ebony, Redheart and Yellowheart.

CA finish - 12 Coats - wet sand smooth with 320/400 - 4 coats 600/800 wet sand then MM to 12K - Plastic polish

I also am messing around with a new way to display it. Looks neat but lots of work for just an everyday pen. Maybe only for special ones from here on out.

Hope you like it.

Jay
Tampa, FL


View in Gallery
 
Last edited:
Signed-In Members Don't See This Ad

magpens

Member
Joined
Feb 2, 2011
Messages
15,911
Location
Canada
Beaut pen !!

What do you mean by this:

<< I also am messing around with a new way to display it. Looks neat but lots of work for just an everyday pen. Maybe only for special ones from here on out. >>

Firstly, I don't think it is an "everyday pen" ... I think it is a "special" pen.

Do you mean it is a lot of work to take 4 pictures and then coallesce them to make it look like 4 pens in one picture with the same background ? I think that is cool and I wouldn't have a clue how you did it.
 

Jayman72

Member
Joined
Aug 19, 2015
Messages
103
Location
Tampa, FL
Beaut pen !!

What do you mean by this:

<< I also am messing around with a new way to display it. Looks neat but lots of work for just an everyday pen. Maybe only for special ones from here on out. >>

Firstly, I don't think it is an "everyday pen" ... I think it is a "special" pen.

Do you mean it is a lot of work to take 4 pictures and then coallesce them to make it look like 4 pens in one picture with the same background ? I think that is cool and I wouldn't have a clue how you did it.

What I meant by "everyday pen" was it's just a ball point

I have a hard time justifying what I need to charge people for segmented pens when it's a ball point vs a RB or FP. This one was made for a friend so I made an exception.

The process to take the picture was as follows:
Set up display - in this case it was two pieces of oak.
Set up camera on a tripod.
Place a ruler in front of display out of view of camera.
Place pen at a set mark facing the direction you want to start. (In my case it was with the clip facing left.)
Take picture. Turn off auto focus. (Being careful not to move the camera. Doing this will keep everything on the same focal plane.)
Rotate pen 90 degrees and move it 1 inch to the right. Make sure it is straight up and down.
Take next picture.
Repeat process until you have taken each side.

Then take all 4 pictures into Photoshop, pick out the best one of the 4 as your main image. Then cut out each of the other three and place them in the photo where they would have been in their original. ( I cut out sections big enough so as to match them up exactly and then just removed the extra tree)

Finally place a subtle drop shadow on each of the moved pens to give them a more natural feel.

Merge all the layers, do your color correction and that's it.

Thanks,
Jay
Tampa, FL
 
Top Bottom