ethikz
Member
Well I watched a quick YouTube video and talking to a friend about some tips, I decided to just try my hand at turning.
I am really enjoying it. I've learned a few things along the way. The actual first pen I tried turning was out of some scraps I found and tried to rush it and near the edges I suppose I took too much off and it just broke off.
I didn't read instructions on the 2nd attempt and ended up putting the pieces in wrong lol. I did buy a punch kit and salvaged some of it but needless to say I had to buy another kit
I bought a whole bunch of extra tubes and kits this time. One thing I didn't learn is about epoxy. My first pen, the top part spins since it isn't glued to the barrel :/
The 2nd one I epoxied and now just waiting to dry and also learned about the friction polish and doing it on the lathe instead of off. Also was given a tip about just sanding the edges and get it more flush to the spacers and it worked. Wasn't as quick as I thought it would be but definitely worth it.
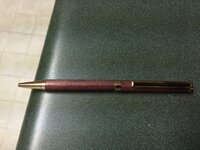
1st is Tulipwood
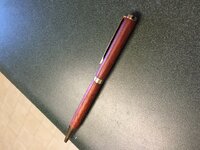
2nd is Padauk
I am really enjoying it. I've learned a few things along the way. The actual first pen I tried turning was out of some scraps I found and tried to rush it and near the edges I suppose I took too much off and it just broke off.
I didn't read instructions on the 2nd attempt and ended up putting the pieces in wrong lol. I did buy a punch kit and salvaged some of it but needless to say I had to buy another kit
I bought a whole bunch of extra tubes and kits this time. One thing I didn't learn is about epoxy. My first pen, the top part spins since it isn't glued to the barrel :/
The 2nd one I epoxied and now just waiting to dry and also learned about the friction polish and doing it on the lathe instead of off. Also was given a tip about just sanding the edges and get it more flush to the spacers and it worked. Wasn't as quick as I thought it would be but definitely worth it.
1st is Tulipwood
2nd is Padauk
Attachments

Last edited: