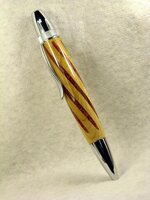
My First Pen Wizard Pen and Picture Post

Signed-In Members Don't See This Ad
See more from rej19

rej19

Member
Joined
Jul 19, 2008
Messages
821
Location
Indianapolis, IN
Got the Pen Wizard for Christmas and gave it a go today. I've started pretty simple with a simple Atlas kit. I can appreciate the infills I have seen by others after attempting this the first time especially those by YoYoSpin. My original intent was to go red,white,blue but I had glitter and CA everywhere contaminating the other grooves so I stayed with red for all. I didn't want to get to close or tight with my first one. I learned a lot from this first attempt. I have thoughts on how to make it easier the next time! I'm certainly looking forward to seeing what others are doing with the Pen Wizard. By the way you would LOL if you saw my camera setup.
 

Attachments

  • DSCN0267.jpg
    DSCN0267.jpg
    34.6 KB · Views: 350
Last edited:
Signed-In Members Don't See This Ad

KenV

Member
Joined
Oct 28, 2005
Messages
4,720
Location
Juneau, Alaska.
I like the way you tapered out the infill at the nib end. Smooth transiiton that moved my eye to the tip. Looking good.
 

Skye

Member
Joined
Jan 3, 2006
Messages
3,487
Location
Rock Hill, SC
Man, we've all done the paper towel backdrop at one time or another.

Very nice looking. I think the all red fill is just fine, I like the metalic flake in it. The finish looks out of this world.

I think the best way to do what you're looking for is to lay down some of each color, heavily, then about a half inch in between each, leave it empty. Then make a mixture of two colors by hand, then put that between the two appropriate colors. Just one idea. The hard part is going to be not filling the grooves all the way with CA, even where there's no colorant.
 

rej19

Member
Joined
Jul 19, 2008
Messages
821
Location
Indianapolis, IN
Thanks for the comments. Not Bounty but Scotts "Rags in a Box" which are pretty good for applying CA by the way. That was actually the most sophisticated part of my photo setup! I purposely started the cutting back some from the nib so I would not have such a drastic change at the nib and not have a "fat" pen. I think the way I will try multi colors next time will be to use masking tape to cover the grooves of the opposite colors. Then do all of one color first then move on to each of the next colors undercovering as you go. I'm not real excited about glitter infill personally and have some other ideas for solid colors. Someone asked about the wood....Maple.
 
Last edited:

PaulDoug

Member
Joined
Mar 2, 2008
Messages
3,488
Location
Benton City, WA.
Well, I like that pen. I think I like the smooth verses the textured look, at least so far. Not sure why I feel that way, but to me pens are smooth. Nice job.
 

workinforwood

Member
Joined
Mar 1, 2007
Messages
8,173
Location
Eaton Rapids, Michigan, USA.
Came out real nice! I don't know what your thoughts are, but I'm a big fan of inlace, which can be bought from CSUSA. You can get the kit in clear and it's very similar to PR, but faster and less finicky. You can color it and add glitter to it, and a couple hours after you put it in the grooves, you can spin it on the lathe. You can purchase some syringes for woodworking, they are larger than medical syringes, and you can drill the spout to a larger size if you want to, for a thicker mix to come out..that'll boost your application control, and inlace is not as liquid as CA.
 
Joined
Dec 21, 2008
Messages
349
Location
New York
Its just wondeful as it is...I would be very proud to write with it, or for that fact- OWN IT!!!! Great job, love the way the red colors almost end but don't. You can teach me too!!!
 
Top Bottom