My First Pen So Far

Signed-In Members Don't See This Ad
See more from Freeby

Freeby

Member
Joined
Jul 6, 2011
Messages
4
Location
CT
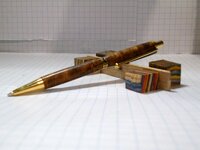
Hey all, this is my first pen I have turned that I am really willing to show off. I am pretty new to the photography part of pen turning though so any criticism is very much appreciated.
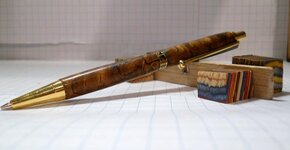
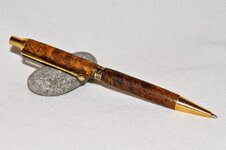
I am not sure the name of the burl as it came from a 4 pack from Woodcraft.
The finish is a BLO/CA finish sanded with 12,000 Micro-Mesh
 

Attachments

  • DSCN1533.jpg
    DSCN1533.jpg
    37 KB · Views: 275
  • DSCN1534 (2).jpg
    DSCN1534 (2).jpg
    29.1 KB · Views: 202
Signed-In Members Don't See This Ad

edicehouse

Member
Joined
Jun 8, 2011
Messages
3,515
Location
Suffolk, VA
Looks good, but the same advice I recieved when I joined here; I will bestow upon you young jedi. Hit up the library section. Visit the part where people are selling stuff. I have found a few resorces here for items.
 

Pentatonik

Member
Joined
Jun 24, 2011
Messages
37
Location
Seattle, WA
For one of your first pens this looks terrific!

As for advice on the photography:

I made one of these light tents: http://www.digital-photography-school.com/how-to-make-a-inexpensive-light-tent

It looks like you tried something similar to this but this would probably work better for you. Also, if you are not already using it, make sure to use the Macro setting on your camera if you have one. I got a lot of good tips and suggestions by looking in the "Pen Photography" forum here.

One last thing, if you have Photoshop it can work wonders. I usually adjust the exposure and the saturation (to make gold colors pop a little more). Just make sure not to over do it.

Keep up the great work!
 

underdog

Member
Joined
Sep 11, 2006
Messages
604
Location
Watkinsville, Georgia
+1 on the macro advice.

It's not bad the way it is, but you may want to de-clutter the shot a little more. Two points on that:
You want a single prop that doesn't detract attention from the pen. Just use one of your blocks or chunks of wood.
You'll want a background that isn't "busy". I have used a single piece of ledger paper leaned in an "L" shape against a chair back to give a seamless background. You could use a letter size for a pen, but you couldn't drape it like a ledger sheet.
Remember that the pen is the reason you are taking the shot. Make it the center of attention by not using anything that will detract from it.

Also take the shot from a little higher angle so that the depth of field encompasses the whole pen so that it's all in focus.

Download one of the many freebie photo editing programs (I use IrfanView) and learn to crop, resize, and manipulate colors and contrast. many times they have a "sharpen" and "auto-adjust colors" feature that work wonders in milli-seconds.

And then there's the all-important lighting and exposure. But you could write a book on that subject. Just make sure to use one kind of light so as not to confuse your camera- for example, don't mix tungsten and flourescent at the same time. Also, diffuse the light with cloth or bounce it.

Too much info? Sorry... I'll stop now...:redface:

Very nice job for your first pen..
How many coats of CA on this pen?
 

Freeby

Member
Joined
Jul 6, 2011
Messages
4
Location
CT
Thanks for all of the great advice everyone!
Underdog- I only used 3 coats of BLO/CA and then finished it off with one coat of BLO alone.
 

underdog

Member
Joined
Sep 11, 2006
Messages
604
Location
Watkinsville, Georgia
Ok... another bit of advice on the finish...

Put at least 5 or 6 coats on. When I first started, I made two mistakes (at the very least). First, I only put a couple coats of CA on. Then the second made it even worse. I started with 320 (or was it 400?) grit sandpaper. I sanded right through the coat in nothing flat. whoops! :redface: I finally just put lacquer on and called it good.

I now put on 10 coats, and lots of folks put on 20 coats of CA. Then start with 600 grit sandpaper, and wet sand up through 12,000 grit for a really nice finish.

Look up CA glue finish on Youtube and watch how it's done. That really helped me a lot. And I just learned how to do this recently, and I turned my first pen years ago. It really applies a lot faster than it sounds.

(And don't forget the cross-ventilation, the fumes from that stuff ain't good for you!)

Good luck and let us know how it goes!
 
Last edited:

Freeby

Member
Joined
Jul 6, 2011
Messages
4
Location
CT
I took your advice about the F stop as well as the background and I did a bit of tweaking in photoshop. Here is the final result now.
 

Attachments

  • V2-07-22-11-ALMPens-6424a_2.jpg
    V2-07-22-11-ALMPens-6424a_2.jpg
    49.2 KB · Views: 128

Freeby

Member
Joined
Jul 6, 2011
Messages
4
Location
CT
Yeah thanks for the great tips everyone! I look toward to posting some of my future works.
 
Top Bottom