
sbutler
Member
Dear PenTurners,
I've been lurking for a couple weeks after being intrigued and inspired by what I saw on Brian Gray's site, pencraftonline.com. Since then, Brian shared some tips and Joe at Berea Hardwoods was generous with his time. So here is my first pen.
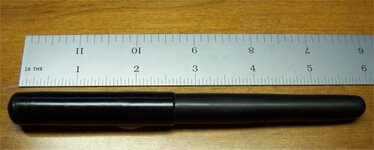
It's an honest to goodness first pen; I've never even made a kit pen. You can't see the chip in the section where I learned that it is not wise to turn the barrel with the section screwed in. (Don't ask.) The section is threaded into the body, but as you can see, I haven't worked through the details of a threaded cap yet. I hope that will be Pen #02.
It's made of nylon, which doesn't finish well, but I couldn't bring myself to learn on the luscious AA I got from Berea Hardwoods. The cap is right off the skew and the barrel is sanded and buffed.
I'd like to add some shiny bits to Pen #02 and am looking for a good source of metal rings and clips if anyone can suggest one. I hate the idea of wasting a pen kit just to get a clip, but I must say, Grant Wilkinson's modified El Grande gave me a responsible reuse plan for a kit: nib, section, threads(!), and clip. Thanks Grant.
Thanks to the PenTurners community for this knowledgebase. I've benefited from your technical insights and enjoyed your creativity.
With best regards,
Scott Butler
------------------- Details on construction -------------------
Shane asked for some details, so here they are.
The guts of the pen are an ElGrande nib and section from Berea Hardwoods and a Schmidt converter. My wife commented, "Oh, so you only made the outside of the pen."
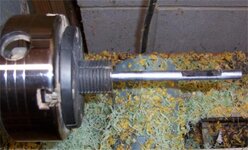
For the barrel, I rounded a blank between centers, then chucked it, drilled it, tapped it, roughed it some more, then parted it off. Then I put it on the metal mandrel in the picture below for final shaping. The mandrel is a 5/16" dia metal rod and it flexed when I took more than a whisker of a cut.
Drilling the barrel went like this. The first 1/2" (approx) of the hole was drilled and tapped with a 10x1 thread for the ElGrande. Then the rest of the barrel was drilled with a narrower 5/16" hole into which the converter fits.
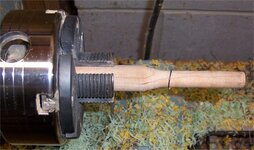
For the cap, I followed the same procedure with final shaping on a wooden mandrel, shown below.
The biggest pain was shaping the barrel on the metal mandrel. As I said above, it was prone to flex. Perhaps more worrisome is the fact that when I removed my barrel to test the fit with my section and then re-mounted it, it was out of round when I re-started my lathe. That's probably not the right words, but I hope you know what I mean. I can probably overcome this by putting registration marks on my barrel and mandrel so I can re-mount it in the same orientation that it was in before I took it off.
I've been lurking for a couple weeks after being intrigued and inspired by what I saw on Brian Gray's site, pencraftonline.com. Since then, Brian shared some tips and Joe at Berea Hardwoods was generous with his time. So here is my first pen.
It's an honest to goodness first pen; I've never even made a kit pen. You can't see the chip in the section where I learned that it is not wise to turn the barrel with the section screwed in. (Don't ask.) The section is threaded into the body, but as you can see, I haven't worked through the details of a threaded cap yet. I hope that will be Pen #02.
It's made of nylon, which doesn't finish well, but I couldn't bring myself to learn on the luscious AA I got from Berea Hardwoods. The cap is right off the skew and the barrel is sanded and buffed.
I'd like to add some shiny bits to Pen #02 and am looking for a good source of metal rings and clips if anyone can suggest one. I hate the idea of wasting a pen kit just to get a clip, but I must say, Grant Wilkinson's modified El Grande gave me a responsible reuse plan for a kit: nib, section, threads(!), and clip. Thanks Grant.
Thanks to the PenTurners community for this knowledgebase. I've benefited from your technical insights and enjoyed your creativity.
With best regards,
Scott Butler
------------------- Details on construction -------------------
Shane asked for some details, so here they are.
The guts of the pen are an ElGrande nib and section from Berea Hardwoods and a Schmidt converter. My wife commented, "Oh, so you only made the outside of the pen."
For the barrel, I rounded a blank between centers, then chucked it, drilled it, tapped it, roughed it some more, then parted it off. Then I put it on the metal mandrel in the picture below for final shaping. The mandrel is a 5/16" dia metal rod and it flexed when I took more than a whisker of a cut.
Drilling the barrel went like this. The first 1/2" (approx) of the hole was drilled and tapped with a 10x1 thread for the ElGrande. Then the rest of the barrel was drilled with a narrower 5/16" hole into which the converter fits.
For the cap, I followed the same procedure with final shaping on a wooden mandrel, shown below.
The biggest pain was shaping the barrel on the metal mandrel. As I said above, it was prone to flex. Perhaps more worrisome is the fact that when I removed my barrel to test the fit with my section and then re-mounted it, it was out of round when I re-started my lathe. That's probably not the right words, but I hope you know what I mean. I can probably overcome this by putting registration marks on my barrel and mandrel so I can re-mount it in the same orientation that it was in before I took it off.
Attachments

Last edited:
")