My first metal inlay

Signed-In Members Don't See This Ad
See more from Darkshier

Darkshier

Member
Joined
Aug 3, 2013
Messages
92
Location
12265 s Strang Line Rd Apt 515 Olathe Ks 66062
It is not without its flaws but for the first that I've made I think I did a pretty good job. I didn't think to level the ends I cut out much to my irritation but overall it turned out pretty good. I chose cedar for the body because I thought it would make the metal pop really well and pen itself is 3 different kits tossed together.
 

Attachments

  • WP_20140323_020.jpg
    WP_20140323_020.jpg
    183.3 KB · Views: 388
Last edited:
Signed-In Members Don't See This Ad

Joe S.

Member
Joined
Jan 11, 2012
Messages
2,000
Location
South Lyon, MI
Good job on the inlay, but what happened up by the clip? The wood looks discolored up there... Also, it could just be the picture, but the hardware looks pretty beat up. Keep at it, I'm sure we will see a master piece soon!
 

Krash

Member
Joined
Feb 10, 2014
Messages
1,259
Location
Albuquerque, NM
Nice job Jeffery!

Segmenting with metal opened up a whole new passion for me. It has and continues to propell me to new and different ideas for beautiful pens. I learn something new with each project. Hopefully I can get all the bugs worked out so that I don't have any regrets at the end of a project.

Keep segmenting and experimenting!
 

Dick Mahany

Member
Joined
Dec 21, 2012
Messages
323
Location
Palm Springs, CA
Looks like you are on your way. The fact that you kept it together during drilling shows your technique is working. Keep on going and be proud of this. Keep,the pics coming!
 

OZturner

Member
Joined
Aug 5, 2013
Messages
6,662
Location
Sydney. NSW. Australia
Excellent First for Metal Inlay Jeffery,
As you mentioned the components are recovered from salvaged Pens, and that makes sense when you are learning new skills.
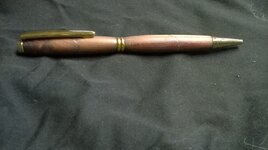
It looks like your insert was a Soda Can. I think for a Gold Pen I would have tried to use Brass, you can obtain 0.025" or 0.030" shim stock that would better suit the Gold hardware. But that is just talking about the appearance.
Looking at you Technique, In general it looks excellent, though on the Nib End insert it looks like there may have been some movement or a gap, at the Joint, or it might just be a bit of something picked up.
It is most important that the surfaces being glued to the insert have to be flat and true, that way the Insert doesn't need to try to conform and under pressure to uneven surfaces, and results in a close fitting Joint.

Great effort, I think you can confidently use new complete kits now.

Congratulations,
Brian.
 

Darkshier

Member
Joined
Aug 3, 2013
Messages
92
Location
12265 s Strang Line Rd Apt 515 Olathe Ks 66062
Thanks for your advice Brian. I have access to a myriad of different metals and had originally considered brass or copper but ultimately the slimfast can won out because the price was negligible and because I didn't want to waste the brass or copper if I ruined it. There is a gap near the nib I had too many things on my mind when I started this project and truing the blanks slipped my mind. This pen will be a good reminder for me to keep my mind on the task at hand. I cannot abide seeing imperfections in my work. I have many but each time I see one it serves as a reminder of a lesson hard learned. My secret to the blank surviving the drilling process is a little tricky. I didn't drill the metal and the blank together. I drilled the metal first matched it to the blanks and then drilled the blanks. Once I had that done I ran the tube through each piece and compressed the metal into the area with it. I had to adjust the hole size on the metal once but I had no issues after that. I probably over complicated things that way but I didn't want to lose a whole week if the blank broke apart. I will definitely be using actual kits after this and different types of metals to show off. Thanks for all of the advice and I will keep improving upon my work.
 
Top Bottom