I did not notice that inclusion and how it looks until you mentioned it. Damn I'm good! :biggrin: <or darn lucky!>
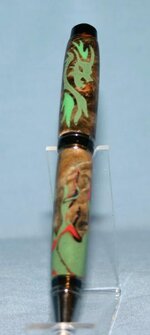
You are really good at drilling, because you had to nail that dragon dead center to not loose any off the sides. Front to back you have some play but side to side is the critical drill point. I never hear about any negatives out there, but I don't doubt there's been a few people that didn't drill their blank in the right location...make haste make waste! That's why I post instructions...and if they are not clear, I am not hard to find.
I followed your instructions... I marked the center down the length of the face.
Then took it a step farther... Before I drilled the blank, I tapped the pilot into my table, then marked 90* reference lines on my drill table from the pilot mark. (One for the reference line on the face, the other for the seam in the blank.)
Used the reference line on the face of the blank to line up with the drill bit and the lines on the table. That way I did not have to worry about whether the blank was cut square, or it my table was perfectly square. Just drilled point to point.
I took more time drilling this blank than ever before. The results are worth it.