
You are using an out of date browser. It may not display this or other websites correctly.
You should upgrade or use an alternative browser.
You should upgrade or use an alternative browser.
My first decal pen
- Thread starter CREID
- Start date
Signed-In Members Don't See This Ad
See more from CREID


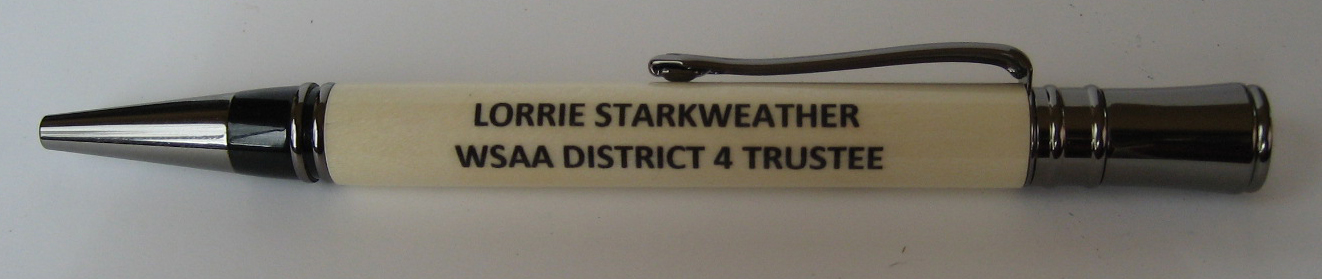
The blank is Holly, turned and finished with CA, 4 coats of thin and 4 cots of medium and wet sanded to 12,000 MM. The decal is just slightly bigger than the text, printed with my older Epson printer and dried for 24 hours, several coats of decal bonder applied over print and dried another 24 hours. Then applied the decal and waited another 24 hours. Then 4 or 5 coats of thin CA and then 8 coats of Medium CA then wet sanded to 12,000 MM and then polished with Maguires Plastx.

It opens up a lot of possibilities for me since I can't afford to have engraving done. My startup cost on this is about what it would cost to do a couple engravings, about $10.
Yea, I think I stopped seeing the edge of the decal at about 5 or 6 coats and then I went to 8. I was going to go to 10 but I had to go do something else and just stopped there.

Yea, the curling thing is kinda weird. It is a matter of how much decal bonder is applied (or whatever you use to seal the ink), and how warm your water is and how long you let it soak and then how long you wait before you attempt to slide the decal off. I am no expert on this but I watched a lot of videos and looked at as many tutorials that I could find and curling was a common thread in most. What I did and this will be different for everybody, by at least a little, but I used hot water from the tap in a bowl, carried it to my desk, then cut out the decal while the water was cooling slightly, then I put the decal in for about 15 seconds, I noticed that at first the decal would curl in the water then start to uncurl just before I took it out and then waited until it finished uncurling however much it was going to (not all the way), then I slid the decal just a little up the backing, then set the decal on the blank and slid the backing out from under the decal and moved the decal around until I had it where I wanted it and used a fairly stiff paint brush (small one) to go over the decal to move out air bubbles.
Signed-In Members Don't See This Ad
Marnat3
Member
Nice job.
Dalecamino
Local Chapter Leader
Good work Curt. Nice and clear.
Jim15
Member
Looks great.
CREID
Member
Thanks for the comments guys. Took me a few tries to get it done and I can see room for improvement. Nice to have done it though, cause I have ideas for more.
gt64155
Member
It looks very nice. I've been interested in trying some decals. There is probably something in the library on how to do these, I'll ask anyway. Does this decal wrap all the way around the pen, so there is a seam on the other side? Or, is it just slightly bigger than the printing? Is the blank cast in clear with the decal on? So many questions, so little time.
Thanks,
Bill
Thanks,
Bill
kruzzer
Member
Nice job on the decal... nice and bold
CREID
Member
It looks very nice. I've been interested in trying some decals. There is probably something in the library on how to do these, I'll ask anyway. Does this decal wrap all the way around the pen, so there is a seam on the other side? Or, is it just slightly bigger than the printing? Is the blank cast in clear with the decal on? So many questions, so little time.
Thanks,
Bill
The blank is Holly, turned and finished with CA, 4 coats of thin and 4 cots of medium and wet sanded to 12,000 MM. The decal is just slightly bigger than the text, printed with my older Epson printer and dried for 24 hours, several coats of decal bonder applied over print and dried another 24 hours. Then applied the decal and waited another 24 hours. Then 4 or 5 coats of thin CA and then 8 coats of Medium CA then wet sanded to 12,000 MM and then polished with Maguires Plastx.
Ligget
Member
Looks great from over here too Curt, well done, must add decal pens to my `to do` list.
CREID
Member
Looks great from over here too Curt, well done, must add decal pens to my `to do` list.
It opens up a lot of possibilities for me since I can't afford to have engraving done. My startup cost on this is about what it would cost to do a couple engravings, about $10.
gt64155
Member
So, the extra coats of CA after applying the decal smooth it all out so the is no raised bump from the thickness of the decal?
This opens a whole new possibility of pens for me. Thanks for the post and the details. I'll have to look into this and give it a try.
Bill
This opens a whole new possibility of pens for me. Thanks for the post and the details. I'll have to look into this and give it a try.
Bill
CREID
Member
So, the extra coats of CA after applying the decal smooth it all out so the is no raised bump from the thickness of the decal?
This opens a whole new possibility of pens for me. Thanks for the post and the details. I'll have to look into this and give it a try.
Bill
Yea, I think I stopped seeing the edge of the decal at about 5 or 6 coats and then I went to 8. I was going to go to 10 but I had to go do something else and just stopped there.
LouF
Member
I like it came out good.
CREID
Member
Very nice. I tried that a few years back with a veterinarian caduceus and it kept curling on me.
Yea, the curling thing is kinda weird. It is a matter of how much decal bonder is applied (or whatever you use to seal the ink), and how warm your water is and how long you let it soak and then how long you wait before you attempt to slide the decal off. I am no expert on this but I watched a lot of videos and looked at as many tutorials that I could find and curling was a common thread in most. What I did and this will be different for everybody, by at least a little, but I used hot water from the tap in a bowl, carried it to my desk, then cut out the decal while the water was cooling slightly, then I put the decal in for about 15 seconds, I noticed that at first the decal would curl in the water then start to uncurl just before I took it out and then waited until it finished uncurling however much it was going to (not all the way), then I slid the decal just a little up the backing, then set the decal on the blank and slid the backing out from under the decal and moved the decal around until I had it where I wanted it and used a fairly stiff paint brush (small one) to go over the decal to move out air bubbles.
Last edited: