My Best Pen Yet!!!!

Signed-In Members Don't See This Ad
See more from Wheaties

Wheaties

Member
Joined
May 8, 2009
Messages
714
Location
Omaha, NE
I don't post many of my pens because they are really nothing new, but I thought this one was worthy.

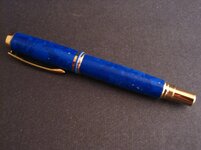
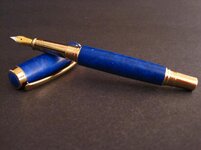
Blue Lapis Tru-Stone

1st fountain pen
1st custom final
1st custom centerband

I didn't use the bushings, just digital calipers, and this is my best fit yet! You can close your eyes and not be able to find the seam. I'm sold on not using the bushings for size!

Sorry about the so-so pictures. Comments and critique's welcome!
 

Attachments

  • IMG_0562.jpg
    IMG_0562.jpg
    48.7 KB · Views: 438
  • IMG_0569.jpg
    IMG_0569.jpg
    41.2 KB · Views: 290
  • IMG_0570.jpg
    IMG_0570.jpg
    38.4 KB · Views: 234
Signed-In Members Don't See This Ad

Parson

Member
Joined
Jun 10, 2009
Messages
798
Location
Houston, Texas
My lapis true stone pens look a lot darker than yours. I do love that lighter color.

Tell me, what is your finishing process? Sanding to 600 grit? Micro mesh pads? Polish?
 

Mark

Member
Joined
Oct 12, 2009
Messages
2,536
Location
Pottstown PA
I'm looking forward to trying out some of the Tru-Stones. Your Lapis is a beautiful color. Very nice pen.
 

CaptG

Member
Joined
Jan 3, 2007
Messages
2,686
Location
Otsego, Mi, USA.
Outstanding work, and as Chris pointed out, nice job on the cb and finial. Gotta love that blue lapis. Keep em coming.
 

RAdams

Banned
Joined
Apr 5, 2009
Messages
2,983
NICE WORK!! The tru stones are a blast and look amazing! You did it justice for sure!
 

Wheaties

Member
Joined
May 8, 2009
Messages
714
Location
Omaha, NE
Thanks everyone!


My lapis true stone pens look a lot darker than yours. I do love that lighter color.

Tell me, what is your finishing process? Sanding to 600 grit? Micro mesh pads? Polish?

I think the photos make it appear slightly lighter, but I still wouldn't call it dark. All I did was turn down to size with my Woodchuck and then wet sand with MM starting at 1500 and going all the way up to 12,000.
 

randbcrafts

Member
Joined
Jan 6, 2006
Messages
434
Location
Jacksonville, FL, USA.
Thanks everyone!


I think the photos make it appear slightly lighter, but I still wouldn't call it dark. All I did was turn down to size with my Woodchuck and then wet sand with MM starting at 1500 and going all the way up to 12,000.


Zach, it looks like you have a Chilean Lapis blank which is a little lighter than the Dark Blue Lapis w/ Pyrite. The Chilean Lapis has the little white specs in it as well, instead of the pyrite. It's a great looking pen either way. Nice work on the pen and the customizations!
 

jbeyer

Member
Joined
Mar 31, 2010
Messages
42
Location
Maryland
Nice job...

How did you make the centerband and final...

Also... How do you know what size you need to measure when you're working? I've just ordered my own digital calipers and want to start using them, but how do you determine what diameter you need to make it? The instructions are not really specific..

Thanks

Jonathan
 

jskeen

Member
Joined
Oct 11, 2007
Messages
1,754
Location
Crosby, Texas, USA.
Great job there! I agree with you that the finial and centerband really make the pen stand out, and try to do that to all the gent's I do. It adds a good bit of time to the assembly, but IMHO it makes a $12 kit stand right up there with a $30 to $50 statesman or Emperor. Put a upgraded nib on that and you have a true custom pen that outshines it's unmodified brethren by a wide margin.

I wonder how that blank would look on a platinum kit, since it has the white specs in it.

Keep up the good work.
 

Wheaties

Member
Joined
May 8, 2009
Messages
714
Location
Omaha, NE
Zach, it looks like you have a Chilean Lapis blank which is a little lighter than the Dark Blue Lapis w/ Pyrite. The Chilean Lapis has the little white specs in it as well, instead of the pyrite. It's a great looking pen either way. Nice work on the pen and the customizations!

Well that explains that. Thanks
 

Wheaties

Member
Joined
May 8, 2009
Messages
714
Location
Omaha, NE
Nice job...

How did you make the centerband and final...

Also... How do you know what size you need to measure when you're working? I've just ordered my own digital calipers and want to start using them, but how do you determine what diameter you need to make it? The instructions are not really specific..

Thanks

Jonathan


I used the last inch or so left over from the cut off. Glued it to a scrap wood blank and turned them down to size. It was tricky getting both out of 1 inch, but with some planning its not too bad. The centerband was the hardest since I did on half of it, then accidentally parted it off so I had to hand sand the other side. I believe there are tutorials in the library to give you a place to start. Here's a thread that shows how to disassemble the centerband:

http://www.penturners.org/forum/showthread.php?t=35571&highlight=centerband+removal


To determine the size, use your calipers to measure the kit hardware. Not each kit is the same so you should always measure each individually. Then turn your blank to the diameter you measured off the hardware.
 
Top Bottom