Mosaic black ti Jr Retro in HRB

Signed-In Members Don't See This Ad
See more from Ruby pen turning

Joined
Jun 28, 2010
Messages
1,830
Location
Pineville, Louisiana
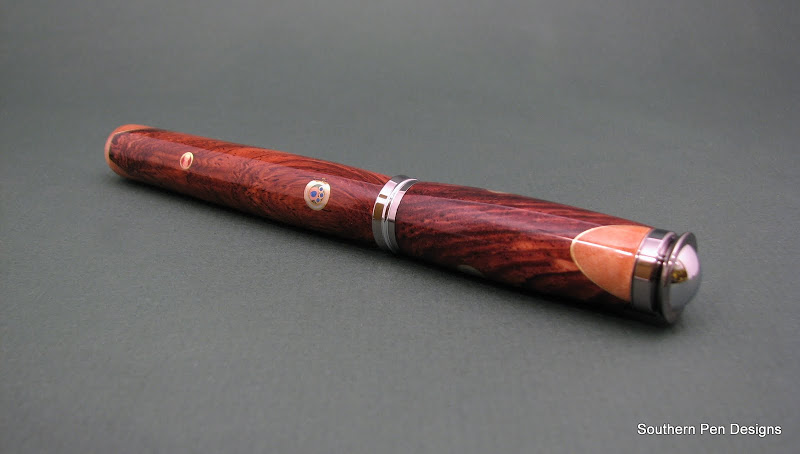
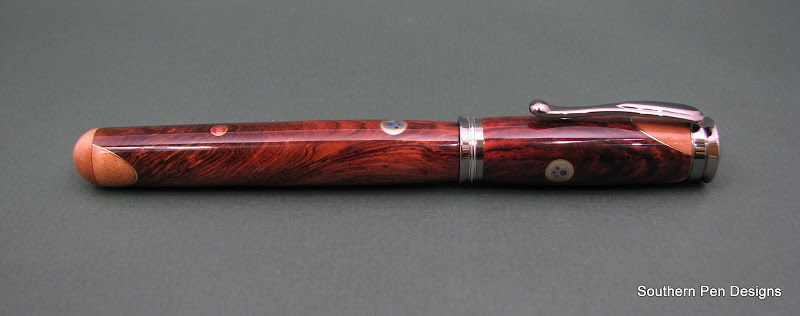
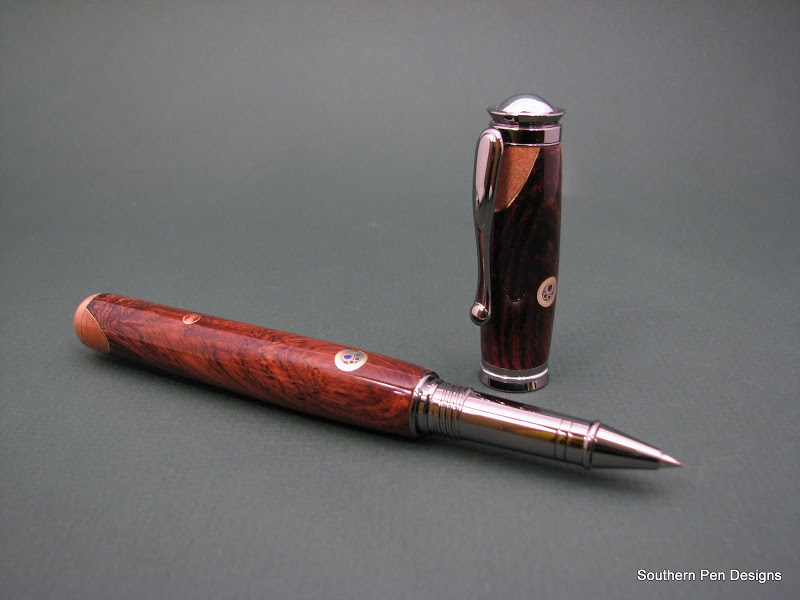
After Wiset showed us the mosaic pins, I had to try it. So this is my first completed pen using mosaic pins in the design. Not everything went well making this pen. First being one of the scallops on the first cap popped off literally on my last pass with the skew, so I had to make a new cap thus the darker HRB. Second thing that went wrong is one of the pins had a chunk come out of the outer brass tube. Dunno how, but it did. I fixed it as best I could with some antique gold mica. Third thing to go wrong is, all of the pins were supposed to line up but the clip would have covered it up so now the do not line up but are turned. The scallops are fiddleback with thin brass. The pins are made up from 1/4 brass, then aluminum then brass then one copper tube and three small brass tubes. They are filled with epoxy tinted turquoise and the three small tubes and copper tube are filled with turquoise mica and CA mix. There are about 15 coats CA sanded and sanded through all the purdy colored pads and polished with Novus heavy/light polish.
Thanks for lookin, comments good/bad are always welcome.

IMG_8002.JPG

IMG_8003.JPG

IMG_8004.JPG

IMG_8006.JPG

IMG_8007.JPG

IMG_8008.JPG

IMG_8009.JPG
 
Signed-In Members Don't See This Ad

wiset1

Member
Joined
Aug 25, 2010
Messages
2,222
Location
Florida
Really FANTASTIC work! I love seeing your take on this and truth be told you're one of my inspirations for doing the scallops, so Thank you for that. I've found that doing these types of pens require so much more work and have so much more that can go wrong with them, but when it turn out...Oh Boy does it ever. This one looks great!

I just fought an up hill battle with a new concept blank yesterday and today. That thing was a turd just stuck in the gate. I finally got it turned and hope to put a finish on it later this week. Way too much aluminum, but it looks cool and I may do a series of them...if my sanity holds out.

Again...AWESOME pen. You guys can call me Tim...no need for the Wiset.
 

wiset1

Member
Joined
Aug 25, 2010
Messages
2,222
Location
Florida
I know, I always try to view the Public Profile for the name...that's just me.
 
Joined
Jun 28, 2010
Messages
1,830
Location
Pineville, Louisiana
They do take time and patience. It does not look like a whole lot but it really is. I had trouble with the brass on the scallops wanting to peal away, so after about every 6th cut or so I would squirt some thin CA on them and that helped a lot.
 

wiset1

Member
Joined
Aug 25, 2010
Messages
2,222
Location
Florida
They do take time and patience. It does not look like a whole lot but it really is. I had trouble with the brass on the scallops wanting to peal away, so after about every 6th cut or so I would squirt some thin CA on them and that helped a lot.

That's what saves me EVERY single time! I order the thin CA in 3 to 5 batches when I plan to do segmenting. It really saves you time and headache.
 

boxerman

Member
Joined
Mar 13, 2010
Messages
4,218
Location
Marshalltown,Ia
So when you put the mosaic pins into the blank do you drill a small hole in the blank to put mosaic pin in? If so what size drill bit do you use? And how do you turn the blank without ruining the mosaic pin?
 

IPD_Mr

Member
Joined
Jun 27, 2007
Messages
3,707
Location
Zionsville, In
Some of it is pretty neat. This one has a little too much and it is distracting to me. It is like there is too much going on and too much to look at. The concept and idea is good to me but maybe on a blank that is more plain to begin with. The grain on the blank along with the scallops looks fine. I think I would put one of the mosaics in the cap and leave the rest alone or maybe another in the end of the body. It really is great looking the way that it is. Also your photography is awesome.
 

SDB777

Member
Joined
Feb 6, 2010
Messages
6,620
Location
Cabot, Arkansas USA
When you cut the pins, does the insides try to come out? And what are you cutting them with?


Awesome segmenting too! Really like all the detail you are putting into each new pen I see with your name on the left bar!


Scott (got some coming...the pins) B
 
Joined
Jun 28, 2010
Messages
1,830
Location
Pineville, Louisiana
So when you put the mosaic pins into the blank do you drill a small hole in the blank to put mosaic pin in? If so what size drill bit do you use? And how do you turn the blank without ruining the mosaic pin?
Craig, I drill a 1/4" hole half way through on one side and half way through on the other side of a square blank. I cannot seem to keep the hole straight through the blank, even with a 1/4" bit. I then turn the blank round and drill and insert the tubes. I then insert the pin. The pin is a slice around 3/8" long which is cut off a longer piece then glues and tapped into the hole and sanded flush. The blank has to be turned slowly so the pin is not pulled out of the hole. CA + heat = debonding.
 
Joined
Jun 28, 2010
Messages
1,830
Location
Pineville, Louisiana
When you cut the pins, does the insides try to come out? And what are you cutting them with?


Awesome segmenting too! Really like all the detail you are putting into each new pen I see with your name on the left bar!


Scott (got some coming...the pins) B
I have tried running the pin all the way through the blank but bad things happen trying to drill through for the pen tubes.
I am just carefully holding the long pin section and cutting a piece off with my table saw.
 
Top Bottom