
You are using an out of date browser. It may not display this or other websites correctly.
You should upgrade or use an alternative browser.
You should upgrade or use an alternative browser.
More test blanks
- Thread starter NewLondon88
- Start date
Signed-In Members Don't See This Ad
See more from NewLondon88


On my screen it kinda looks like Jonathon Frakes #1 on "The Next Generation" or maybe it's just Charlie.


LOL .. yes, we're often mistaken for one another. People are always asking
him if he's NewLondon88


Well I'm glad that you know what the hell is going on Bruce!!! I not only can't figure out how they were made, but I'm really stumped as to why they are even mounted in a lathe!!!:redface:
I won't comment on that Squeer avatar:biggrin:
LOL .. what's wrong with a fake pic of a fake pic on a fake magazine cover?
They were made on two lathes. One to turn the blanks to size, and
another one sitting inside the laser. Thanks to Jerry Sambrook for making
the parts to get this working.
Maybe I should drag out the camera and make a video..

Thanks for that .. that's a tip I can keep in the arsenal! :biggrin:
But no, that is wood.
Between the test package, A package from another member containing a hand made turkey call and some blanks, A box of Alumilite blanks form Jeff to practive my kitless, and my prize from the bash, I AM PRACTICALLY SITTING ON MY MAILBOX!
I have been an avid model builder most of my life. I have probably built in the neighborhood of at least 300 or 400 cars, bikes, planes, trains, etc. etc. I am looking forward to playing with these blanks! Maybe i will break out the ole airbrush! I bet an airbrushed CA finish might be pretty cool! hmmmm... Sure am glad my airbrush is external mix!
Ooh.. can't wait to see what you come up with for a paint job..
Faux suede, anyone?


LOL .. whenever the little light bulb goes on over my head I thank the
deities cause I don't know if it will ever happen again. :tongue:
I think the same thing. But every time I open the 'fridge, there it is again.:biggrin:
Signed-In Members Don't See This Ad
workinforwood
Member
I don't know what you are smoking...looks like aged copper to me. Looks quite well simulated....kinda impressive really.
marter1229
Member
The only thing you are missing , is my address.
Looks great!
Terry
Looks great!
Terry
moke
Member
That is awesome---you are there!
NewLondon88
Local Chapter Leader
seems like there should be some darker junk in the corners? Dunno.
I'm not good with paints.
I'm not good with paints.
witz1976
Member
holy s...doo doo!! That looks freaking increadible. Now I can't wait to see it with a finish!
NewLondon88
Local Chapter Leader
I'm going to let it dry a couple of days and then try casting it in PR.
These are acrylic paints, so they're full of water.
These are acrylic paints, so they're full of water.
wdcav1952
Activities Manager Emeritus
Who is that handsome devil on the cover of Esquire?
NewLondon88
Local Chapter Leader
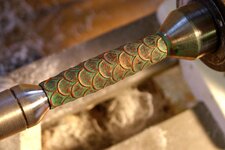
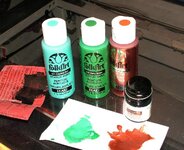
here's the stuff I used, in case anyone wanted to try it. Picked them up
at JoAnn Fabrics on sale.. I think most were under $1. But I'm sure that
any acrylic paint would work. I had some black acrylic from a hobby store.
Painted the whole thing black first (thinned with water, just need a dark
background) Didn't get a solid black blank, it just helps to deepen the copper.
After af ew minutes I blotted it with a paper towel so some of
the black showed through.
I used an acrylic spray over that so the next coats didn't soak in.
Then I slopped on a combination of the blue and green, not very
well mixed. That way you get some aqua spots, some green, some blue.
After about a minute I wiped this off in one direction only. That way
it left the blue/green in the hollows as the cloth skipped over them.
But where it was well wiped, the black and copper showed through.
After that dried, I put a little more of the copper on my fingertip and
with the lathe running, I lightly touched it to the blank to leave some
copper on the highlights. Pretty simple, really.
Attachments
Phunky_2003
Member
Thats pretty impressive. I have one I am in the middle of working on. Its going to be drying now til probably Monday. It is a learning experience doing these. And soooo many possibilities.
altaciii
Member
Who is that handsome devil on the cover of Esquire?
On my screen it kinda looks like Jonathon Frakes #1 on "The Next Generation" or maybe it's just Charlie.
jttheclockman
Member
These are really going to be special blanks and you are entering a whole new avenue of different blanks. The sky is the limit. Keep up the great work.
PenMan1
Member
I like it!
johnnycnc
Member
Pretty nice, Charlie.
Charlie,
I am just speechless. You 3D blanks are totally in a different generation or genre blanks.
As you know I also make golf clubs, so I equate your 3D blanks are similar to the time when the persimmon club head for driver changed to metal (steel or titanium), and hickory shaft to steel/graphic shaft.
They will be changing the pen making community if it hasn't done it already.
Looking forward to see what else you have in that lab of yours.
Trying to get a decent aged copper effect. Seems like it's missing something.
Maybe I should actually LOOK at some aged copper.. :tongue:
Pioneerpens
Member
Dang! That looks great Charlie!
thewishman
Member
Very nice! Looks very much like copper to me.
ROOKIETURNER
Member
Looks great to me!
NewLondon88
Local Chapter Leader
I think we have packages going out to testers on Monday. It will certainly
take some planning. I've heard comments that all the work is done, they
just need to be assembled, but it just ain't so! These aren't for beginners,
it will take some talent and patience. An artistic eye wouldn't hurt.
(which is why we need testers :tongue: )
.. and with the exception of the Bricks blank, you can't do a normal CA finish.
The depth of the patterns will tear the paper towel right out of your hands
and leave nice little shreds all over your CA'd blank. (DAMHIKT!)
NewLondon88
Local Chapter Leader
[/color]
On my screen it kinda looks like Jonathon Frakes #1 on "The Next Generation" or maybe it's just Charlie.
LOL .. yes, we're often mistaken for one another. People are always asking
him if he's NewLondon88
Josh Gertz
Member
Painting
Hey there
I used to paint a lot of war gaming miniatures and you actually have the right technique for doing oxidized metals.
The one thing that you may want to try is to paint the tube the copper/bronze color you want and wait until its completely dry and then water down the blue/green color you are using until its very watery and will flow into the recesses. Dont load up the brush to much but just dab the tube until you see a small pool develop. Do this with a very light version of the color you want.
Wait until this layer drys and repeat the process with a darker shade of the color. Repeat again until your layering is to your satisfaction.
Those paints are water based acrylics so when you water them down it creates a transparency and you will be able to see the layers show through once they start building up.
-Josh
You guys appear to really be onto something. Its amazing how you took a piece of equipment that's been used for quite a while in the pen world and transformed the output into something very original. You continue to impress and its only the start.
You guys appear to really be onto something. Its amazing how you took a piece of equipment that's been used for quite a while in the pen world and transformed the output into something very original. You continue to impress and its only the start.
Well I'm glad that you know what the hell is going on Bruce!!!
I not only can't figure out how they were made, but I'm really stumped as to why they are even mounted in a lathe!!!:redface:I won't comment on that Squeer avatar
:biggrin:NewLondon88
Local Chapter Leader
Thanks, Josh .. It never occurred to me to use the transparency as a feature!
And thank you, Bruce.. my first thought was that I could use it help me make
kits, but I still haven't gotten that far yet! We took this little detour .. :tongue:
And thank you, Bruce.. my first thought was that I could use it help me make
kits, but I still haven't gotten that far yet! We took this little detour .. :tongue:
NewLondon88
Local Chapter Leader
Well I'm glad that you know what the hell is going on Bruce!!!
I won't comment on that Squeer avatar
LOL .. what's wrong with a fake pic of a fake pic on a fake magazine cover?
They were made on two lathes. One to turn the blanks to size, and
another one sitting inside the laser. Thanks to Jerry Sambrook for making
the parts to get this working.
Maybe I should drag out the camera and make a video..
greenmtnguy
Local Chapter Leader
Don't be stingy with the CA and the paper towel will work. Drops willl not work well. I am using a stream of Medium. Go easy and wait 4 or 5 goooood coats before you get aggressive. I am applying the CA on the slowest speed and letting the CA spin for a bit before I use accelerator. Use considerably more CA than normal, because these blanks are not normal- just unique. I printed out the address labels so sit by your mailbox testers. Coming soon to your neighborhood.
aweiss44
Member
NL- i may have skipped over it, but is that actual copper? if it is, look at stained glass craft suppliers. they sell various types of "patina" makings liquids, basically acids etc that give you different appearances on the copper came used in stained glass. they may have something that you're looking for. basically you brush it on, wait a bit and wipe off the excess.
NewLondon88
Local Chapter Leader
NL- i may have skipped over it, but is that actual copper? if it is, look at stained glass craft suppliers.
Thanks for that .. that's a tip I can keep in the arsenal! :biggrin:
But no, that is wood.
greenmtnguy
Local Chapter Leader
On the advice of my cohort, I must state that my way of CA application may be different than others so use your judgement on what will work for you with these blanks. You have to think differently with these blanks because they are so different from what we are accustomed to.
Don't be stingy with the CA and the paper towel will work. Drops willl not work well. I am using a stream of Medium. Go easy and wait 4 or 5 goooood coats before you get aggressive. I am applying the CA on the slowest speed and letting the CA spin for a bit before I use accelerator. Use considerably more CA than normal, because these blanks are not normal- just unique. I printed out the address labels so sit by your mailbox testers. Coming soon to your neighborhood.
Between the test package, A package from another member containing a hand made turkey call and some blanks, A box of Alumilite blanks form Jeff to practive my kitless, and my prize from the bash, I AM PRACTICALLY SITTING ON MY MAILBOX!
I have been an avid model builder most of my life. I have probably built in the neighborhood of at least 300 or 400 cars, bikes, planes, trains, etc. etc. I am looking forward to playing with these blanks! Maybe i will break out the ole airbrush! I bet an airbrushed CA finish might be pretty cool! hmmmm... Sure am glad my airbrush is external mix!
NewLondon88
Local Chapter Leader
Yeah.. I was insisting that you put the CA on with a caulking gun, but he won on
that point. But I did put thick CA on with a popsicle stick and make a CA shell
around the blank. Some of the small parts are very fragile.
that point. But I did put thick CA on with a popsicle stick and make a CA shell
around the blank. Some of the small parts are very fragile.
NewLondon88
Local Chapter Leader
Maybe i will break out the ole airbrush! I bet an airbrushed CA finish might be pretty cool! hmmmm... Sure am glad my airbrush is external mix!
Ooh.. can't wait to see what you come up with for a paint job..
Faux suede, anyone?
JohnU
Member
Looks good Charlie! I used some acrylic paints in the past under pr and didnt let it dry enough so it tinted the pr. Looks like you got all your bases covered. All of the blanks you guys have been putting out look great!
NewLondon88
Local Chapter Leader
Have you seen out 'lasered feather' blanks? :tongue:
JohnU
Member
I was thinking that exact thing when I was looking at some of your designs. lol
cnirenberg
Member
Charlie,
That does look just like aged copper. I pulled some of the copper pipe out that burst in the attic last October, they could be related. I can attest to the fact that your blanks hold up better than the cheap copper in my attic..
That does look just like aged copper. I pulled some of the copper pipe out that burst in the attic last October, they could be related. I can attest to the fact that your blanks hold up better than the cheap copper in my attic..
cinder_ladylocket
Member
You guys just amaze me with all your talents...........can you bottle some up and send them this way??? Great blank!!!
NewLondon88
Local Chapter Leader
You guys just amaze me with all your talents...........can you bottle some up and send them this way??? Great blank!!!
LOL .. whenever the little light bulb goes on over my head I thank the
deities cause I don't know if it will ever happen again. :tongue:
Signed-In Members Don't See This Ad
thewishman
Member
LOL .. whenever the little light bulb goes on over my head I thank the
deities cause I don't know if it will ever happen again. :tongue:
I think the same thing. But every time I open the 'fridge, there it is again.:biggrin: