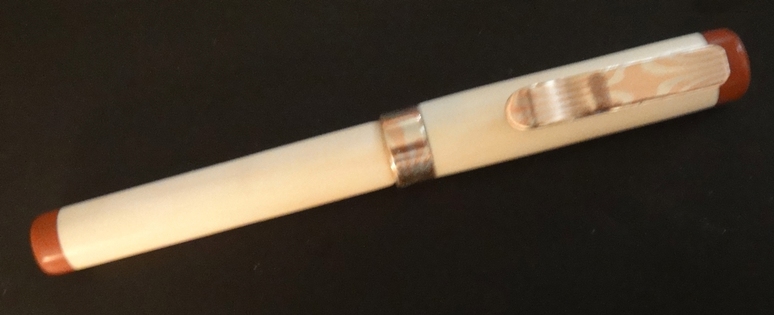
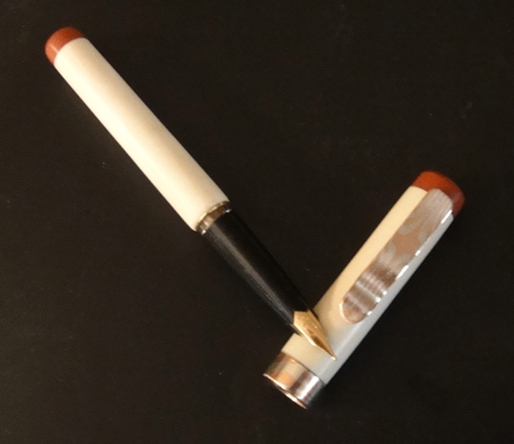
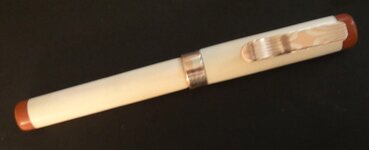
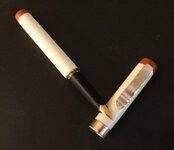
A little over a month ago I took a 2 day workshop to learn how to make Mokume Gane rings from sheets of silver and copper. We cleaned, diffusion bonded, ground, forged, annealed twisted, rolled, shaped and finished. Of course my ring was a centerband. Well the one from the class came out too big but there was enough of the billet we made to make a few more and a clip or 2. Didn't know if a white or black background would look better, so here is the first try in ivory with a little red ebonite trim. At some point, I may try the black. Section is a vintage Mont Blanc I got in a trade with TerryF.

You are using an out of date browser. It may not display this or other websites correctly.
You should upgrade or use an alternative browser.
You should upgrade or use an alternative browser.
Mokume Gane - The real stuff!
- Thread starter BRobbins629
- Start date
Signed-In Members Don't See This Ad
See more from BRobbins629


wow bruce that looks fantastic i would love to learn that craft
how hard is it to do?
how long did it take you?
cool stuff
thanks
Signed-In Members Don't See This Ad
workinforwood
Member
I don't know what your babbling about Bruce, but I like that pen tremendously! Great proportions and colors, clean and simple, it's a total winner
Katsin
Member
Nice!
I think that's wonderful too, Bruce. :good::good:
Now that you've had a lesson, will you do some more? Is this the type of thing that is practical to attempt at home?
Now that you've had a lesson, will you do some more? Is this the type of thing that is practical to attempt at home?
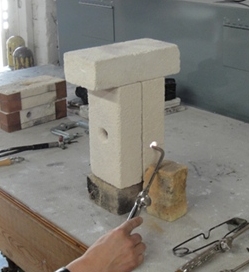
Thanks Skip - No sure if I'll do it right away, but it is definitely doable in the home shop. The only thing I don't have is the little homemade refractory brick furnace, but the teacher showed us how to make that as well and its not that hard. There are also a few places where you can but sheet or billets and just do the fabrication but its always a little more fun to start from scratch.I think that's wonderful too, Bruce. :good::good:
Now that you've had a lesson, will you do some more? Is this the type of thing that is practical to attempt at home?
PenMan1
Member
Nice stuff, as usual, Bruce! I like everything about it.
Just curious...Did you use that little rolling press that you posted to adhere the metals?
Just curious...Did you use that little rolling press that you posted to adhere the metals?
witz1976
Member
Looks great Bruce. I would love to learn how that is done. Congratulations on your first!
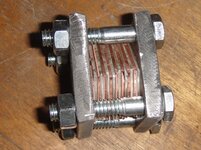
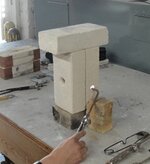
No - not to adhere but to roll to gauge when it was thin enough from forging with a hammer. To fuse the metals, a stack is placed in a little frame is tightened to hold them together and then it is placed in a little furnace heated with a torch. There's a view port on the furnace so you can see when the metals start to flow which is time to remove the heat.Just curious...Did you use that little rolling press that you posted to adhere the metals?
Attachments
Dave_M
Member
Way cool! I would love to have the opportunity to learn how to do that. Wonderful piece of work.
Dave
Dave
thewishman
Member
Love the pen - that wood-grain-metal looks very good. I admire your creativity in bringing other arts into penmaking - always look forward to your latest creations.
Thanks for the pictures - they really add to the understanding of the process (a small part of the whole process).
Thanks for the pictures - they really add to the understanding of the process (a small part of the whole process).
KenV
Member
Bruce -- sounds like you are ready to read "Gas Burners for Forges Furnaces & Kilns" by Michael Porter ISBN 1-879535-20-3
You will need to scale down a bit -- but there is a well developed technology for smiths of all sorts and kinds.
You will need to scale down a bit -- but there is a well developed technology for smiths of all sorts and kinds.
azamiryou
Member
Heh, I had been thinking about making components from real mokume and then using a very plain wood for a reversal effect (woodgrain visible in the metal parts but not the wood parts), but you beat me to it!
Cool looking pen, I can't wait to see the black one. It may just be the photos, but the mokume looks a little washed out against the white.
Cool looking pen, I can't wait to see the black one. It may just be the photos, but the mokume looks a little washed out against the white.
eldee
Member
Nice job Bruce. You are certainly covering the spectrum.
I think you're right about it being a little washed out. There is some stuff out there to darken it which I may give a try to create more contrast.Heh, I had been thinking about making components from real mokume and then using a very plain wood for a reversal effect (woodgrain visible in the metal parts but not the wood parts), but you beat me to it!
Cool looking pen, I can't wait to see the black one. It may just be the photos, but the mokume looks a little washed out against the white.
workinforwood
Member
Its amazing and inspirational to read up on Mokume. Not a cheap hobby but not much more than casting resins but the time involved is way different. So much better than Damascus. You rock Bruce
fiferb
Member
Very Cool! Can't wait to see more, Bruce!
wizard
Member
Bruce, I think it looks super! As usual, Very creative! Did you pick the red (reddish brown) ebonite trim to tie in with the copper in the Mokume? I'm trying to picture what the pen would look like with black ebonite accents. I wonder if it would tie in more with the section from Terry? Anyway, just rambling... Great job! Regards, Doc
OKLAHOMAN
Member
Bruce, now your entering the world of William Henry ( http://www.williamhenrystudio.com/catalog.html) betcha this will give you som ideas...:biggrin::wink:
Just as I would expect from you a pen to be treasured.
Just as I would expect from you a pen to be treasured.
bluwolf
Member
Bruce, the Mokume Gane is terrific! Especially that clip. I don't know if it was intentional or not but it's interesting the way it almost seems to form a balanced design on the clip. Just my opinion but I think it would look better against a dark background for the pen.
Thanks Doc - yes I picked the red to go with the copper, and next one will be with black ebonite. The good news - I got 2 sections from Terry in the deal and there's enough of the billet left for one more.Bruce, I think it looks super! As usual, Very creative! Did you pick the red (reddish brown) ebonite trim to tie in with the copper in the Mokume? I'm trying to picture what the pen would look like with black ebonite accents. I wonder if it would tie in more with the section from Terry? Anyway, just rambling... Great job! Regards, Doc
Thanks for the link Roy - I hadn't seen that before. Looks like I have a long way to go, but some great ideas there.Bruce, now your entering the world of William Henry ( http://www.williamhenrystudio.com/catalog.html) betcha this will give you som ideas...:biggrin::wink:
Just as I would expect from you a pen to be treasured.
Thanks - I did pick out that portion for the clip. See above for all black version to come.Bruce, the Mokume Gane is terrific! Especially that clip. I don't know if it was intentional or not but it's interesting the way it almost seems to form a balanced design on the clip. Just my opinion but I think it would look better against a dark background for the pen.
jasontg99
Member
Bruce,
That is awsome! Where did you take this class?
Jason
That is awsome! Where did you take this class?
Jason
The class was at the Visual Arts Center in Richmond. I've taken a few jewelry classes there that are once a week for 8-10 weeks, but this one was taught by Eric Burris who is from Maryland so it was a 2 day workshop. He does teach them around the country. If you're interested, go to his web site and contact him to see his schedule.Bruce,
That is awsome! Where did you take this class?
Jason
clapiana
Member
BRobbins629 said:The class was at the Visual Arts Center in Richmond. I've taken a few jewelry classes there that are once a week for 8-10 weeks, but this one was taught by Eric Burris who is from Maryland so it was a 2 day workshop. He does teach them around the country. If you're interested, go to his web site and contact him to see his schedule.
wow bruce that looks fantastic i would love to learn that craft
how hard is it to do?
how long did it take you?
cool stuff
thanks
[/quote]
how hard is it to do?
how long did it take you?
cool stuff
thanks[/quote]
How hard - some jewelry and/or metalsmith experience is helpful such as how to use a jeweler's saw and torch. Its not something that I would have tried without the class, but with some guidance on a scale of 1-10 its about a 5 or 6. If there's a class like the one I took offered, you probably could get by with little or no experience, but some makes it easier. The basics techniques used are cutting the squares, cleaning them, heating them in the furnace, grinding the edges, forging (banging with a hammer), annealing with torch, twisting with visegrips, cutting with a jeweler's saw and possibly soldering. We also did some rolling which is also easy if you have the equipment.
How long - This was a 2 day workshop with about 1/2 the time the instructor was demonstrating. We started with a sheet of silver and a sheet of copper. At the end of the second day, I came out with a ring and about 2/3 of the billet left. the billet we made was about 3/4" x 1" by 16 layers thick of about 20 gauge metal.