
toddlajoie
Member
So I posted a whole bunch of my recent pens >here< but I wanted to post this one separately.
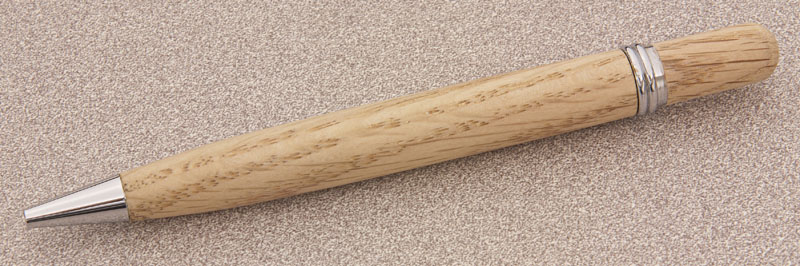
A few months back our local chapter had a challenge to modify a Wall St/Sierra Style pen kit, This was mine. Made with High END Red Oak (meaning scraps from my stair treads that came from Home Depot...), I disassembled all of the WS2 hardware to remove all the black enamel pieces. Took the body tube and epoxy'd it to the lower assembly where it usually presses loosely into. The bottom of the lower assembly has a 7mm tube in it that holds the nib on below the black piece. I mounted the tube assembly on the lathe and ground off the entire center band until it was flush with the body brass tube. Then I cut the oak to the size of the tubes, Drilled a 7mm hole all the way through, then from one end, drilled the it out for the larger tube just deep enough for it to fit in, and epoxy'd it in place and turned it to match the parts. For the top, I disassembled it again, removing the clip, black enamel and cap, took another piece of oak and drilled it large enough for the upper part to fit and epoxie'd that together. while I was turning the cap on the lathe, I also took off a bit of the brass from the hardwar also, as this part is usually the one that press-fits in tight, but in this case it needs to turn freely, since the body tube is attached to the wood. After pressing it all together, I realized I had not noticed that the Nib did not press all the way into the tube. It has a small shelf on it for the black enamel. I took it back off, put the nib on the lathe and turned this shelf off, allowing the nib to press all the way into the tube, but now the pen was about 1/8 inch too short and the refill would not retract all the way. I fixed this by drilling out a little bit of the plastic from inside the transmission, and all was right in the world. I'd like to take another stab at this sometime, and see about keeping the clip, and maybe getting rid of the metal bands at the top...
A few months back our local chapter had a challenge to modify a Wall St/Sierra Style pen kit, This was mine. Made with High END Red Oak (meaning scraps from my stair treads that came from Home Depot...), I disassembled all of the WS2 hardware to remove all the black enamel pieces. Took the body tube and epoxy'd it to the lower assembly where it usually presses loosely into. The bottom of the lower assembly has a 7mm tube in it that holds the nib on below the black piece. I mounted the tube assembly on the lathe and ground off the entire center band until it was flush with the body brass tube. Then I cut the oak to the size of the tubes, Drilled a 7mm hole all the way through, then from one end, drilled the it out for the larger tube just deep enough for it to fit in, and epoxy'd it in place and turned it to match the parts. For the top, I disassembled it again, removing the clip, black enamel and cap, took another piece of oak and drilled it large enough for the upper part to fit and epoxie'd that together. while I was turning the cap on the lathe, I also took off a bit of the brass from the hardwar also, as this part is usually the one that press-fits in tight, but in this case it needs to turn freely, since the body tube is attached to the wood. After pressing it all together, I realized I had not noticed that the Nib did not press all the way into the tube. It has a small shelf on it for the black enamel. I took it back off, put the nib on the lathe and turned this shelf off, allowing the nib to press all the way into the tube, but now the pen was about 1/8 inch too short and the refill would not retract all the way. I fixed this by drilling out a little bit of the plastic from inside the transmission, and all was right in the world. I'd like to take another stab at this sometime, and see about keeping the clip, and maybe getting rid of the metal bands at the top...