First off, any comments I make are not criticising Lou's kit. Just my observations that I've seen on some posted here.Maybe they will help someone who want's to make one
As the pics will show, this puzzle kit is designed for the Sierra and I got one with the kit. But I don't really like the Sierra so just put another tube inside the glued up blank and used another kit.
I'm sure there are instructions for getting the best fit from these kits, but like most blokes, I wouldn't have read them anyway:biggrin:
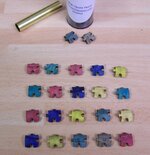
The first pic shows the parts laid out ready to stick on the tube. Arranged so that similar colours aren't next to each other. There are numbers on them, but I couldn't find any logical sequence.
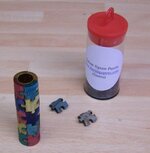
Second pic shows them dry assembled onto the tube.Here I hit the first tiny snag. The tube was proud of the assembly by a gnat's hair. No biggie,just sand it down a little.
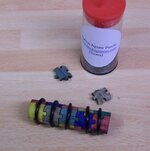
Like every other one I've seen, there were a few really tiny gaps between some of the bits. Also no biggie, just paint the tube. I expected this as if they were absolutely perfect, then you wouldn't be able to assemble it.
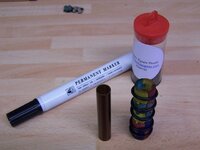
I then used a couple of rubber o-rings to squeeze the parts together around the diameter of each layer, then remove the tube and used a permenant marker to blacken the tube. Then just glued up the tube and stuck it in the assembly. As I'd already trimmed the tube, it was now possible to press the ends in so I had pressure from all sides of the parts.
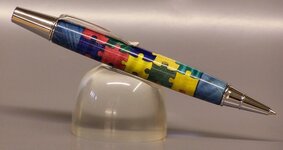
As this one was for my missus, she chose the kit and I added a bit of blue BEB to the ends of the internal tube.
Whether it was done on a regular Sierra or not, I'm pretty pleased with the fit of the parts ( except one of my own thick glue lines :frown
They are fun little projects and of course, for a very worthy cause:biggrin:
As the pics will show, this puzzle kit is designed for the Sierra and I got one with the kit. But I don't really like the Sierra so just put another tube inside the glued up blank and used another kit.
I'm sure there are instructions for getting the best fit from these kits, but like most blokes, I wouldn't have read them anyway:biggrin:
The first pic shows the parts laid out ready to stick on the tube. Arranged so that similar colours aren't next to each other. There are numbers on them, but I couldn't find any logical sequence.
Second pic shows them dry assembled onto the tube.Here I hit the first tiny snag. The tube was proud of the assembly by a gnat's hair. No biggie,just sand it down a little.
Like every other one I've seen, there were a few really tiny gaps between some of the bits. Also no biggie, just paint the tube. I expected this as if they were absolutely perfect, then you wouldn't be able to assemble it.
I then used a couple of rubber o-rings to squeeze the parts together around the diameter of each layer, then remove the tube and used a permenant marker to blacken the tube. Then just glued up the tube and stuck it in the assembly. As I'd already trimmed the tube, it was now possible to press the ends in so I had pressure from all sides of the parts.
As this one was for my missus, she chose the kit and I added a bit of blue BEB to the ends of the internal tube.
Whether it was done on a regular Sierra or not, I'm pretty pleased with the fit of the parts ( except one of my own thick glue lines :frown
They are fun little projects and of course, for a very worthy cause:biggrin: