
You are using an out of date browser. It may not display this or other websites correctly.
You should upgrade or use an alternative browser.
You should upgrade or use an alternative browser.
logo pens
- Thread starter its_virgil
- Start date
Signed-In Members Don't See This Ad
See more from its_virgil


Thanks!
John

I've got templates saved in Photoshop for different pen sizes. So I open up
the blank for say .. a Jr Gent II and it's all ready to fill in. Makes life easier.
I find that saving a blank full sheet with the grid lines already in place
(according to the label # ) helps, too.
I leave an extra 2mm overhang for the length and 3mm of overlap on the
width. That leaves me room for error and trimming, and the 3mm is enough
to give a good label to label adhesion so the label doesn't unravel in the
resin.
Now, if I could just get the air bubble issue solved..
I've got great looking labels, just can't see them through the resin!

Do a good turn daily!
Don


I do almost the same thing, except I roll them on a mouse pad.
Sorry, didn't mean to hijack the thread.. and I just realized that I didn't
mention how good the pens look!! My bad..
Ah yes .. the old Kin jet. :biggrin:
I've been using the Alps (dry ribbon) printer because I can use metallic inks.
Next I'm going to try the dry inks on a thin sheet of vinyl and see how that
works..


Signed-In Members Don't See This Ad
thewishman
Member
Looks good, Don! Saved on the engraving, too.:wink:
ldb2000
Member
They came out great Don . Congrats on a nice sale . Did you over coat the lables first or just stick them on and cast ?
its_virgil
Member
Thanks. Just print, peel and stick, then cast. Works great.
Do a good turn daily!
Don
Do a good turn daily!
Don
They came out great Don . Congrats on a nice sale . Did you over coat the lables first or just stick them on and cast ?
bitshird
Member
Good looking pens Don
laserturner
Member
Super job Don. These are really nice.
its_virgil
Member
Thanks Ken. I'll bring some to Arizona and you can see one in person.
do a good turn daily!
Don
do a good turn daily!
Don
Super job Don. These are really nice.
its_virgil
Member
Thanks Chris. Not too sure about saving. The labels and ink are not cheap and I seem to waste a few just getting the right size. But once the size is determined for a kit I have learned to save it. ;-)
Do a good turn daily!
Don
Do a good turn daily!
Don
Looks good, Don! Saved on the engraving, too.:wink:
george
Member
Great, really great job. I have a packet of alluminite on the way, can not wait to start casting.
toolcrazy
Member
Very nice batch of pens.
JWS Penworks
Member
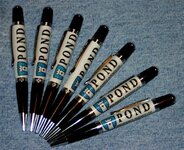
Great Job Don! Do you have a tutorial for casting the polyester resin?This group of pens was made for a local insurance company using their logo. The logo was printed on a label, stuck on the tube, and cast in polyester resin. Comments welcome. Thanks for looking.
Do a good turn daily!
Don
Thanks!
John
its_virgil
Member
There are several in the library. After I get the label made and stuck on the tubes I cast them just like I do snake skins. My snake skin tutorial is in the library. There are several threads here on casting labels. Do a search and you'll find lots of info.
Do a good turn daily!
Don
Do a good turn daily!
Don
Great Job Don! Do you have a tutorial for casting the polyester resin?
Thanks!
John
JWS Penworks
Member
Don,
Thanks for the info!
John
Thanks for the info!
John
NewLondon88
Local Chapter Leader
Thanks Chris. Not too sure about saving. The labels and ink are not cheap and I seem to waste a few just getting the right size. But once the size is determined for a kit I have learned to save it. ;-)
Do a good turn daily!
Don
I've got templates saved in Photoshop for different pen sizes. So I open up
the blank for say .. a Jr Gent II and it's all ready to fill in. Makes life easier.
I find that saving a blank full sheet with the grid lines already in place
(according to the label # ) helps, too.
I leave an extra 2mm overhang for the length and 3mm of overlap on the
width. That leaves me room for error and trimming, and the 3mm is enough
to give a good label to label adhesion so the label doesn't unravel in the
resin.
Now, if I could just get the air bubble issue solved..
I've got great looking labels, just can't see them through the resin!
Very nice group of pens, well done.
its_virgil
Member
This is what I do also. And yes, it does make life easier after the size for each kit's tube is determined.I've got templates saved in Photoshop for different pen sizes.
I find that saving a blank full sheet with the grid lines already in place
(according to the label # ) helps, too.
Leaving the 3mm overlap is essential. As you say, this give the label good adhesion and less or no lifting. I place the labeled tube on the counter and roll it under my hand to press the label good and tight onto the tube...giving special attention to the edges and the seam.I leave an extra 2mm overhang for the length and 3mm of overlap on the
width. That leaves me room for error and trimming, and the 3mm is enough
to give a good label to label adhesion so the label doesn't unravel in the
resin.
I have less problems with bubbles on the label blanks than I do with snake skin blanks. I use an ultrasonic cleaner with hot water and turn on the heat on the cleaner. The heat thins out the resin and helps get out air. The resin pours nicer and bubbles introduced while pouring can escape easier with the hot thin resin. I know a couple of guys who heat the resin in an oven prior to adding the catalyst. Then the filled mold goes into the pressure pot at 25psi.Now, if I could just get the air bubble issue solved..
I've got great looking labels, just can't see them through the resin!
Do a good turn daily!
Don
Skye
Member
I'm guessing this is on a color laser printer?
Dalecamino
Local Chapter Leader
Very nice work Don . If I get an order for pens with Logos , can I just send them to you ? :biggrin:
NewLondon88
Local Chapter Leader
Leaving the 3mm overlap is essential. As you say, this give the label good adhesion and less or no lifting. I place the labeled tube on the counter and roll it under my hand to press the label good and tight onto the tube...giving special attention to the edges and the seam.
I do almost the same thing, except I roll them on a mouse pad.
Sorry, didn't mean to hijack the thread.. and I just realized that I didn't
mention how good the pens look!! My bad..
its_virgil
Member
Send them to me if you want....or I'll make the blanks for you and you will get the joy of turning them and selling the pens. I can't make the smiley faces work on the new forum so I'll do them the old fashioned way.
Thanks for the comments.
Do a good turn daily!
Don
I can't make the smiley faces work on the new forum so I'll do them the old fashioned way. Thanks for the comments.
Do a good turn daily!
Don
Very nice work Don . If I get an order for pens with Logos , can I just send them to you ? :biggrin:
its_virgil
Member
Thanks for the comments on the pens. No hijacking as far as I'm concerned...we're all (well, almost all) in this together to learn and share our knowledge.
Do a good turn daily!
Don
Do a good turn daily!
Don
I do almost the same thing, except I roll them on a mouse pad.
Sorry, didn't mean to hijack the thread.. and I just realized that I didn't
mention how good the pens look!! My bad..
its_virgil
Member
Guess again Skye....
Lexmark X5470 Kin jet printer.
Do a good turn daily!
Don
Lexmark X5470 Kin jet printer.
Do a good turn daily!
Don
I'm guessing this is on a color laser printer?
NewLondon88
Local Chapter Leader
Guess again Skye....
Lexmark X5470 Kin jet printer.
Do a good turn daily!
Don
Ah yes .. the old Kin jet. :biggrin:
I've been using the Alps (dry ribbon) printer because I can use metallic inks.
Next I'm going to try the dry inks on a thin sheet of vinyl and see how that
works..
TBone
Member
Don, those pens look great. I've not heard of a kin jet. Anything special about it?
rherrell
Member
Yeah Tommy, it mispells words.:biggrin:Don, those pens look great. I've not heard of a kin jet. Anything special about it?
its_virgil
Member
Sorry guys. My fingers got tagnled a bit. My printer is really an ink jet printer.
Merry Christmas.
Don
Merry Christmas.
Don
Don, those pens look great. I've not heard of a kin jet. Anything special about it?