Hi Derrick,
I must be still getting over the Christmas and New Year Festivities, as I am having some difficulty understanding what "Is the Problem you are having".
As I read it, and using my words.
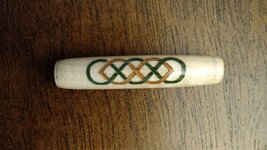
You used your Neje Laser Engraver to engrave the Celtic Knot.
Then you painted over the engraving, with Green and Wood Brown paint, over which you then covered the now Painted Engravings with CA.
You tried finishing with CA to Finally Finish the Pen Blank.
But the CA over the Painted Engraving, was at a different level, and noticeable to the Pen Blank Finish. -
Is this your problem you are experiencing?
I have found CA to be an Excellent Finish, but you cannot and will not necessarily make a rough or undulating finish Smooth, unless you fill all the Low Sections up to the same Height of the High Sections, then with a very fine Abrasive such as Micro Mesh, using all the grades up to the 12000, to level the Finish to a Common level, and smoothness.
Well that is a "Popular Desired Belief", but in Practice it is Desirable to use the Abrasive on the High Section eg (Painted Sections), to bring them in line and smoothness with the Lower or Major Surface, before applying the Final Finishing.
I know that is not necessarily what you are wanting to hear, but I would use abrasive to remove the Finish Coat you have applied, then with Micro Mesh, Polish the Engraving to a Common Level Surface and Fine Finish, so that the Final Finish can be applied completely over the Blank.
Of Course I have not seen the Blank, and there may be other satisfactory methods.
But I firmly believe that a Fine Abrasive Finish has to be built on the Base of the Bare Blank, before any Finish or Engraving takes place.
Then after the Engraving or Painted Infill etc, is Abraded to the same degree as the Blank Base, with the Applied Finish being equally covered over the Blank, and Final Abrasion applied to obtain a Level and Smooth Finish.
Please let us know how you get on.
I hope this all makes sense I am now being called for Dinner.
Regards,
Brian.