
CharlesH
Member
Hey guys,
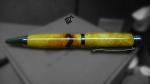
Long time since I last posted a pen. I had to motivate myself into making this one! This is afzelia burl, really light in coloration, mostly yellow. This one has a big knot that gives it a really nice character.
30 something coats of medium CA glue!
Enjoy and please click the thumbnails!
Charles
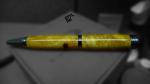
Long time since I last posted a pen. I had to motivate myself into making this one! This is afzelia burl, really light in coloration, mostly yellow. This one has a big knot that gives it a really nice character.
30 something coats of medium CA glue!
Enjoy and please click the thumbnails!
Charles
")