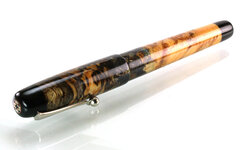
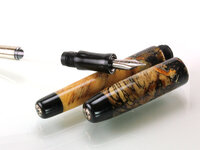
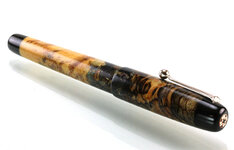
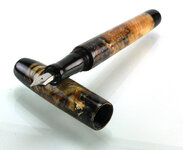
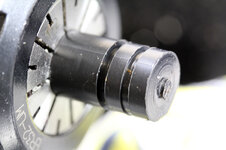
Spalted signature wood with ebonite ends, mosaic pin in each end, and gilding and patination. 12X.8 triple tap and die for the cap and body connection. What a difference a triple makes. Only 2 1/2 turns to close where my other pens took 6-8 turns or twists. All other threads are singles. Its about 5 1/2 inches closed with a #5 Jowo nib. State any type of comment you want. Thanks for looking.

You are using an out of date browser. It may not display this or other websites correctly.
You should upgrade or use an alternative browser.
You should upgrade or use an alternative browser.
Kitless#4, 2nd Wood kitless
- Thread starter MikeL
- Start date
Signed-In Members Don't See This Ad
See more from MikeL


Dan if its anything like mine they are simple resin inserts. Kinda like a tube in a kit pen.
Here are some pics of the inserts i made. http://www.penturners.org/forum/f13/my-pith-pen-bsea-90561/
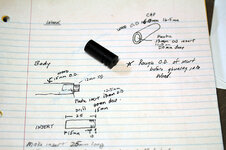
The inserts are really quite simple (both plastic and the ebonite). Of course, size of the hole you drill for the insert you want depends on the dimensions of your pen. My dimensions really are to make a #5 nib look proportional. The other focus needs to be on the tap and die sizes you plan on using. My cap insert threads and the body threads that screw into the cap are 12X.8. Therefore this will dictate your insert size. If you can see my sloppy notes, the insert for the cap had a 12.5 OD. The drill hole size to accept the 12X.8 is 11.2mm (I used 11.25 drill bit because I had one) meaning I drilled a 11.25hole into 12.5 OD insert. If you want a thicker wall then make the insert OD bigger. However, IMHO, that will in-turn dictate a larger OD of the cap. It is just personal preference. I am not using large nibs so I try to keep the pen size down. My cap final dimension are just under 16mm. I cut very shallow grooves into the plastic just to help the epoxy grab on. I cut the insert longer than I need. Epoxy in. Let cure. Then part off some off the wood and the excess plastic so it is perfectly flush. Then I turned the cap to rough size and then drilled the 11.25 hole to accept the tap. Word of caution: Make sure your insert is in the dead center. If it is not your wall thickness between the plastic and the wood will not be concentric and it may create problems when turning to final size. The ebonite insert into the body is done pretty much the same except you don't part it off flush with the wood. You need some extended to accept the threads that will screw into the cap. I useepoxy (T-88 epoxy) but I guess CA would also work. Hope that answers the question.
The insert timebandit showed is pretty cool. I guess that is neded for a wood section. Mine can be more simple since I used ebonite. I may have to give a wood section a try pretty soon!
Well, this was not my typical finish since I gilded this pen I sealed the guilding and patina with laquer spray. I had no idea if CA would react to the gilding and turn the whole thing black. I knew laquer would be OK. I sprayed the entire pen with three coats of laquer. Then I used CA after the laquer cured. By the time I finished sanding and buffing, the amount of finish on the ebonite ends is probobly very very thin if any at all. Ebonite finishes up so nice I didn't really care if I sanded and buffed it all off. Too much finish on the clip end will make it difficult to unscrew the finial to put on the clip. I used wax between the screwed surfaces to make sure I would be able to unscrew. My first wood pen was just CA and I only put a very thin coat on the ebonite.
I was not too concerned with the threads remaining since it is going inside the body of the pen. I was more concerned with the wall thickness and strength of the pen as the converter gets manipulated in and out over the life of the pen. Very sharp observation!
The insert shown in my picture is for the barrel. I forgot to take the one of the section and cap. The front section would be done just like you did your body, and i did my wood finial, which is just have some extended out for the threads. The front section actually goes all the way through. So it was a wood tube, that i put the inserts into with the insert hanging out the back for the threads.
The reason why i did my barrel insert that way, is because i didnt want the wood lip between the insert and the finished barrel diameter. There is a thin resin ring on the insert behind the threads that the wood tube butts up to, kind of like the trim ring when you press a kit together and the metal parts meet flush with the tube you just turned. That insert butted up flush with the wood tube. I think i was afraid of that wooden edge getting chipped and damaged so i wanted the resin to butt up to it to help protect it.
Im used to it. As long as there isnt a bunch of play in the diameters, it shouldnt move much. I overcame this problem by cutting that tiny tenon before you cut your threads for your section. The die wont even touch it. I cut the tenon for the threads and then cut that small tenon. Then i polish both all the way through the micromesh pads and then cut the threads last. Ive never had one break yet. Unless someone does something incorrectly, it should be ok.

Fair enough. I like the pen in the link you provided of your pen. Can't get more natural looking than that. I may try it sometime. I do get carried away (maybe obsessed) with trying to have zero scratches in the finish. One thing I like about these glass like finishes is the clarity it provides to look almost in to the grain. Not sure I can explain properly but noticed the first time when I did a curly koa, The gloss finish seemed to almost provide a window into the grain almost magnifying it. I probably am not describing it well. Anyway, I like wood and almost all finishes dealing with wood because....well... I just like wood.


No sir, no tubes. Thanks.
Signed-In Members Don't See This Ad
Bruce markwardt
Member
Very nice job.
dansills
Member
Awesome! I have to ask... What finish is that? I'm trying to wrap my brain on how you applied a finish at all with the finial.
Dan Masshardt
Member
I want to make similar style pens in the near future. One thing that I don't fully understand is the integration of the wood and other material (ebonite etc) where the cap to body threads are How is the ebonite put into the wood to enable this?
If you are not inclined to answer no problem Just thinking through it
Either way, great looking pen!
If you are not inclined to answer no problem Just thinking through it
Either way, great looking pen!
Impressive, great job on the fit and finish. That is a stunning piece of wood and a great match with the parts.
mikespenturningz
Member
Stunning. This is the kind of kitless that I would like to try. Love it..
Dale Lynch
Member
That's fantastic Mike.
wyone
Member
wow.. you remind me how far this skill can go. AWESOME
OZturner
Member
Mike, as Jan said "how many ways can one say GREAT".
Firstly, Fantastic Spalted Blank, Incredible Ebonite Ends, with a Mosaic inserts.
Secondly, Exceptional Proportions, Lines and Profile.
Thirdly, Outstanding Fit and Craftsmanship.
Fourthly, Beautiful Functional Hardware.
Congratulations,
Brian.
Firstly, Fantastic Spalted Blank, Incredible Ebonite Ends, with a Mosaic inserts.
Secondly, Exceptional Proportions, Lines and Profile.
Thirdly, Outstanding Fit and Craftsmanship.
Fourthly, Beautiful Functional Hardware.
Congratulations,
Brian.
Ironwood
Member
Outstanding work.
Cwalker935
Member
Now that is classy!
That is a really great looking pen Mike.
lwalper
Member
Very nice!
Si90
Member
Thats a beautiful piece of wood and you have done it real justice. Fantastic looking pen, well done.
Sandsini
Member
Mike, I showed the photos of your pen to my wife to illustrate the direction I want my penmaking to go. She and I both love it. Wonderful work!
bjbear76
Member
I am so envious of your talent....that's truly awesome work
Mintman
Member
I agree with the comments above. This is a fantastic pen! I'm very interested in how you made the ebonite inserts. It looks like you have ebonite inserted into the bottom section of the cap.
I will try to give more complete answers later but I will say inside the cap is a cheaper plastic since it is not exposed for looks, only needed for threads. The body insert is ebonite since half of it is exposed and half is inserted. Ebonite polishes up very nice and I needed the exposed portion to match the tips of the pen ( finial end w/ clip and the opposite end).
Thanks for the nice comments. Better explanation coming when I get some time.
Thanks for the nice comments. Better explanation coming when I get some time.
John Den
Member
OMG Something else for me to aim at.
Absolutely Brilliant!!!!
Regards
John
Absolutely Brilliant!!!!
Regards
John
Timebandit
Member
Great job Mike! That wood has some great character and color to it. Looks Like spalted Chinese Tallow to me. Love the inserts in the finials as well. Beautiful pen!
Are the shallow threads that i see at the back end of the section threads on the converter or are they threads that didnt get removed fully?
Are the shallow threads that i see at the back end of the section threads on the converter or are they threads that didnt get removed fully?
Timebandit
Member
I want to make similar style pens in the near future. One thing that I don't fully understand is the integration of the wood and other material (ebonite etc) where the cap to body threads are How is the ebonite put into the wood to enable this?
If you are not inclined to answer no problem Just thinking through it
Either way, great looking pen!
Dan if its anything like mine they are simple resin inserts. Kinda like a tube in a kit pen.
Here are some pics of the inserts i made. http://www.penturners.org/forum/f13/my-pith-pen-bsea-90561/
Twissy
Member
Beautifully done Mike!
I want to make similar style pens in the near future. One thing that I don't fully understand is the integration of the wood and other material (ebonite etc) where the cap to body threads are How is the ebonite put into the wood to enable this?
If you are not inclined to answer no problem Just thinking through it
Either way, great looking pen!
The inserts are really quite simple (both plastic and the ebonite). Of course, size of the hole you drill for the insert you want depends on the dimensions of your pen. My dimensions really are to make a #5 nib look proportional. The other focus needs to be on the tap and die sizes you plan on using. My cap insert threads and the body threads that screw into the cap are 12X.8. Therefore this will dictate your insert size. If you can see my sloppy notes, the insert for the cap had a 12.5 OD. The drill hole size to accept the 12X.8 is 11.2mm (I used 11.25 drill bit because I had one) meaning I drilled a 11.25hole into 12.5 OD insert. If you want a thicker wall then make the insert OD bigger. However, IMHO, that will in-turn dictate a larger OD of the cap. It is just personal preference. I am not using large nibs so I try to keep the pen size down. My cap final dimension are just under 16mm. I cut very shallow grooves into the plastic just to help the epoxy grab on. I cut the insert longer than I need. Epoxy in. Let cure. Then part off some off the wood and the excess plastic so it is perfectly flush. Then I turned the cap to rough size and then drilled the 11.25 hole to accept the tap. Word of caution: Make sure your insert is in the dead center. If it is not your wall thickness between the plastic and the wood will not be concentric and it may create problems when turning to final size. The ebonite insert into the body is done pretty much the same except you don't part it off flush with the wood. You need some extended to accept the threads that will screw into the cap. I useepoxy (T-88 epoxy) but I guess CA would also work. Hope that answers the question.
The insert timebandit showed is pretty cool. I guess that is neded for a wood section. Mine can be more simple since I used ebonite. I may have to give a wood section a try pretty soon!
Attachments
Awesome! I have to ask... What finish is that? I'm trying to wrap my brain on how you applied a finish at all with the finial.
Well, this was not my typical finish since I gilded this pen I sealed the guilding and patina with laquer spray. I had no idea if CA would react to the gilding and turn the whole thing black. I knew laquer would be OK. I sprayed the entire pen with three coats of laquer. Then I used CA after the laquer cured. By the time I finished sanding and buffing, the amount of finish on the ebonite ends is probobly very very thin if any at all. Ebonite finishes up so nice I didn't really care if I sanded and buffed it all off. Too much finish on the clip end will make it difficult to unscrew the finial to put on the clip. I used wax between the screwed surfaces to make sure I would be able to unscrew. My first wood pen was just CA and I only put a very thin coat on the ebonite.
Are the shallow threads that i see at the back end of the section threads on the converter or are they threads that didnt get removed fully?
I was not too concerned with the threads remaining since it is going inside the body of the pen. I was more concerned with the wall thickness and strength of the pen as the converter gets manipulated in and out over the life of the pen. Very sharp observation!
Timebandit
Member
The insert timebandit showed is pretty cool. I guess that is neded for a wood section. Mine can be more simple since I used ebonite. I may have to give a wood section a try pretty soon!
The insert shown in my picture is for the barrel. I forgot to take the one of the section and cap. The front section would be done just like you did your body, and i did my wood finial, which is just have some extended out for the threads. The front section actually goes all the way through. So it was a wood tube, that i put the inserts into with the insert hanging out the back for the threads.
The reason why i did my barrel insert that way, is because i didnt want the wood lip between the insert and the finished barrel diameter. There is a thin resin ring on the insert behind the threads that the wood tube butts up to, kind of like the trim ring when you press a kit together and the metal parts meet flush with the tube you just turned. That insert butted up flush with the wood tube. I think i was afraid of that wooden edge getting chipped and damaged so i wanted the resin to butt up to it to help protect it.
Timebandit
Member
Are the shallow threads that i see at the back end of the section threads on the converter or are they threads that didnt get removed fully?
I was not too concerned with the threads remaining since it is going inside the body of the pen. I was more concerned with the wall thickness and strength of the pen as the converter gets manipulated in and out over the life of the pen. Very sharp observation!
Im used to it. As long as there isnt a bunch of play in the diameters, it shouldnt move much. I overcame this problem by cutting that tiny tenon before you cut your threads for your section. The die wont even touch it. I cut the tenon for the threads and then cut that small tenon. Then i polish both all the way through the micromesh pads and then cut the threads last. Ive never had one break yet. Unless someone does something incorrectly, it should be ok.
Dan Masshardt
Member
This thread is a perfect resource for the other threads on kitless help. Thanks for taking the time to share!
mark james
IAP Collection, Curator
Tried to copy/post your previous thread on the pen to BSEA... Alas, brain not working with fingers...
Justin... Looked at the thread... Dude.. U need to turn - that was amazing!!!
Hope all is well.
Justin... Looked at the thread... Dude.. U need to turn - that was amazing!!!
Hope all is well.
Last edited:
NittanyLion
Member
Mike, that pen has my vote for front page! Nice!
Timebandit
Member
You know what would make this pen stand out just a little more for me....just a lighter satin type finish. Not real flat satin, but a real light one, with just the shine/reflection gone out of it to give it a little bit warmer feel like the natural wood. They also change the feel of the pen in the hand a little bit.
You know what would make this pen stand out just a little more for me....just a lighter satin type finish. Not real flat satin, but a real light one, with just the shine/reflection gone out of it to give it a little bit warmer feel like the natural wood. They also change the feel of the pen in the hand a little bit.
Fair enough. I like the pen in the link you provided of your pen. Can't get more natural looking than that. I may try it sometime. I do get carried away (maybe obsessed) with trying to have zero scratches in the finish. One thing I like about these glass like finishes is the clarity it provides to look almost in to the grain. Not sure I can explain properly but noticed the first time when I did a curly koa, The gloss finish seemed to almost provide a window into the grain almost magnifying it. I probably am not describing it well. Anyway, I like wood and almost all finishes dealing with wood because....well... I just like wood.
southernclay
Member
I love it! The mosaic is an awesome touch, cool clip too. Studying on kitless is racking my brain enough but one day would love to tackle something similar. I love wood pens, I've been studying on what all woods thread for now. Great job and thanks for showing and sharing the info. Front page all the way.
cschimmel
Member
Fantastic pen
plano_harry
Member
That is really beautiful! The coloring in the wood really works with the ebonite. No interior tubes on the wood?
That is really beautiful! The coloring in the wood really works with the ebonite. No interior tubes on the wood?
No sir, no tubes. Thanks.
Signed-In Members Don't See This Ad