Gift for VisExp

Signed-In Members Don't See This Ad
See more from davinci27

davinci27

Member
Joined
Sep 5, 2008
Messages
511
Location
Franklin, GA
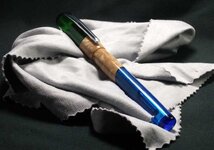
See Through Gift for VisExp

I participated in the pen/puzzle swap over on the eagle forum, and I got paired up with Keith. He sent me an awesome feather pen (http://www.penturners.org/forum/showthread.php?t=42906) and a very beautiful koa and aluminum blank that is currently on my lathe. In return :biggrin: I sent him this pen.

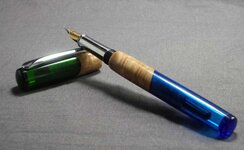
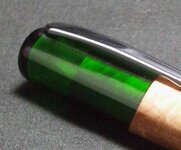
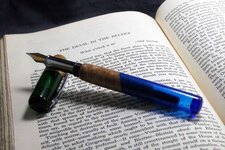
I have to say this pen was alot of fun to make, but the first few tries still lay on the shop floor. The pr came from http://exoticblanks.com of course, and the wood is ribbed fruit malle burl from scribblesticks. the kit parts are out of a Barron/Navigator. It's hard to see in some of the pictures, but the burl continues up into the upper and lower tubes. I've included a close up where you can see the grain.

I'll post the blank I got from keith as soon as it is turned into a pen :wink:

As alway comments/critiques/criticisims are welcomed.
 

Attachments

  • onclouth.jpg
    onclouth.jpg
    31.4 KB · Views: 254
  • stacked.jpg
    stacked.jpg
    23.7 KB · Views: 245
  • seethrough.jpg
    seethrough.jpg
    17.7 KB · Views: 246
  • book.jpg
    book.jpg
    54.8 KB · Views: 218
  • long.jpg
    long.jpg
    36.5 KB · Views: 294
Last edited:
Signed-In Members Don't See This Ad

VisExp

Member
Joined
Oct 1, 2007
Messages
2,738
Location
Palm Coast, FL, USA.
I was the lucky person to open the mail today to find this pen :biggrin: It looks even better in person. Ben's work is top notch and I'm very pleased to be able to add this to my collection of "pens by other turners". Thank you very much Ben.

Unfortunately you've probably started me down yet another slippery slope. I've seen plenty of pictures here on the forum of kitless and kit-little pens, but this is the first time I've seen one in person, and I have to say I'm both impressed and intrigued. I'm definitely going to have to start figuring out what is involved in making one.
 

davinci27

Member
Joined
Sep 5, 2008
Messages
511
Location
Franklin, GA
Thanks Folks

John: I didn't realize you were over here, I guess I should have but I didn't think about it. Did I mention I was almost in you neighborhood. I've got a good friend who lives near you. He's getting married in about a month and we were going to the wedding. My wife got pregnant and the baby is due a week before, so we had to cancel the trip

Keith: I am so excited you like the pen. I was really excited when I got your name in the swap. As for the kitless thing, it really is fun. When I first started turning pens I didn't think I would be into kitless, but I really enjoy them.
 

davinci27

Member
Joined
Sep 5, 2008
Messages
511
Location
Franklin, GA
Had some folks ask about polishing the inside of the barrels, so I thought I'd post his here as well.

First I liberally sprayed the bit with PAM cooking spray while drilling. Then to polish the inside, I used EEE ultra shine followed by Novus Polish #3 then Novus Polish #2.

Keith and I were chatting yesterday, and he suggested turning a dowel that fit inside the barrel, then splitting the dowel down the middle. Put sandpaper in the split, then you can use that to sand the inside prior to the polish. I've done something like this before with a spare brass tube, and I'm pretty sure it will work.
 

ed4copies

Local Chapter Manager
Joined
Mar 25, 2005
Messages
24,527
Location
Racine, WI, USA.
Had some folks ask about polishing the inside of the barrels, so I thought I'd post his here as well.

First I liberally sprayed the bit with PAM cooking spray while drilling. Then to polish the inside, I used EEE ultra shine followed by Novus Polish #3 then Novus Polish #2.

Keith and I were chatting yesterday, and he suggested turning a dowel that fit inside the barrel, then splitting the dowel down the middle. Put sandpaper in the split, then you can use that to sand the inside prior to the polish. I've done something like this before with a spare brass tube, and I'm pretty sure it will work.

To add to your idea, you can take the dowel and mount it in your scrollchuck, with the other end in the cup of a live center. Turn on the lathe and you have an "interior of the blank" sanding and polishing station.

IF your dowel is long enough, you can put both halves of the pen on this "mandrel" then sand one at a time. Remove sandpaper, switch to polish cloth, repeat.

Only problem occurs if your hole is wider in the middle somewhere (bit had to flex - close as I can figure), then that spot is never touched and you have a problem. Should you figure out how to solve this, let me know.

(Just curiosity, of course!!)
 

ed4copies

Local Chapter Manager
Joined
Mar 25, 2005
Messages
24,527
Location
Racine, WI, USA.
Back to Ben's pen.

Really neat innovation!!! I would SUGGEST you make the junctions square (not on an angle). Just because the "screwed on pen cap" will be out of alignment with the bottom two times out of three, due to the 3 start position of the cap.

With a "square" transition, it will always look right.

FWIW!!! Great job of thinking and executing something new (to me).

Dawn reminds me you are just grad-ji-ating from "newbee" status. I keep forgetting!!!!
 
Last edited:

davinci27

Member
Joined
Sep 5, 2008
Messages
511
Location
Franklin, GA
I thought about making the joints straight across, but since I was making it for a fellow pen turner, I thought the diagonal cuts would be a bit more complicated. So i guess it was a bit of a trade off.

To do this particular pen, I had to turn each different piece and then assemble them. You can't see it in the pictures, but the burl grain lines inside the tube matches the burl outside the tube.

I think What I'll do with the next one is the opposite of what you suggest. That's what I did with this one, and I think the addition of the sanding dowel will improve. Basically I glued a scrap onto the end of the blank, and left that in the collet chuck. Then I turned down the blank till it was thin enough that I could see through the blank to see the inside. I didn't turn to final size, just enough so I could see the inside to see if it was polished.

I left the blank in the chuck and then used q-tips to polish the inside. I think I'll turn the sanding dowel and put it in a jacobs chuck on the tail stock. That way I can see the inside as I'm polishing it. I have to polish it before assembling so that I can get everything including ther area where the burl sleeves are.
 

VisExp

Member
Joined
Oct 1, 2007
Messages
2,738
Location
Palm Coast, FL, USA.
I would SUGGEST you make the junctions square (not on an angle). Just because the "screwed on pen cap" will be out of alignment with the bottom two times out of three, due to the 3 start position of the cap.

Ed, the pen is based on the Sedona/Baron/Navigator which has a two start thread, so you get the alignment correct half the time :biggrin:

As Ben mentioned, it is a trade off, and something I have to deal with on some of my designs. I think the aesthetics of the design more than make up for it though.

Did I mention how much I like the pen :biggrin:
 
Top Bottom