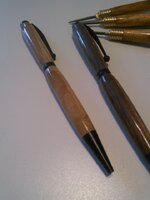
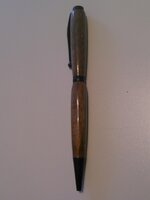
first two pens

Signed-In Members Don't See This Ad
See more from mjrbuzz

mjrbuzz

Member
Joined
Aug 31, 2014
Messages
152
Location
Port A Texas
take it easy on me these are my very first two pens and just about my first time turning. the first is olive wood that didint have alot of grain and the seond is walnut, both have a oat of danish oil before a a finish. please comment. I know i have a lil work on the fitting i was just sared to get too close to the bushings.
 

Attachments

  • IMG_20140903_140046.jpg
    IMG_20140903_140046.jpg
    158.9 KB · Views: 198
  • IMG_20140903_140145.jpg
    IMG_20140903_140145.jpg
    117.3 KB · Views: 169
Signed-In Members Don't See This Ad

BSea

Member
Joined
Dec 28, 2009
Messages
4,628
Location
Little Rock, Arkansas
Those are very good for your 1st 2 pen. Much better than my 1st 2. :good: Don't worry too much about bushings. You'll spend more on paper towels than bushings. So don't hesitate to get as close as possible to the bushings.

You might also consider taking your pictures outside in a shaded but bright area. If you show your pens a lot, you'll find that your photography skills will improve along with your turning skills.:rolleyes:
 

BJohn

Member
Joined
Feb 13, 2014
Messages
820
Location
Cabot, Arkansas
For your first couple of pens, I must say mine did not look much better. So keep turning practice practice practice.

A agree with Bob, turn as close a possible to bushings as you feel comfortable, Then finish by sanding. With practice you will be surprised how close you will get and how little sanding you will need to do.

I also use a very sharp skew to turn my pens, at first it kind of scared me, but with practice and by using a sharp skew it will also eliminate a lot of the sanding.

Good Luck Keep turning
 

seamus7227

Member
Joined
Mar 18, 2009
Messages
6,220
Location
Wichita Falls, TX
Nice work Clayton!! Our first pens are never the best, however, in our own eyes they look spectacular!! Just be sure you hang on to those two pens, regardless of what someone offers you $$$. My very first pen was a European pen made with Ash and one of customers that i was delivering to said she wanted to buy it since it was my first and that it would probably be worth some money one day. (I about died laughing at that comment) So i sold it to her for $30 and ended up buying it back close to a year later by making her a pen to takes its place. I told her that she could have her pick so she chose a click bullet pen kit with snakeskin. Im so glad i did that looking back, since it gives me a guide to see where i started and how far i have come! Be careful of the VORTEX though, it will suck you in and before you know it, you will be dreaming pens. Anyway, the most important thing is to have fun no matter what!!
 

mark james

IAP Collection, Curator
Joined
Sep 6, 2012
Messages
12,752
Location
Medina, Ohio
I agree with Seamus... Keep your first pens! Take notes, write down what you liked, and what you want to improve on.

Your first efforts are good! Work on the proportions, keep things in balance between the upper and lower barrels, and I also agree - work closer in to the bushings!

I would favor getting calipers and measuring your fittings and doing your measurements with the calipers instead of relying on the bushings. Even good bushings will become "not good" after several pens when you have "slightly turned and sanded the bushings." Not than I have ever done that...

Have fun!
 

mjrbuzz

Member
Joined
Aug 31, 2014
Messages
152
Location
Port A Texas
Clayton, those look good. Great start. Tell us about your sanding process.


I'm learning so i'm not sure i have a process as of yet :redface:

I start with 220 then to 400 then an 800-1000 pad, then ca back to 400,800 pad, 3000 pad that i got from autozone and then i finished it off with an automotive polishing compound with a paper towel. Please feel free to suggest something different. forgot to mention i usually put a coat of danish oil on before the ca.
 

OZturner

Member
Joined
Aug 5, 2013
Messages
6,662
Location
Sydney. NSW. Australia
A Terrific Start, Clayton with two Pens,
That is the hardest part over.
In the preceding posts there is all the Advice and Comments, you need at the moment.
Take them onboard, and let's see number Three.
Congratulations,
Brian.
 

plano_harry

Member
Joined
Jan 12, 2012
Messages
1,959
Location
Plano, TX 75093
Clayton, those look good. Great start. Tell us about your sanding process.


I'm learning so i'm not sure i have a process as of yet :redface:

I start with 220 then to 400 then an 800-1000 pad, then ca back to 400,800 pad, 3000 pad that i got from autozone and then i finished it off with an automotive polishing compound with a paper towel. Please feel free to suggest something different. forgot to mention i usually put a coat of danish oil on before the ca.

First off, the finish is very good, better than I often see from more experienced turners, so feel free to ignore this. :) The step many new turners miss is stopping the lathe and sanding longways before going on to the next grit. This is key to removing the tiny ripples/ridges that form as the CA is applied. The rotary sanding is parallel to the ridges and doesn't do a good job of taking them out and leveling the finish. So by following each rotary sanding step with the lathe off longways sanding, you get an ever flatter surface. This is also the best way to sand the bare wood before you apply your finish.

There are some good articles in the library that have more detail. Again, a very good start. I hope that helps.
 
Top Bottom