So...I just bought my lathe this last Thursday, pretty much so I could get into crafting pens. On Friday I got my basic Rockler pen kit and a couple odds and ends including some acrylic blanks (as I really like some of the crazy stuff you guys do with the acrylics). Anyway, long story short, by today I could spend some time playing around with my new hobby.
o i
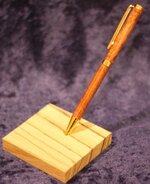
The set included 3 24kt slimline kits and a couple wooden blanks. For my first pen I used the bubinga. It has a CA finish, 3 coats of thin and 3 of medium, which I applied while it was spinning slowly (500 rpm or so), and let it set for a few minutes per coat on the thin and more on the medium. The CA was very lumpy and uneven though so I let it set up for 4 hours at room temp then sanded it down with the micro-mesh system. the result is okay, the finish came out smooth except right at the edges where the bushings were. Unfortunately, the pen isn't very exciting, the wood turned out to be kinda boring and the for factor, fit, and finish leave something to be desired.
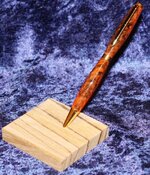
For my second pen I used one of the acrylic blanks I picked up. It's supposed to be "Lava" I think. second go 'round, lessons learned, much better pen. I also turned each of the barrels separately on a mandrel with the PSI mandrel saver live piece (and my handy, dandy HF digital caliper). This set up eliminated the wobble in the system that I noticed on the first pen. (And thanks to one of the threads on here for setting me in that direction) I finished the pen by wet sanding with the micro mesh system through all the steps after doing a rough sand at 400. After going through the whole process though, one of the barrels had 4 scratches in it. I repeated the process from the 400 through the MM and they were handled. I then used and automotive scratch remover and wax to buff and polish the pen. One thing I learned about the acrylic pen is that I need to choose the acrylic more carefully. The photo shows all the character of the pen, but the side it doesn't show is by and large a big orange mess with one a couple little black spots/streaks.
Well, anyway, sorry for the long read but I'm a little jazzed at the moment. Any questions, comments, or suggestions for what I could do to improve would be much appreciated.
Thanks for checkin it out,
Joe
o i
The set included 3 24kt slimline kits and a couple wooden blanks. For my first pen I used the bubinga. It has a CA finish, 3 coats of thin and 3 of medium, which I applied while it was spinning slowly (500 rpm or so), and let it set for a few minutes per coat on the thin and more on the medium. The CA was very lumpy and uneven though so I let it set up for 4 hours at room temp then sanded it down with the micro-mesh system. the result is okay, the finish came out smooth except right at the edges where the bushings were. Unfortunately, the pen isn't very exciting, the wood turned out to be kinda boring and the for factor, fit, and finish leave something to be desired.
For my second pen I used one of the acrylic blanks I picked up. It's supposed to be "Lava" I think. second go 'round, lessons learned, much better pen. I also turned each of the barrels separately on a mandrel with the PSI mandrel saver live piece (and my handy, dandy HF digital caliper). This set up eliminated the wobble in the system that I noticed on the first pen. (And thanks to one of the threads on here for setting me in that direction) I finished the pen by wet sanding with the micro mesh system through all the steps after doing a rough sand at 400. After going through the whole process though, one of the barrels had 4 scratches in it. I repeated the process from the 400 through the MM and they were handled. I then used and automotive scratch remover and wax to buff and polish the pen. One thing I learned about the acrylic pen is that I need to choose the acrylic more carefully. The photo shows all the character of the pen, but the side it doesn't show is by and large a big orange mess with one a couple little black spots/streaks.
Well, anyway, sorry for the long read but I'm a little jazzed at the moment. Any questions, comments, or suggestions for what I could do to improve would be much appreciated.
Thanks for checkin it out,
Joe