First Try W/Tru-Stone

Signed-In Members Don't See This Ad
See more from latelearner

latelearner

Member
Joined
Dec 29, 2009
Messages
286
Location
Lancaster, Ohio
001.JPG

002.JPG

003.JPG

004.JPG

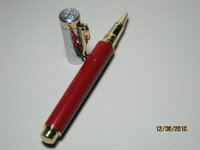
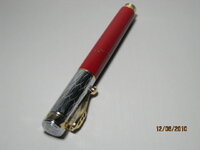
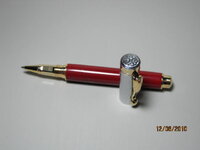
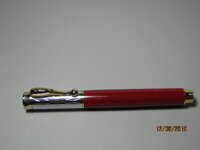
This was the first time I've tried using Tru-Stone and I was pretty pleased with the results. The kit is the Electra and the finish is wet sand thru 600 and mm thru 12000 followed by 3 coats of Nufinsh auto polish buffed with a cotton wheel. I know the pictures aren't great, but I have to get one thing down pat at a time. All comments/criticisms welcome. Thanks.

Larry
 
Signed-In Members Don't See This Ad

ToddMR

Member
Joined
May 3, 2010
Messages
1,715
Location
Columbus, OH
Nice job! Is there more line design in the blank and the picture doesn't show it? BTW, nice job I am still waiting to get something like the pen pro before tackling tru-stone.
 

Padre

Member
Joined
Dec 2, 2009
Messages
1,841
Very nice job. The pen shows off the blank perfectly.
 

latelearner

Member
Joined
Dec 29, 2009
Messages
286
Location
Lancaster, Ohio
Nice job! Is there more line design in the blank and the picture doesn't show it? BTW, nice job I am still waiting to get something like the pen pro before tackling tru-stone.

Yes, there is quite a bit more of the gold veins running through the blank, however, my photography leaves alot to be desired.
 

IPD_Mrs

Member
Joined
Jun 27, 2007
Messages
2,048
Location
Zionsville, Indiana
Nice looking kit. If I may ask, as I have never tried this ,what type of tools did you use on it ?

Waiting on Mike's woodchuck to come in now - however he has turned tru-stone with his skew ever since we started turning. You really do have to stop and sharpen the skew several times while turning a tru-stone blank though if you are going to do it this way as you need a very sharp tool while turning this. This makes it a bit more time consuming than other materials if you don't have a woodchuck.

Linda
 

jttheclockman

Member
Joined
Feb 22, 2005
Messages
19,143
Location
NJ, USA.
Truestone is a nice material to work with or at least the ones I used. Some say that not all truestone reacts the same way. I have found a sharp skew to be the tool as with any kit or blank I have done since I started 2 years ago.

If I may make a couple suggestions on the photos because you are right there. It is more about positioning the pen. Never lay the cap portion down toward us. We all know what the kit looks like. We want to see the material. Center your pen or crop them later on. Take the photos at a 45 degree angle instead of straight down. It gives the pen depth. Just my 2¢

The pen did come out very well and I am sure you will be using that material more often. It makes for a classy look. Thanks for showing.
 

ctubbs

Member
Joined
Sep 12, 2010
Messages
3,588
Location
Murray, Kentucky
The pen is beautiful. Good fit and finish is obvious. Looking at the photos, were they shot on a white background? If so, as I suspect, you are under exposing by about a stop or 1 1/2 stops. Almost all cameras set the exposure expecting an 18% gray card. That is what an average subject looks like to the exposure meter. Shooting white without making any change will turn that subject to an 18% gray much like your backgrounds are. Set your camera on a tripod and force the aperture open by at least one stop and have a look at the pen photo again. I think the detail will show better. Now all this is assuming you can adjust your camera's exposure. PM me if you want.
Charles
 
Top Bottom