
You are using an out of date browser. It may not display this or other websites correctly.
You should upgrade or use an alternative browser.
You should upgrade or use an alternative browser.
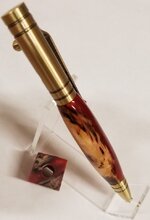
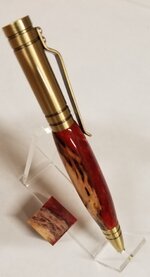
First try at hybrid worthless wood casting - thoughts?
- Thread starter giardinm
- Start date
Signed-In Members Don't See This Ad
See more from giardinm


Signed-In Members Don't See This Ad
Pen Zen
Member
Looks good to me. I would like to make some blanks that looked that good.
MRDucks2
Member
giardinm
Member
Thanks to @coulcd for supplying the "hand harvested" red box elder material to practice with.
SteveAxelrod
Member
Both are pretty blanks. Nice job!
Excellent looking blank castings !!
However, I am not a big fan of the shape to which you turned them ... a little too "bulgie" for me. . I like a little bulge on some kits but not that much, and I would turn the Tec pen blanks almost straight. . Just my opinion for what it's worth.
It seems that you are well on your way to being self-sufficient for really pretty blanks !! . Well done !!
VERY nice website you have created !!!!
Last edited:
acts65
Member
nice! tell us more? what type of wood, resin, dye, mica powder, stabilized, pressure pot? how was your overall experience? Looks great!
TattooedTurner
Member
I think the blanks turned out great but I'm with Mal on this one. Less of a bulge would produce a better looking pen with both kits IMO. The blanks themselves are fantastic, and a little reshaping would take them from "nice" to "beautiful".
I too would like to know more about what you used to create the blanks.
I too would like to know more about what you used to create the blanks.
coulcd
Member
The wood is from a medium sized box elder tree. The tree had died naturally and all except for about 4 feet of the trunk broke off in a storm. I was removing the trunk and noticed good coloring around a crotch about 6 inches above the ground so I kept it. Wood was very dry and a little wormy. It was not sealed or treated before stabilizing.
OZturner
Member
Excellent Blanks Nick
Great Choice of Hardware, Superb Finish.
Congratulations.
Brian.
Great Choice of Hardware, Superb Finish.
Congratulations.
Brian.
giardinm
Member
More information on process
Stabilized with cactus juice from Mesquiteman.
Vacuum chamber form Ebay with 3 cfm vacuum pump.
pumped down for about 1 hour (bubbles pretty much stopped at that point)
Released vacuum and let soak for 2 hours (2X's vacuum time)
put into toaster oven at 225 for 2 hours
Trimmed to a square shape approximately 3/4 by 3/4
(some pieces had curved while drying)
treated silicone mold with stoner mold release
put pieces of wood into mold
Placed wood and mold into toaster oven at 200F to preheat mold and wood
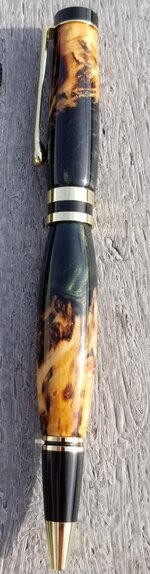
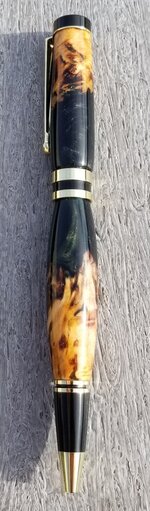
Mixed mulitple colors of alumilite
1.) green alumilite dye with clear alumilite and green interference pearlex
2.) blue alumilite dye with clear alumilite and copper pearlex
3.) once poured and mixed into mold over the pieces of stabilized wood put into pressure pot
4.) pressure pot made from random fittings and harbor freight pressure pot
5.) held at ~ 55 psig for 1 hour
6.) pressure released and cut to 3/4 by 3/4 by 5.5 inches on table saw
7.) continued on through normal pen blank preparation and kit assembly
I didn't find any bubbles or voids inside the wood or acrylic.
Turned like butter.
Ended with 5 coats of CA and sanded and polished.
I wasn't sure about the CA, but the wood seemed to need the extra coating vs the alumilite.
Stabilized with cactus juice from Mesquiteman.
Vacuum chamber form Ebay with 3 cfm vacuum pump.
pumped down for about 1 hour (bubbles pretty much stopped at that point)
Released vacuum and let soak for 2 hours (2X's vacuum time)
put into toaster oven at 225 for 2 hours
Trimmed to a square shape approximately 3/4 by 3/4
(some pieces had curved while drying)
treated silicone mold with stoner mold release
put pieces of wood into mold
Placed wood and mold into toaster oven at 200F to preheat mold and wood
Mixed mulitple colors of alumilite
1.) green alumilite dye with clear alumilite and green interference pearlex
2.) blue alumilite dye with clear alumilite and copper pearlex
3.) once poured and mixed into mold over the pieces of stabilized wood put into pressure pot
4.) pressure pot made from random fittings and harbor freight pressure pot
5.) held at ~ 55 psig for 1 hour
6.) pressure released and cut to 3/4 by 3/4 by 5.5 inches on table saw
7.) continued on through normal pen blank preparation and kit assembly
I didn't find any bubbles or voids inside the wood or acrylic.
Turned like butter.
Ended with 5 coats of CA and sanded and polished.
I wasn't sure about the CA, but the wood seemed to need the extra coating vs the alumilite.