First Stabilized Blank/Pen

Signed-In Members Don't See This Ad
See more from MartinPens

MartinPens

Member
Joined
Apr 3, 2010
Messages
1,813
Location
Medford, Oregon, USA
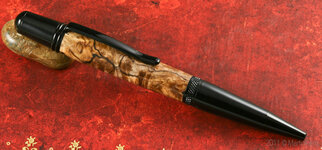
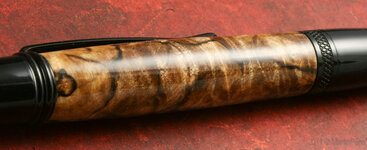
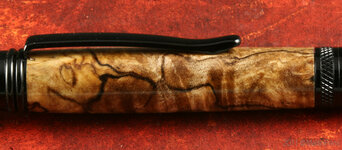
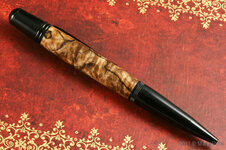
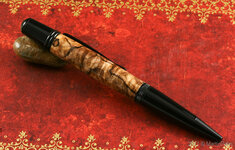
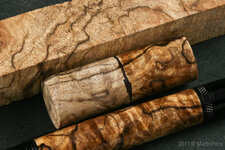
This is stabilized spalted maple from Oregon. It was so punky and brittle that I could snap it easily. Some of it was even dusty.

Stabilized in the Cactus Juice Chamber I won in the IAP Bash. :party:

I cut it long instead of trying to drill through a blank cut at length.
Ends are squared with the standard blank squaring drill attachment. Next time I will knock the corners off on the bandsaw or with the belt sander.
I used a sharp tool and took my time. Turned it proud of the bushings and sanded it to match bushings. I use 220, 320 & 400. 2 coats thin CA and 4 coats medium CA. I touch the tip of a skew to where the bushings meet the blank for separation. 400 light sanding and then micropads. Beale three wheel polishing/buffing and then to the light tent.

Hope you don't mind the details. I've seen lots of newbies on the sight and wanted to put a little method in the thread.

I chose the black Sierra kit because of the challenge in having it so thin. I really wanted to see if it would hold up or if it would crack.

In the photos I tried to get one with a lot of reflection, which isn't easy to do with my setup. The nicest part of the stabilization is how it makes the grain shimmer and pop inside.

When I get more juice and do a few more batches of stabilizing, I'll be offering these blanks in the individual classified section.

Comments are welcome. Thanks Curtis for the great prize!

Martin
 

Attachments

  • 1Stable-9126.jpg
    1Stable-9126.jpg
    399.9 KB · Views: 236
  • 1Stable-9129.jpg
    1Stable-9129.jpg
    274.1 KB · Views: 236
  • 1Stable-9130.jpg
    1Stable-9130.jpg
    319.9 KB · Views: 241
  • 1Stable-9128b.jpg
    1Stable-9128b.jpg
    410.8 KB · Views: 257
  • 1Stable-9124b.jpg
    1Stable-9124b.jpg
    436.3 KB · Views: 178
Signed-In Members Don't See This Ad

ToddMR

Member
Joined
May 3, 2010
Messages
1,715
Location
Columbus, OH
Martin looks like you did a nice job! I like reading the details on the posts. I admit I normally don't include too much detail myself anymore unless it has to do with the mishap I had while turning or something else. The fit and finish looks nice. I like the wood and the choice of kit as well.
 

paps

Member
Joined
Dec 7, 2010
Messages
143
Location
Bryan, TX
That's some beautiful wood and it really goes well with that kit. Thanks for showing it and the added info.
 

Arcadia

Member
Joined
Mar 18, 2011
Messages
19
Location
Waynesboro, TN
Really great job Martin! That wood looks totally cool with the black pen. Appreciate the details being a total newbie.

Pat
 

MartinPens

Member
Joined
Apr 3, 2010
Messages
1,813
Location
Medford, Oregon, USA
G1Pens said:
Looks great. So I take it you like the cactus juice system?

I do like it. Curtis is one busy guy, but has taken the time to respond to my messages and the learning curve is in session. I was cooking/curing the blanks at too hot of a temp. I'm hoping to do a single layer batch today and see what a difference there is in a 200 degree oven verses 240. That's after I get a thermometer and see what the temp really is in the $10 thrift store toaster oven. The juice penetrates well. I really put it to the test because the wood was literally dusty in places and I was able to turn it down (sand it down in final stages) to Sierra kit thinness! Adding dyes is a next step sometime soon. Thanks

Martin

Sent from my iPad using Forum Runner
 

wiset1

Member
Joined
Aug 25, 2010
Messages
2,222
Location
Florida
Martin, I really like it and it works well with the kit! Spalted is really difficult to work raw and it's great that you're informing the newer turners what needs to be done with this type of wood.
 

wizard

Member
Joined
Aug 27, 2009
Messages
3,569
Location
Houston, Texas
Martin, You did a great job of salvaging some wood that turned out beautiful. Did the wood darken some as you infused it with the resin?. Looks gorgeous particularly the darker wood on that kit. Fit, finish and photos are excellent as usual. Thanks for showing. Regards, Doc P.S. You are lucky..I tried to order a system and...they were out...:frown: Curtis is probably making some more.:)
 

MartinPens

Member
Joined
Apr 3, 2010
Messages
1,813
Location
Medford, Oregon, USA
Doc, right out of the chamber they look significantly darker. But after they cure in the toaster oven they lighten up again. I will do a comparison and post a before and after pick. Quite honestly the resin was great improvement to the blanks. It made the grain shimmer. I don't think they are any darker at all. The CA glue darkened and enhanced them a bit, as it usually does, but the grain shimmers more. I'll take some stage picks and post on this thread soon. Martin

Sent from my iPad using Forum Runner
 

itzapen

Member
Joined
Apr 20, 2010
Messages
103
Location
Houston Texas
great lookin' pen. Great stabilizing system also. Right now I'm stabilizing/dyeing a batch of spalted maple as I type this and watchin' the NCAA game. Gotta love that multi-taskin' LOL
 

ctubbs

Member
Joined
Sep 12, 2010
Messages
3,588
Location
Murray, Kentucky
Martin, that is a beautiful piece of timber you rescued and on that kit, together they make a wonderful pen. Congratulations.
Doc, I guess you and I will just have to stand by twisting our hair until Curtis makes time to build more of his chambers. I nearly bought one the other day, put it off one day and then he was out. I have been beating myself about the head and shoulders with wet noodles every since. Just sit and wish until he makes more, I guess.
Charles
 

MartinPens

Member
Joined
Apr 3, 2010
Messages
1,813
Location
Medford, Oregon, USA
Thanks! Working on some photos right now of what the blanks look like before, after the curing process and turned with and without CA. Will be posting soon.

Martin

Sent from my iPad using Forum Runner
 

MartinPens

Member
Joined
Apr 3, 2010
Messages
1,813
Location
Medford, Oregon, USA
before and after

So here the top blank is before stabilizing and the bottom is after. The second shot is an original blank unstabilized, a round cutoff with the left side sanded with no CA and right side with CA finish and then the finished pen. You can see, hopefully clearly, the salvage that was done with the juice. More juice on order. Doing a large batch and then making some of these blanks available on the forum.

Martin
 

Attachments

  • b4after-9169b.jpg
    b4after-9169b.jpg
    422.4 KB · Views: 88
  • b4after-9170b.jpg
    b4after-9170b.jpg
    403.1 KB · Views: 93
Top Bottom