First Rinehart Rollerball

Signed-In Members Don't See This Ad
See more from Dan Masshardt

Dan Masshardt

Member
Joined
Jan 30, 2013
Messages
4,806
Location
Mechanicsburg, PA
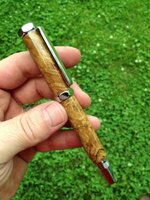
I think this is a Briskar-burl, but I honestly can't remember for sure.

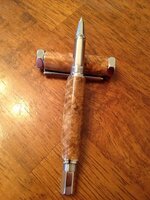
I love being able to be able to use these tubes / bushings to make a number of pen styles - Baron/Navigator, Sedona, Rhinehart etc.

The kit felt too light to me at Woodcraft, but I ordered one in my last purchase from Exotics, and am pleased with it.

As a matter of fact, I really like it.
 

Attachments

  • image-1360790587.jpg
    image-1360790587.jpg
    45.8 KB · Views: 295
  • image-1742324109.jpg
    image-1742324109.jpg
    47.1 KB · Views: 252
Signed-In Members Don't See This Ad
Joined
Feb 24, 2012
Messages
4,368
Location
Claremont NH
The rhinehart kits are really nice kits. That size is another that has lots of variations on exactly the same tubes. Makes it nice... Great job Dan.
 

BSea

Member
Joined
Dec 28, 2009
Messages
4,628
Location
Little Rock, Arkansas
That's a very nice pen. I'm guessing the wood might be spalted maple burl. Or even spalted white oak burl. The cap looks kinda like oak.
 

NittanyLion

Member
Joined
Feb 3, 2013
Messages
804
Location
State College PA
Briskar-burl? Must be a new species found in the central mountains of Pennsylvania.......I did have some white oak burl with some spalting....could be that. I believe you also have some of my maple burl....tough to tell from the pic. Is that Mike's finishing technique with reverse sanding? Looks great!
 

OOPS

Member
Joined
Feb 6, 2010
Messages
674
Location
Spokane, WA
I really like this pen style too Dan, and I will pass along a tip that someone else posted on this site. He said that when assembling the cap, take great care so that the flat surfaces of the two "nuts" align perfectly. If you do, he said, the pen looks even better. I have been doing that myself, and find that he was correct.

It is hard to tell from the photos of your pens, but it looks like the top "nut" is just a bit out of alignment from the lower. This assembly tip might be worth considering the next time you put one of these together.
 

Dan Masshardt

Member
Joined
Jan 30, 2013
Messages
4,806
Location
Mechanicsburg, PA
I really like this pen style too Dan, and I will pass along a tip that someone else posted on this site. He said that when assembling the cap, take great care so that the flat surfaces of the two "nuts" align perfectly. If you do, he said, the pen looks even better. I have been doing that myself, and find that he was correct.

It is hard to tell from the photos of your pens, but it looks like the top "nut" is just a bit out of alignment from the lower. This assembly tip might be worth considering the next time you put one of these together.

I did think about that when I assembled it. It is pretty close. Maybe not absolutely perfect but basically aligned right.
 

BSea

Member
Joined
Dec 28, 2009
Messages
4,628
Location
Little Rock, Arkansas
I really like this pen style too Dan, and I will pass along a tip that someone else posted on this site. He said that when assembling the cap, take great care so that the flat surfaces of the two "nuts" align perfectly. If you do, he said, the pen looks even better. I have been doing that myself, and find that he was correct.

It is hard to tell from the photos of your pens, but it looks like the top "nut" is just a bit out of alignment from the lower. This assembly tip might be worth considering the next time you put one of these together.

Looking at the 1st picture it looks like it may be a bit off, but in the 2nd pic, it looks perfect. You should also align the facets on the bottom finial to match, and those don't look aligned to me. But to be honest, I'd not noticed until I read the post by OOPS.
 

Dan Masshardt

Member
Joined
Jan 30, 2013
Messages
4,806
Location
Mechanicsburg, PA
Looking at the 1st picture it looks like it may be a bit off, but in the 2nd pic, it looks perfect. You should also align the facets on the bottom finial to match, and those don't look aligned to me. But to be honest, I'd not noticed until I read the post by OOPS.

I did NOT check that. :).
 
Joined
Jan 25, 2011
Messages
819
Location
Philla., Pa.
I really like this pen style too Dan, and I will pass along a tip that someone else posted on this site. He said that when assembling the cap, take great care so that the flat surfaces of the two "nuts" align perfectly. If you do, he said, the pen looks even better. I have been doing that myself, and find that he was correct.

It is hard to tell from the photos of your pens, but it looks like the top "nut" is just a bit out of alignment from the lower. This assembly tip might be worth considering the next time you put one of these together.

I believe that was me. Glad you found the tip helpful. The cap and both finials can be lined up. Honestly, it's not something most really notice when they aren't lined up, but you do notice when they are, if that makes any sense.
 

Dan Masshardt

Member
Joined
Jan 30, 2013
Messages
4,806
Location
Mechanicsburg, PA
I believe that was me. Glad you found the tip helpful. The cap and both finials can be lined up. Honestly, it's not something most really notice when they aren't lined up, but you do notice when they are, if that makes any sense.

Also, we are probably our own worst critics (like a musician who knows something is slightly off) and there is something self gratifying about knowing its 'right.'
 

Dale Allen

Member
Joined
Oct 27, 2012
Messages
1,384
Location
Massillon, OH
Looks great Dan.
As for making the flats line up........how often do we get that particular with a nut and bolt. It would not matter to me. In fact, it they were lined up I'd consider that it may have been 'done that way on purpose'! :biggrin:
 
Top Bottom