
You are using an out of date browser. It may not display this or other websites correctly.
You should upgrade or use an alternative browser.
You should upgrade or use an alternative browser.
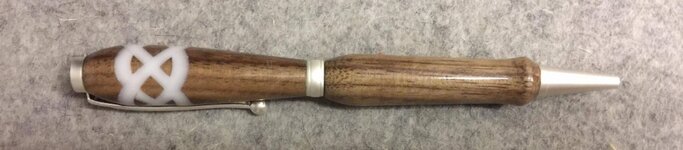
First presentable Celtic Knot pen I have made
- Thread starter Buddy Stacy
- Start date
Signed-In Members Don't See This Ad
See more from Buddy Stacy


Jump in Bob. The water is fine. I will say this I have done it both ways and need to do it both ways for what I do. But the short answer it is more beneficial to not cut all the way through to keep the alignment easier to maintain. But as i stated above, if you do this the inlay material must be pretty accurate and the glue used should be able to take up any gaps.
Now if cutting all the way through the thing that really jumps out is accuracy in lining up your cuts. This will dictate how well the knot looks. A jig to hold the pieces in line is needed. for this I use a piece of aluminum angle to keep things true and flat. This system definitely needs clamping in all directions. A little more challenging to do this way but can be done.
Buddy If you are using thick CA there is no way that is drying in a few minutes. Even if you hit it with accelorator. By fill I mean no matter how close you get the inlay material there will be some gap and the fill of this gap is important or it will show up on the knot. If you are that close when you clamp it then good for you but I try not to use clamps in that situation. what you do is close the top but the bottom where you left that little piece does not move. I do believe as I said your drilling process is the key for you to solve and then go from there. Good luck and keep showing us your progress.
1/8" is fine but what happens when turned and it now is on an angle the material flattens out and it becomes wide than 1/8". Stretching the knot will help there.


Signed-In Members Don't See This Ad
jttheclockman
Member
Hello Buddy
Maybe we can help you get there a little faster. If you give us a little background into how you are making these we can analyze it for you and help some. Just tell us
----what tool you are using to make them
----what is the thickness of the blade
----what angle are you cutting at
----what glue are you using
----are you cutting all the way through your blank
----do you have a jig to get repeatable cuts
----how are you gluing your inlays
I will hold my comments till I read your responses. I see a few things we can fix right away but will hold. You will be doing celtic knots like the pros in no time. :biggrin: You have the basic principle down but just need a little tweeking.
Last edited:
Buddy Stacy
Member
----what tool you are using to make them
Tablesaw
----what is the thickness of the blade
1/8", maybe just a bit over. The plexi is 1/8" and I think it could fit a little more snugly
----what angle are you cutting at
45 degrees
----what glue are you using
CA
----are you cutting all the way through your blank
No
----do you have a jig to get repeatable cuts
Yes
----how are you gluing your inlays
CA on the inlay, evenly coat the kerf, clamp for 2-3 minutes before cutting the next.
My biggest issue is I have a very hard time drilling dead center. My bit wanders as I go through. What starts as a center cut may be off as much as 1/8" or more on bottom. I have checked the alignment of my drill press and it is plumb, just don't know how to stop the bit from wandering. I take small cuts and clear the hole after each cut. This helps, but still not perfect.
Sent from my iPhone using Penturners.org mobile app
Last edited:
jttheclockman
Member
OK Buddy thanks for reporting back. Yes the first thing that jumps out is the drilling portion. The next thing that jumps out at me is the thickness is too much. It more or less hides the design.
Let start at the beginning. The table saw is a perfect saw to do these on even though they can be done with a miter saw (hand or motorized) or a bandsaw. I suggest you get yourself a thinner blade. This has a .090 kerf and is one I like to use many times www.amazon.com/Freud-Tooth-Crosscut...id=1490541981&sr=1-5&keywords=freud+thin+kerf
But you can get even thinner if you would like. You can use a 7-1/4" blade on your tablesaw which can get down to 1/16" kerf. The reason for a thinner kerf is to let the inlays breathe in the design. The other way to accomplish this is to use a greater angle in your cuts, like say 60 degrees instead of 45 and this too looks nice. It enlongates the knot on the blank so it covers more area.
Now the important thing when cutting is to exactly match the inlay material to the kerf size of the blade. I would suggest a tad less to allow for glue. If you do this there is no need for clamps especially if you use epoxy. I like epoxy because it fills any voids and makes sure there is complete coverage to prevent blow outs. When you make your cuts and do not go all the way through the blank and clamp it tight, you throw your pattern off if everything is not perfect. That inlay can be laying against one side of the blank more than another because more glue on the opposite side. Do this 4 times and and the errors are multiplied. You see this when people show the knot and all 4 quadrants of the knot are not equal. The 2 opposite quadrants should always be equal and that is the mark of a great knot.
If you are using CA and able to make your next cut in a couple minutes tells me you are not using thick CA. That means there is no fill of your kerf when cut and you need to be dead accurate with blade kerf to inlay material and that is very tough to do. I can not do it and do not even try. I use the above mentioned method.
Now the most important part of a good celtic knot or any segmented blank is accuracy in drilling. Trying to drill accurately on a drill press is very very tough unless that drill press is highly tuned and there is no runout in the chuck. I suggest you drill these on your lathe. I suggest when you make your blank to make it absolutely square ( can be done round but that is a whole other set of problems and knowledge) I suggest a set of pen jaws. You can get the Nova pen jaws or you can get a PSI pen jaws. Timberbits has a better quality set of pen jaws though if you ask me. I could also suggest you turn the blank round and use a collect chuck but that requires you to find dead on centers of that blank and place between center to turn. Acurracy need level jumps up here because the knot will show crooked if not.
Any material can be used for inlay as long as it is proper thickness.
So to sum this up, the drilling part is the first major step you need to overcome and all the rest is cosmetics but they all tie together to make a nice looking and accurate knot. Good luck and hope something in here helps.
Bob Kardell
Member
Not to budge into the tread ... but ... I have not made one of these but I want to and am I the middle of building a jig - is it better to cut all the way through or not? Or does it really matter as long as you match your technique to your cut?
Sent from my iPhone using Penturners.org mobile app
Sent from my iPhone using Penturners.org mobile app
Buddy Stacy
Member
Wow! Loads of information to work through.
I will say that I am using the thicker material at a 45 degree angle on purpose. Being new to this method I felt it would be easier to use 1/8" material with a 1/8" blade as a learning process.
And I am indeed using a thick CA. I am not seeing any issues with bonding using this glue. I don't understand what you mean by "...there is no fill of your kerf when cut...". Yes, I know what a kerf is. But what do you mean by fill? The inlay touches side to side with a thin layer of thick CA. Even though I am clamping it, as per your suggestion above about allowing room for the glue, I may not actually need to. The inlay slides in smoothly with no play once it is in the kerf. I just felt maybe it should fit more snugly but to have room for the glue, it's probably right where it should be.
I will certainly take your words to heart and play around some more. I had not thought of using the lathe to drill. I will need to get some new jaws for my Nova chuck as I only have what came with them and I don't think they will do well for this.
Thank to very much for taking the time to share your knowledge! Now to practice, a lot!!! Lol
Sent from my iPhone using Penturners.org mobile app
jttheclockman
Member
Not to budge into the tread ... but ... I have not made one of these but I want to and am I the middle of building a jig - is it better to cut all the way through or not? Or does it really matter as long as you match your technique to your cut?
Sent from my iPhone using Penturners.org mobile app
Jump in Bob. The water is fine. I will say this I have done it both ways and need to do it both ways for what I do. But the short answer it is more beneficial to not cut all the way through to keep the alignment easier to maintain. But as i stated above, if you do this the inlay material must be pretty accurate and the glue used should be able to take up any gaps.
Now if cutting all the way through the thing that really jumps out is accuracy in lining up your cuts. This will dictate how well the knot looks. A jig to hold the pieces in line is needed. for this I use a piece of aluminum angle to keep things true and flat. This system definitely needs clamping in all directions. A little more challenging to do this way but can be done.
jttheclockman
Member
Wow! Loads of information to work through.
I will say that I am using the thicker material at a 45 degree angle on purpose. Being new to this method I felt it would be easier to use 1/8" material with a 1/8" blade as a learning process.
And I am indeed using a thick CA. I am not seeing any issues with bonding using this glue. I don't understand what you mean by "...there is no fill of your kerf when cut...". Yes, I know what a kerf is. But what do you mean by fill? The inlay touches side to side with a thin layer of thick CA. Even though I am clamping it, as per your suggestion above about allowing room for the glue, I may not actually need to. The inlay slides in smoothly with no play once it is in the kerf. I just felt maybe it should fit more snugly but to have room for the glue, it's probably right where it should be.
I will certainly take your words to heart and play around some more. I had not thought of using the lathe to drill. I will need to get some new jaws for my Nova chuck as I only have what came with them and I don't think they will do well for this.
Thank to very much for taking the time to share your knowledge! Now to practice, a lot!!! Lol
Sent from my iPhone using Penturners.org mobile app
Buddy If you are using thick CA there is no way that is drying in a few minutes. Even if you hit it with accelorator. By fill I mean no matter how close you get the inlay material there will be some gap and the fill of this gap is important or it will show up on the knot. If you are that close when you clamp it then good for you but I try not to use clamps in that situation. what you do is close the top but the bottom where you left that little piece does not move. I do believe as I said your drilling process is the key for you to solve and then go from there. Good luck and keep showing us your progress.
1/8" is fine but what happens when turned and it now is on an angle the material flattens out and it becomes wide than 1/8". Stretching the knot will help there.
Last edited: