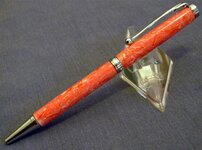
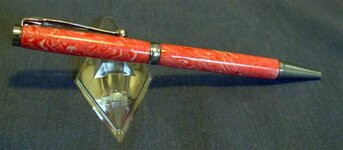
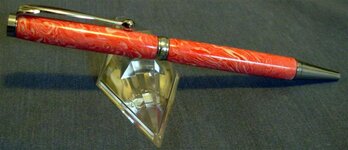
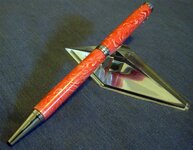
First Polymer Clay: Damascus White, Red, & Pink

Signed-In Members Don't See This Ad
See more from ghostrider

ghostrider

Member
Joined
Feb 3, 2011
Messages
952
Location
Grand Rapids, Michigan
I've been playing with Polymer Clay lately, and so far have not had a lot of success. I did this because I want to do some Damascus with metal colors, but used these colors first for practice. All-in-all I'm not all that unhappy with the way it turned out. I like the look even though it is pink.

Still a lot of room for improvement though. I don't know why, but for some reason the clay did not stick to the tubes, and it also seemed sort of flimsy when I managed to slide one of the tubes out to glue it in. I can't really tell for sure what went wrong since I baked two different types/brands at the same time, so this one was baked at a higher than called for temp. That wasn't all that much a concern as this was just practice anyway.

I know it doesn't fit the bushings right, but that's because I just didn't want to push my luck with the tubes wanting to slide out (kind of). I probably should have just junked it and started over, but I liked the look so much it seemed a waste to through it out just because it was sub-par.


Thanks for looking. All comments and critiques welcome.
 

Attachments

  • DSCN1252 (Medium).JPG
    DSCN1252 (Medium).JPG
    69.5 KB · Views: 440
  • DSCN1259 (Medium).JPG
    DSCN1259 (Medium).JPG
    41 KB · Views: 211
  • DSCN1263 (Medium).JPG
    DSCN1263 (Medium).JPG
    44.2 KB · Views: 182
  • DSCN1264 (Medium).jpg
    DSCN1264 (Medium).jpg
    63.8 KB · Views: 339
Signed-In Members Don't See This Ad

ghostrider

Member
Joined
Feb 3, 2011
Messages
952
Location
Grand Rapids, Michigan
It came out good!! Trying to figure out what went wrong.......:confused:
It's a mixture of Sculpey III, and Premo. I also made another set of tubes out of Kato, and baked them both together at a little over 300 for an hour (Kato tubes were pretty thick).

I followed the instructions laid out in your tutorial, and used a sheet of poly clay as glue.

On these tubes, for some reason they just didn't stay adhered to the brass. I also noticed a couple voids on one of the tubes.
 

SDB777

Member
Joined
Feb 6, 2010
Messages
6,620
Location
Cabot, Arkansas USA
Maybe it's the rum-n-coke viewing these....but are they more orange to anyone else?


I really like the layering that I'm seeing, and it does remind me of the damascus knife blades a little(different color of course).


Scott
 

leehljp

Member Liaison
Joined
Feb 6, 2005
Messages
9,326
Location
Tunica, Mississippi,
Looks great for the first time. You beat me to the draw. I picked up some PC last week to try some mokume - or damascus - but since my background was in Japan I go with mokume. :wink:

I really want to do this but it is a few weeks away yet. That looks good - but it reminds me more of what some are trying to achieve with Urushi or Japanese lacquer. I say that because that is near the color of one of the most popular lacquer colors.
 
Last edited:

Toni

Member
Joined
Feb 23, 2010
Messages
2,042
Location
Phenix City, Alabama
It came out good!! Trying to figure out what went wrong.......:confused:
It's a mixture of Sculpey III, and Premo. I also made another set of tubes out of Kato, and baked them both together at a little over 300 for an hour (Kato tubes were pretty thick).

I followed the instructions laid out in your tutorial, and used a sheet of poly clay as glue.

On these tubes, for some reason they just didn't stay adhered to the brass. I also noticed a couple voids on one of the tubes.

Well first thing wrong is using Sculpey III dont use it might crack over time and doesnt hold up well. The kato one should have turned out great, so I am a bit clueless as to what happened. Was it conditioned really good? Kato is a very hard clay to condition. I dont use it often for that reason but its a great clay!!

Dont know why it didnt adhere, wish I could be of more help, sorry...Toni
 

ghostrider

Member
Joined
Feb 3, 2011
Messages
952
Location
Grand Rapids, Michigan
Looks great for the first time. You beat me to the draw. I picked up some PC last week to try some mokume - or damascus - but since my background was in Japan I go with mokume. :wink:

I really want to do this but it is a few weeks away yet. That looks good - but it reminds me more of what some are trying to achieve with Urushi or Japanese lacquer. I say that because that is near the color of one of the most popular lacquer colors.
Actually, I went a little too far with the folding and needing. It was just red and white, but mixed to the point of turning pink.

Scott, I had a very difficult time getting the colors this close to real. I spent a better part of the morning trying to get good shots, and finally started over. Sometimes different computers look different. I experienced that when I was tying lanyards and fobs out of parachute cord.
 

ghostrider

Member
Joined
Feb 3, 2011
Messages
952
Location
Grand Rapids, Michigan
It came out good!! Trying to figure out what went wrong.......:confused:
It's a mixture of Sculpey III, and Premo. I also made another set of tubes out of Kato, and baked them both together at a little over 300 for an hour (Kato tubes were pretty thick).

I followed the instructions laid out in your tutorial, and used a sheet of poly clay as glue.

On these tubes, for some reason they just didn't stay adhered to the brass. I also noticed a couple voids on one of the tubes.

Well first thing wrong is using Sculpey III dont use it might crack over time and doesnt hold up well. The kato one should have turned out great, so I am a bit clueless as to what happened. Was it conditioned really good? Kato is a very hard clay to condition. I dont use it often for that reason but its a great clay!!

Dont know why it didnt adhere, wish I could be of more help, sorry...Toni
This one wasn't Kato, but white Sculpey III, and Premo red.

I haven't tried to turn the Kato yet (put it on pretty thick). I probably worked the kato each color for anywhere between one and two hours. The yellow I used was so hard that I finally put some Scupley clay softener in it just to soften it up a bit.

I've got yellow in Sculpey, Premo, and Kato, from three different stores, and all of them were on the hard side when I bought them. Every package those stores had in stock were like that, because I looked through to get the softest one. The Kato yellow I needed while watching a movie, and that's well over an hour and it still was crumbly. So, I thought I'd try the clay softener, and it helped.

For some reason though, the Kato just didn't seem to want to stick together. I ordered some Kato Glue for that problem.

When I put it on the tubes, it separated at the seam while baking. We'll see how it turns out.


With the red/white (Premo/Sculpey III), I made a sheet of Sculpey III for the tubes, then rolled the layered stuff over it like you recommend. It didn't come out too uniform, so I'm chalking it up to inexperience.
 

timhoman0351

Member
Joined
Jun 30, 2012
Messages
8
Location
Orlando Florida
Try scuffing tubes with 80 grit or the edge of a small file to give more grip to tube.I use liquid Polyclay on the tube before putting on clay.The voids are from rolling the clay on the tube and the clay spreading away from the tube.Pinch and roll and let it rest a while before final roll so the clay may firm up a little.Also the liquid Polyclay can be colored and be used to make transfers.Im still doing trials on this stuff and am happy to say its applications for use in pen making are endless.
 

Drstrangefart

Member
Joined
Sep 15, 2010
Messages
4,258
Location
Woodstock, Ga. U.S.A.
I use FIMO when I do mine. I've found wide discrepancy between different brands of clay. Mine are all glued to the tubes with thick CA. Also, letting it cool overnight will firm it up a lot. I just make mine blank size and turn it on the lathe like a regular blank, only a lot more carefully. Haven't done one in some time now, but I might give it another shot down the road a piece. I'm enjoying home-casting a bit too much right now.
 

ghostrider

Member
Joined
Feb 3, 2011
Messages
952
Location
Grand Rapids, Michigan
Try scuffing tubes with 80 grit or the edge of a small file to give more grip to tube.I use liquid Polyclay on the tube before putting on clay.The voids are from rolling the clay on the tube and the clay spreading away from the tube.Pinch and roll and let it rest a while before final roll so the clay may firm up a little.Also the liquid Polyclay can be colored and be used to make transfers.Im still doing trials on this stuff and am happy to say its applications for use in pen making are endless.
Sorry for not responding to you and Drstrangefart. I didn't realize this thread was revived.

I do scuff the tubes, and will try some of the liquid that your talking about. I've got a bunch of the colored stuff (as well as the clear) left from when I made the candy stripe blanks for the SegBox. So I'll probably try that. I also have some of the Kato PolyPaste that is supposed to act like an adhesive (it's just a thicker version of the liquid polyclay).

Since this thread I've done several clay tubes. Still have problems with the voids. For me I think the voids are where the different colors separate. I'm starting to try some light kneading after slicing the cane to try to get those pockets out.
 

ghostrider

Member
Joined
Feb 3, 2011
Messages
952
Location
Grand Rapids, Michigan
I use FIMO when I do mine. I've found wide discrepancy between different brands of clay. Mine are all glued to the tubes with thick CA. Also, letting it cool overnight will firm it up a lot. I just make mine blank size and turn it on the lathe like a regular blank, only a lot more carefully. Haven't done one in some time now, but I might give it another shot down the road a piece. I'm enjoying home-casting a bit too much right now.
I've done a bit with Fimo also (Look for my Presimo done with Fimo soon in the SOYP section) also. I like that the bake temp is so low with it, and I've started baking my tubes two, and sometimes even more times to get it harder. The one think I like about Kato is that it keeps it's colors well, and it can get super hard when you play with the bake settings (I did this after talking with the guy who lab tests it, and also after reading his posts on FB. I've now taken to baking it at 325*, instead of 300*. I've also started waiting overnight also as I agree it sometimes does seem to get firmer.
 
Top Bottom