
You are using an out of date browser. It may not display this or other websites correctly.
You should upgrade or use an alternative browser.
You should upgrade or use an alternative browser.
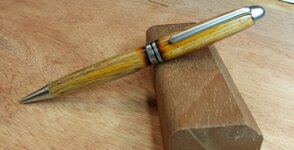
First pen ever!
- Thread starter Mengtian
- Start date
Signed-In Members Don't See This Ad
See more from Mengtian


Yep.

Cocobolo


It is Cocobolo. Lots of coloring, like someone else said, much of it is sapwood.
I may have to steal that idea. Your pen came out real nice! GREAT JOB!

Signed-In Members Don't See This Ad
CREID
Member
That's a very nice pen, especially for your first. I really like the accents.
Curt
Curt
cainmycoffee
Member
That looks awesome.
Charlie_W
Member
Super job for your first pen!
Can I ask about the coloring of the blanks near the center band?
Can I ask about the coloring of the blanks near the center band?
mecompco
Member
Very nice! I, too, would like to know about the accents. Personally, and this is just MHO, I would have slimmed down the lower barrel a bit. Keep up the great work!
Regards,
Michael
Regards,
Michael
Skie_M
Member
I was about to say .... looks like you got overzealous with the sanding to face your blank and you burned the wood! But hey, it does make for an interesting design addition! ")
Dan Masshardt
Member
I think the proportions are good and I actually like the burned part.
GaryMGg
Member
I think the proportions are good and I actually like the burned part.
Yep.
Jim15
Member
Great looking first pen.
Looks good !! What type of wood ?
Cocobolo
1080Wayne
Member
Not like any piece of cocobolo I`ve ever seen .
Dan Masshardt
Member
When I first saw it I thought maybe oak but on another look it does look like cocobolo sapwood. sapwood would explain why it's not familiar.
JimB
Member
I like the accents. Great job. Congrats!
Jack Parker
Member
Very nice looking pen! Great job!!
kruzzer
Member
You are now a pen maker...great job
ELA
Member
Very nice! I like the color of the wood. Your choice for the kit and blank are a good combination.
Not like any piece of cocobolo I`ve ever seen .
It is Cocobolo. Lots of coloring, like someone else said, much of it is sapwood.
Skie_M
Member
I have a very small amount of cocobolo sapwood ... mostly attached to some small crosscut slabs I have. It is indeed a light tan color, but it's VERY light and soft ... MUCH softer than the cocobolo heartwood we're all used to. If you've ever dealt with Northern Texas Mesquite and it's sapwood compared to it's heartwood, you know exactly what I'm talking about.
Drewboy22
Member
The accents or "burn" marks are just that. I jacked the speed of the lathe up and put another piece of wood on the edges to burn them slightly.
Just kind of came to me.
I may have to steal that idea. Your pen came out real nice! GREAT JOB!
ToddM
Member
Very nice! I may have to borrow the idea of the burn marks also!...... Ok, so I'm stealing it too, but borrow sounds nicer! :wink:
jsolie
Member
Very nice! I like the how you did the accent part. Will have to try that at some point.
Skie_M
Member
There are several ways you can manufacture burn marks or accent your pens and other work ...
Take a piece of really sap-full wood that contrasts in color (darker) and hold it against your nearly finished piece for a few seconds at high speed to burn the resin color into the workpiece... (very similar to what you did, but it adds additional color to the piece ... cedar, cherry, or mahogany for red ... ebony or blackwood for black ...)
Hold some steel piano wire (use holders on the ends, the wire will get VERY hot) to cut/burn a mark into the workpiece as it spins at high speed ... (leaves a burn line around the pen - several in a row can function as a grip)
Cut small lines around your workpiece and glue some copper, brass, or aluminum wire into the line so that it just barely stands proud of the wood (use CA glue) and sand it back to match the surface of the workpiece ... (Gives a metal inlay of the desired metal)
Cut wider and deeper lines around your workpiece and glue some crushed (think rice grain or smaller) stone into the line. Use a semi-precious and fairly soft stone, like (blue/green) turquoise, (deep green) malachite, (red) jasper, (yellow) serpentine, (deep blue/purple) sodalite, ect ... Use CA to glue it in place, and leave it just a little proud of the pen's surface. Sand it back to match the pen contours. If there are any voids where a piece of stone can go, stop and glue some more stone in, and repeat till you have a beautiful unbroken surface. (Gives a crushed stone inlay of the desired color genuine stone)
There are many other ways to accent your pens as you make them, none of them are wrong, because they're all beautiful to someone!