First Kitless

Signed-In Members Don't See This Ad
See more from davinci27

davinci27

Member
Joined
Sep 5, 2008
Messages
511
Location
Franklin, GA
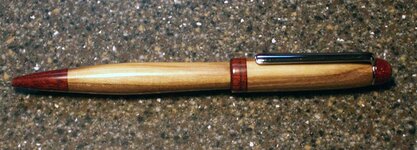
So I got intrigued by the whole kitless concept. The pen is blood wood and BOW with a CA finish. It is based on a euro kit. This pen isn't quite as kitless as some, but I replace many of the parts with custom pieces. I've got to work on recessing the clip. Then I can pull parts from other places.

This project did bring up a question though. How do you press pieces into pens that have wooden nibs? I pressed the transmission in before attaching the nib. Then I used the transmission to hold the pen while I finished it. But it was pretty wobbly during the CA application. It would have been nice if I could have finished sanded and aplied CA prior to pressing in th transmission.
 

Attachments

  • IMGP1911.jpg
    IMGP1911.jpg
    58.4 KB · Views: 362
Signed-In Members Don't See This Ad

ldb2000

Member
Joined
Sep 11, 2007
Messages
5,381
Location
Laurence Harbor, NJ, USA.
That is an excelent example of a kitless pen . Beautiful job , I love it .:good::good::good:.
For finishing I use a jam chuck and the tailstock to hold the blanks before I press in the transmission and finial .

Please post this pen in the "Kitless Challenge" thread over in the Advanced pen turning forum so other people can have examples of kitless ballpoint pens to view all in one place , as a reference , rather then having to have to go through all the posts here in SOYP
 

bitshird

Member
Joined
Aug 27, 2007
Messages
10,236
Location
Adamsville, TN, USA.
Ben I would suppose is your given name? The pen is really very nice, I have never considered a wooden nib, I've made nibs out of stainless, brass, and aluminum, but never wood, there is a tutorial or article in the library that deals with J clips, again I haven't looked at it in some time, I made two Sterling clips which are both still on my bench, but back to your pen, I think the deal was that it use a cross refill and slimline transmission, have a shop made finial, and center band, I may be mistaken about the CB it may not be necessary, that is a pretty pen, did you recess the nib into the lower barrel or is it just glued on face to face?
 

rherrell

Member
Joined
Aug 22, 2006
Messages
6,334
Location
Pilot Mountain, NC
Get yourself a .249" chucking reamer and ream out the tube before installing the transmission. It will slip right in with light (er) pressure but will still be tight enough to operate correctly.
 

davinci27

Member
Joined
Sep 5, 2008
Messages
511
Location
Franklin, GA
Butch - Thanks, I posted it over in the kitless challenge thread.

Ken - Yep Ben's the name. The nib has a tenon that is slid into the lower barrel. After I glued them together, I put them back on the lath and finished sanding the 2 pieces then applied the CA finish.

Rick - Thanks for the suggestion, I'll look into that now. I like the whole kitless concept so I'll probably be looking for more pointers like this.
 

PaulDoug

Member
Joined
Mar 2, 2008
Messages
3,488
Location
Benton City, WA.
Ben, very nice job on that pen. I really like the wood combo. Great job. More satisfying and rewarding than a straight kit pen, isn't it? Don't know if they sell but sure fun to make.

Is the detail ring on the CB and nib burned in ot is it metal? Again, great job.
 
Last edited:

davinci27

Member
Joined
Sep 5, 2008
Messages
511
Location
Franklin, GA
Paul- Thanks. They are fun, but they take a while. I spent more time on the nib than I spend on a regular slime or euro. I'm sure it'll go faster as I get more practice. I haven't really started selling pens yet, so I don't know how they would sell.

The detail ring in the center and on the nib are gray pearl ex. I used the skew to cut a small groove, then filled the grove with pearl ex and put a few drops of thin ca over to hold the powder together.
 

workinforwood

Member
Joined
Mar 1, 2007
Messages
8,173
Location
Eaton Rapids, Michigan, USA.
Great pen Ben! I put the nib in before the tranny. I use the pen press which allows the tip to go into a hole so the press is actually pushing uniformly around the nib and a bit further up in the meatier section rather than pushing directly straight on the tip and haven't had a problem. I would have used a 7mm expanding mandrel available at arizona sillouette at a very reasonable price, to apply and sand a CA finish before installing tranny. I spray the expanding mandrel first with bostick tablesaw slick so no CA will damage the mandrel!
 

davinci27

Member
Joined
Sep 5, 2008
Messages
511
Location
Franklin, GA
Thanks, I use the drill press to press my parts together, but I was thinking about just using a scrap of wod and drilling a hole for the nib, then the pressure wuld be further up and not right on the tip.

Also, here's another picture. I've been working on getting better shots of my pens. Still not there, but better than the flat on the counter shot.
 

Attachments

  • IMGP1915.JPG_595.jpg
    IMGP1915.JPG_595.jpg
    82.4 KB · Views: 94
Top Bottom