
You are using an out of date browser. It may not display this or other websites correctly.
You should upgrade or use an alternative browser.
You should upgrade or use an alternative browser.
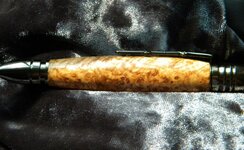
First Burl
- Thread starter RustySplinters
- Start date
Signed-In Members Don't See This Ad
See more from RustySplinters


Signed-In Members Don't See This Ad
Pens By Scott
Member
Looks great!
ctubbs
Member
Good looking job, Michael. Are you using a mandrel or turning between centers? It would be good if you learned to use a set of calipers. That way you could be assured that the barrel matches the components of the kit. Sometimes the bushings and kit parts are not the same size, so if you turn to the size of the parts, they will always be a fit. To the bushings, not always so. Respectfully submitted.
Charles
Charles
RustySplinters
Member
Cheers, Scott!
Charles,
Well, I'm not quite sure I understand what you mean. The barrel is fit to the hardware, it just might be difficult to see that from the lighting -- I have to work on the photography standpoint.
I have a set of calipers, but I dont often use them. I turned it on a mandrel using the bushings that I purchased with the set.
Explain?
ctubbs
Member
Michael, what I meant was that the hardware, (nib, center band, clip and finale) do not always come out the same size as the bushings. All our kits are mass produced and are made within tolerances. That means some will be a bit larger while others will be a bit smaller than a new set of bushings. Also as the bushings are used, they will wear down where they are smaller than they were when new. Therefore it is always best to turn the blank to the size that matches the hardware on hand less the thickness of your finish, whatever that is. Perfect is where your finger can not detect where the blank ends and the hardware begins. That is perfect. We live in an imperfect world so I find it feels better for the blank to be just a bit proud of the hardware rather than the other way around. Naturally, I try to keep that ledge as small as possible. I was in no way picking on you work. For that pen, you did one bang up job. I truly wish my first pen or even my tenth one for that matter looked that good. Burl is notorious for blowing up in your face. You 'done good' Michael, and you have the right to be proud of it. Do not allow some old grouchy guy, such as myself, to put you down. That was the furtherest thing from my mind when I made the post. I did look at the photo and wondered about the lighting. It is very difficult to feel a photo on my screen. If I may be of any help, let me know. I am still learning, too.
Charles
Charles
RustySplinters
Member
Well thank you for the advice! That's what this site is for after all -- sharing what one's learned!
And thanks for the other stuff one the introduction thread -- I'm looking forward to reading through the libraries. Thanks a ton!
And thanks for the other stuff one the introduction thread -- I'm looking forward to reading through the libraries. Thanks a ton!
Ruby pen turning
Member
I think what he is saying is that from the looks in the picture, it looks like you may have over turned the nib end a little but pictures do seem to magnify any small errors.
If you can find a dead center you can turn between the dead center and live center by just putting the points of the centers into the brass tube and tightening the tail stock a LITTLE bit and use calipers to gauge the finished wood. A few months ago I got sick of the wobble and out of round barrels on my pens and started TBC and have not used the mandrel one time since.
If you can find a dead center you can turn between the dead center and live center by just putting the points of the centers into the brass tube and tightening the tail stock a LITTLE bit and use calipers to gauge the finished wood. A few months ago I got sick of the wobble and out of round barrels on my pens and started TBC and have not used the mandrel one time since.