Figured Walnut

Signed-In Members Don't See This Ad
See more from silent soundly

Joined
Jun 2, 2015
Messages
81
Location
Modesto, CA
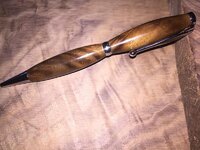
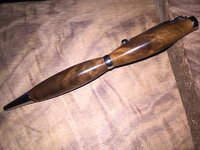
I know that slimlines are taboo around here, but I like how they put the focus on the blank instead of the pen parts. I was in Woodcraft for the first time the other day and bought a couple of pieces of figured walnut from a selection of short cutoffs. This is the first pen that I have turned from it. The background is the wood that I used.
 

Attachments

  • IMG_7762+2.jpg
    IMG_7762+2.jpg
    80.1 KB · Views: 367
  • IMG_7765+2.jpg
    IMG_7765+2.jpg
    81.7 KB · Views: 279
Signed-In Members Don't See This Ad

Edgar

New Member Advocate
Staff member
Joined
Feb 6, 2013
Messages
6,897
Location
Alvin, TX 77511
Slimlines aren't taboo around here at all. In fact, they allow more opportunities for variation & creativity than most any other kit.

Those look really nice. Just one thing you might consider - when I want to make one with fairly meaty barrels like that, I generally use a comfort center band or make of my own about that size. To my way of thinking, that gives a little better proportions to the whole pen, but that's just me.
 
Joined
Jun 2, 2015
Messages
81
Location
Modesto, CA
Did I miss something? When did Slimlines become 'taboo'??


Love Walnut, don't think it's used often enough. What did you use for a finish?


Scott ($100 kits should be taboo) B

Ok, maybe taboo was too strong of a word. I am new here and have been reading quite a bit. It seems like some people think that beautiful blanks are wasted on cheap kits. Maybe I am getting the wrong idea. It's really my only option right now and I have spent a lot of money getting into this hobby.

The finish is CA. Here's my process. Sand to 600. Clean with denatured alcohol. Then I clean again with CA accelerator. Next, I apply about ten coats of thin CA. I stopped using accelerator between coats and haven't looked back. It only takes about 10-15 seconds for each coat of thin to dry. I dribble the ca on the top of the spinning blank and spread it with a smooth viva paper towel strip. After the CA coats, I sand with 400 until there are no shiny spots. Then a quick 600 sand. Then wet sand with micro mesh to 12,000. Last, I sand the ends flush with a lathe setup and assemble.
 

mecompco

Member
Joined
Apr 24, 2015
Messages
1,607
Location
Fairfield, Maine
The wood and the workmanship look good. I have to agree that the wasp-waist just does nothing for me, but that's just personal preference. I second the suggestion on going with the Comfort center band--for an extra .50 it makes a much nicer pen (again, IMHO). Keep up the good work!

Regards,
Michael
 
Joined
Jun 2, 2015
Messages
81
Location
Modesto, CA
Michael, what is a comfort center band? I'm new to the hobby as well and the shear volume of kits available is a little daunting!

Thanks,

Dave

A comfort pen is like a slimline pen, but the center band is thicker.

I like the skinny center band, but I realize that some people don't prefer it.
 

mecompco

Member
Joined
Apr 24, 2015
Messages
1,607
Location
Fairfield, Maine
Michael, what is a comfort center band? I'm new to the hobby as well and the shear volume of kits available is a little daunting!

Thanks,

Dave

A comfort pen is like a slimline pen, but the center band is thicker.

I like the skinny center band, but I realize that some people don't prefer it.

Yup, go to PSI and look at their Comfortline pens. Really the only difference between them and the Slimlines are the thicker band. You turn the center to the larger diameter, then the finial end to the 7mm bushing. If you use the rubber "comfort" grip, you part off the nib end at full diameter and slide on the grip (nice 'cause you don't have to worry about getting the nib diameter exact and if you have a problem (as I do upon occasion, like blowing out the end of a blank, it gets cut off). You can also turn the nib end down to a 7mm bushing to make a "Fatline" pen w/o the rubber part.

If you've not turned larger diameter pens, I think you'll really like them. They leave a lot more of your material to show off, and turn faster. Just a suggestion.

Regards,
Michael
 
Joined
Jun 2, 2015
Messages
81
Location
Modesto, CA
Better yet, make your own centerband. Or make your own nib, or make your own finial. The sky is the limit on modifying slimlines. That's why we have slimline contest.

Here's the contest pens from the 10th BASH: http://www.penturners.org/forum/f228/all-entry-pictures-119761/

BTW, my very 1st pen was a walnut slimline.

Wow, those pens are fantastic.

I have experimented with a wood center band, but it was before I learned to avoid off center turning and they don't look right at all. Maybe I'll take them apart and see if I can fix them. Doesn't hurt to try.
 

BSea

Member
Joined
Dec 28, 2009
Messages
4,628
Location
Little Rock, Arkansas
Better yet, make your own centerband. Or make your own nib, or make your own finial. The sky is the limit on modifying slimlines. That's why we have slimline contest.

Here's the contest pens from the 10th BASH: http://www.penturners.org/forum/f228/all-entry-pictures-119761/

BTW, my very 1st pen was a walnut slimline.

Wow, those pens are fantastic.

I have experimented with a wood center band, but it was before I learned to avoid off center turning and they don't look right at all. Maybe I'll take them apart and see if I can fix them. Doesn't hurt to try.
I turn mine between centers. But I make them look more like Euros with the centerband thicker than the barrel below. You don't have to use bushings except for the barrel that meets the nib. Or at least you don't have to turn all the way to the bushings.

Here are a couple favorites of mine.

The red and black one is one I did for a local PITH challenge.

The other 2 are a set made from Lignum Vitae. The smaller is a euro that I prefer over the slimline. But it can be done the same way with a slimline. It's my everyday carry pen. It has no finish at all. Just sanded to 600 or 1000 (I don't remember).
 

Attachments

  • Local PITH May 2014 Pic 2 small.jpg
    Local PITH May 2014 Pic 2 small.jpg
    105.2 KB · Views: 87
  • Lignum Vitae Pair after 2 weeks.jpg
    Lignum Vitae Pair after 2 weeks.jpg
    133.6 KB · Views: 91
Joined
Jun 2, 2015
Messages
81
Location
Modesto, CA
The other 2 are a set made from Lignum Vitae. The smaller is a euro that I prefer over the slimline. But it can be done the same way with a slimline. It's my everyday carry pen. It has no finish at all. Just sanded to 600 or 1000 (I don't remember).

I have seen the clip "built in" to the top of the pen before, but have not seen an explanation of how to do it. Can you provide a link? It looks interesting.

The other two are sharp too. Does the center band actually fit over the bottom of the pen? Very nice.
 

mike4066

Member
Joined
Sep 24, 2014
Messages
353
Location
Akron, Ohio
The other 2 are a set made from Lignum Vitae. The smaller is a euro that I prefer over the slimline. But it can be done the same way with a slimline. It's my everyday carry pen. It has no finish at all. Just sanded to 600 or 1000 (I don't remember).

I have seen the clip "built in" to the top of the pen before, but have not seen an explanation of how to do it. Can you provide a link? It looks interesting.

The other two are sharp too. Does the center band actually fit over the bottom of the pen? Very nice.


Check out the library, there are a lot of great tutorials on modifying slimline pens. There is one on how to setup a clip with a similar look to that one. http://content.penturners.org/library/pens/challenge_pen.pdf
 

BSea

Member
Joined
Dec 28, 2009
Messages
4,628
Location
Little Rock, Arkansas
The other two are sharp too. Does the center band actually fit over the bottom of the pen? Very nice.
Yes, the centerband has a recess cut so it fits slightly over the bottom. You can do this with a drill bit, or using the point of a skew to cut the recess. Makes it much cleaner looking.

I should have looked at the tutorial mike mentions above. That's not how I did mine. I did mine similar to this one:http://content.penturners.org/library/techniques/invisibleclipforjremperor.pdf
 
Top Bottom