Euro Cocobolo

Signed-In Members Don't See This Ad
See more from Gilrock

Gilrock

Member
Joined
Oct 18, 2011
Messages
560
Location
Tucson, AZ
This was my 2nd pen I made after joining IAP and learning about using a CA finish. So far I don't think I'm doing it right....I feel like I end up sanding off as much as I put on cause it doesn't end up smooth. Anyways I was happy with the final result but it took many retries. I'm pretty sure the sticker on the wooden blank I selected said Cocobolo although I've seen several others mentioning this same wood and I've never seen the lighter shade of wood along with it. Not sure what it's called.

Still working on a lightbox setup...I got the box built yesterday but I'm not really happy with the lights I tried and I had no way to mount them where I wanted them placed so the lighting isn't even.
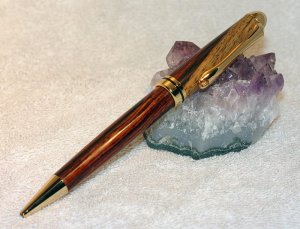
1_Euro_Cocobolo.jpg
 
Signed-In Members Don't See This Ad

Steve Busey

Member
Joined
Jul 9, 2008
Messages
1,143
Location
Marietta, GA.
Some cocobolo can be problematic to finish if it has high oil content - that might be part of your finish problem. What grits are you sanding with?
 

RogerH

Member
Joined
Jul 28, 2011
Messages
307
Location
Illinois
Nice job. Pen looks beautiful.

I apply a lot of pressure on the paper towel, and I use smooth blue shop towels when I apply the CA. When I use plain paper towels, I have problems with bumps and ridges too.

Good luck.
 

Gilrock

Member
Joined
Oct 18, 2011
Messages
560
Location
Tucson, AZ
Some cocobolo can be problematic to finish if it has high oil content - that might be part of your finish problem. What grits are you sanding with?

I've always started my sanding using the Woodcraft sanding pack which I think goes 150, 240, 320, 400, 600 and then I MM 1500-12000. Before I joined IAP all would do is apply a finishing polishing wax so it always seems like I was at the mercy of the quality of the wood for how nice it turned out. I had a piece of clear stabilized buckeye burl that turned out really nice using that method but other woods would appear too grainy afterwards.

I'm learning the more I read this forum...there were a lot of things I didn't know to do before and I'm slowly collecting the materials I need. When I did that pen I think I only had thick CA, I had no acetone or DNA, and I had no accelerant so I was probably not waiting long enough before attempting my next steps. I did so much to that pen it's amazing it looks halfway decent...I think it had CA, polishing wax, and wet sanding with MM all in a 30 minute period...lol.
 

Gilrock

Member
Joined
Oct 18, 2011
Messages
560
Location
Tucson, AZ
Nice job. Pen looks beautiful.

I apply a lot of pressure on the paper towel, and I use smooth blue shop towels when I apply the CA. When I use plain paper towels, I have problems with bumps and ridges too.

Good luck.

Yeah blue shop towels is all I had lying around so that's what I've used also. I watched a video yesterday so I have some new ideas to try next time.
 

ve3bax

Member
Joined
Jun 29, 2011
Messages
142
Location
Perth, On. Canada
I've always started my sanding using the Woodcraft sanding pack which I think goes 150, 240, 320, 400, 600 and then I MM 1500-12000.


if you are sanding CA with 150 to start thats really aggressive! if i have an uneven finish i usually use some #0000 steel wool to smooth it out a bit then start at 1500MM... just a few seconds each grit, all wet sanding... if its pretty smooth i would probably jump up to around 3600...

the thing with CA is the actual buildup of material is quite thin and if you hit it too aggressively you will sand right through in no time!
 

Bree

Member
Joined
Jun 19, 2009
Messages
1,736
Location
Buffalo, NY
Oil can cloud CA. Cocobolo is very oily wood so it has a definite potential to cloud CA. You use the acetone to remove some of the surface oil so the CA can both adhere and not cloud. Oil tends to migrate up over time anyhoo so you may get adhesion and clouding issues on woods like Cocobolo. One possibility is to acetone it, then shellac it to basically seal it and then put CA over the shellac which is very sticky stuff and pretty much adheres to anything. I don't like mixing finish types but I have tried this and it worked pretty well for whatever it is worth.

:wink::wink::wink:
 

Gilrock

Member
Joined
Oct 18, 2011
Messages
560
Location
Tucson, AZ
I've always started my sanding using the Woodcraft sanding pack which I think goes 150, 240, 320, 400, 600 and then I MM 1500-12000.


if you are sanding CA with 150 to start thats really aggressive! if i have an uneven finish i usually use some #0000 steel wool to smooth it out a bit then start at 1500MM... just a few seconds each grit, all wet sanding... if its pretty smooth i would probably jump up to around 3600...

the thing with CA is the actual buildup of material is quite thin and if you hit it too aggressively you will sand right through in no time!

Yeah I was trying to describe too much in one post...I was describing my sanding steps before applying the CA. After the CA is applied I pick a grit based on what the surface feels like to my fingers which is normally 400 or 600.
 

ghostrider

Member
Joined
Feb 3, 2011
Messages
952
Location
Grand Rapids, Michigan
The different coloring in the wood you see is the difference between the sapwood, and the heartwood.

If you get ridges, your using too much CA. Use thinner CA, or less of it. I normally use mainly thin, and build up. If I need to make up for lost wood, then I'll use thick/medium. Thin goes on smoother, and requires less final sanding.
 

dmott

Member
Joined
Oct 20, 2011
Messages
62
Location
San Diego
(I myself) Dont sand past 600 before you apply your CA. I believe m(have bene told) sanding too high will naturally seal some woods with their own oils.

I sand to 600, a few coats of thin CA, about 6 of medium, then a few more of thin.

Start sanding at 400 then go thru your micromesh. I go 400, 600, (I then go 1000 sometimes) then polishing compunds.
 

Attachments

  • 2011-10-26_08-20-18_831 (800x451).jpg
    2011-10-26_08-20-18_831 (800x451).jpg
    190.6 KB · Views: 104
  • 2011-10-25_00-28-10_350 (800x451).jpg
    2011-10-25_00-28-10_350 (800x451).jpg
    185.1 KB · Views: 107
Last edited:
Top Bottom