
You are using an out of date browser. It may not display this or other websites correctly.
You should upgrade or use an alternative browser.
You should upgrade or use an alternative browser.
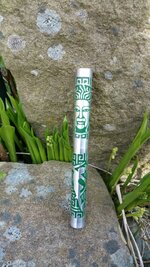
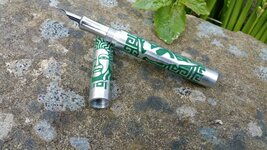
Etched kitless Medusa & Perseus
- Thread starter BradG
- Start date
Signed-In Members Don't See This Ad
See more from BradG


It's quite frustrating John, but I will crack the correct times to use. the trouble I suspect is if left in the zincate bath too long (an extra 15 seconds to put it into perspective) the zincate begins to flake. This will still take on a copper plating, then a chrome plate, then a tin plate for black chrome effect.... but as the base zincate begins to flake a little more the plating blisters and peels off.


Sorry John not quite following your question. If I've understood it correctly, then the shiny parts is the surface layer, and the green parts are etched in and coloured.
Yes. You got it !!! Heh, heh, heh. I am going to try this. you have me hooked. Now to go find some acid. :biggrin:


Signed-In Members Don't See This Ad
Dalecamino
Local Chapter Leader
That's what I was watching for! :biggrin: Nice one Brad! :wink: Love the brushed look and, color. Very well done.
BradG
Member
Thanks chuck & Mal ")
Skiprat,
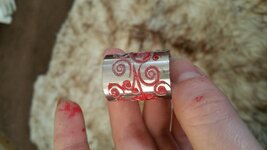
I know this looks rough and nasty, but it's proof of concept to see how it would behave.
I put a stainless plumbing fitting into the etch tank today and pushed it for a deep etch. The deeper it goes the rougher it looks.. earlier in the process it looked rather nice when it had just removed the top layer. Almost like a diamond encrustation finish. I spray painted it which always looks awful as it's too thick, but it allowed me to see a better view of the etch.
I reckon with a bit of refining, a lighter etch with the right pattern, and most probably not painting it at all would look rather tricky
Skiprat,
I know this looks rough and nasty, but it's proof of concept to see how it would behave.
I put a stainless plumbing fitting into the etch tank today and pushed it for a deep etch. The deeper it goes the rougher it looks.. earlier in the process it looked rather nice when it had just removed the top layer. Almost like a diamond encrustation finish. I spray painted it which always looks awful as it's too thick, but it allowed me to see a better view of the etch.
I reckon with a bit of refining, a lighter etch with the right pattern, and most probably not painting it at all would look rather tricky
Attachments
Hi Brad, that pen is as cool as always. Well done again.
Now forgive a stupid question but I'm intrigued as to why you used paint.. I would have thought that you would anodize the entire thing, then sand back the original un-etched surface, leaving the etched picture .
You know Im very interested in your progress with stainless, .
I think you are right with a light etch. I don't think colour fill is better than a stippled or diamond etch.
As soon as you nail it, I'll be your new best freind!! :biggrin:
Now forgive a stupid question but I'm intrigued as to why you used paint..
I would have thought that you would anodize the entire thing, then sand back the original un-etched surface, leaving the etched picture .You know Im very interested in your progress with stainless, .
I think you are right with a light etch. I don't think colour fill is better than a stippled or diamond etch.
As soon as you nail it, I'll be your new best freind!! :biggrin:
Last edited:
jttheclockman
Member
As always Brad a very well done piece of art. The work in this is beyond what we see. We as members have a little insight to what the volume of work is because you share with us the technique.
I am thinking along with Skip on this. Is it possible to reverse the effects. 2 different things. Annodize the entire pen and then acid the design. Or acid the the entire pen and have the design stand proud.
Look at us we are telling you what to do:biggrin:. Just thinking out loud. Keep up the great work. You are doing something very few of us could even think about trying.
BradG
Member
Anodising is very, very sensitive to imperfections. usually when I anodise a pen I have to meticulously sand the piece in order for it to anodise evenly. This isn't possible in all those hard to reach parts of a deep etch.
This was further complicated by etching using Ferric chloride because of all the smut it created, and even after a thorough clean, contaminants seeping out of the metal would cause the anodising to fail. so, from that point forward I started to use acrylic enamel which is quite hard wearing compared to "paint".
However, I no longer use Ferric chloride for etching, and the process is so much cleaner. I stand a chance of being able to give it a scrub with a toothbrush with some caustic to clean it up and I suspect it may well anodise. Since using this new approach of etching, I have not setup an anodising tank. It's on my list of things to do, and you can be sure once ive setup an acid tank again attempting to anodise the infill will be one of my first experiments. Along with anodising the surface a different colour etc.
I have quite a list of things to get around to, but step by step il get back in the game. I've been away from it for a bit so im progressively getting back into it. hence the last being a kit pen. this time kitless.. next time most probably anodised, then etched and anodised..... then somewhere along the line practising zincating aluminium so I can chrome and Black chrome pieces..
Step by step
jttheclockman
Member
Oh I would be interested in that last part with the aluminum. I prefer to work with it than other metals. We are watching for sure. Good to have you back in the game. I enjoy things that are above and beyond such as what you do. Makes for an interesting read.
BradG
Member
Oh I would be interested in that last part with the aluminum. I prefer to work with it than other metals. We are watching for sure. Good to have you back in the game. I enjoy things that are above and beyond such as what you do. Makes for an interesting read.
It's quite frustrating John, but I will crack the correct times to use. the trouble I suspect is if left in the zincate bath too long (an extra 15 seconds to put it into perspective) the zincate begins to flake. This will still take on a copper plating, then a chrome plate, then a tin plate for black chrome effect.... but as the base zincate begins to flake a little more the plating blisters and peels off.
Looks great Brad. Keep on.
renichols
Member
Could you powder coat, then sand off the top layer to the bare metal. Something like Shiprat suggested with the etchimg?
BradG
Member
I could, but I don't want to powder coat
kruzzer
Member
Great work Brad... I don't know how you do it but just keep doing it..
Bill78
Member
Inspirational and beautiful!!! Thanks for posting it.
Must learn how to do that!
Must learn how to do that!
Cwalker935
Member
That is fantastic.
Jim15
Member
Great work. Thank you for posting your creations, I like admiring them.
Dalecamino
Local Chapter Leader
SHIPRAT!? I like that title :biggrin::biggrin: :wink:
BradG
Member

furini
Member
That is superb!
Jgrden
Member
My brain gets tired out keeping up with the tought of which is relief and the belilef?!?!? It looks as though this pen has the picture etched out, right?
BradG
Member
My brain gets tired out keeping up with the tought of which is relief and the belilef?!?!? It looks as though this pen has the picture etched out, right?
Sorry John not quite following your question. If I've understood it correctly, then the shiny parts is the surface layer, and the green parts are etched in and coloured.
Jgrden
Member
My brain gets tired out keeping up with the tought of which is relief and the belilef?!?!? It looks as though this pen has the picture etched out, right?
Sorry John not quite following your question. If I've understood it correctly, then the shiny parts is the surface layer, and the green parts are etched in and coloured.
Yes. You got it !!! Heh, heh, heh. I am going to try this. you have me hooked. Now to go find some acid. :biggrin:
jttheclockman
Member
Hey John is dropping some acid.:biggrin::biggrin:
BradG
Member
No need to play with Acid or corrosives anymore John :wink: Watch this space
Jgrden
Member
:biggrin:Youse guys are too funny
bluwolf
Member
Brad, I think it looks great! I never would have thought of that color. But it really works.
Mike
Mike
BradG
Member
Thanks Mike. I think it complements silver quite nicely