Dissappointed with my first Stars & Strips pens

Signed-In Members Don't See This Ad
See more from 76winger

76winger

Member
Joined
Aug 30, 2009
Messages
2,784
Location
Lebanon Indiana
I've now made a few laser cut kits with fair results, so I though I was ready to give it a go with (looks more difficult) Stars & Strips kits. And not happy with trying one first, I jumped in all the way and started assembling both the kits I'd recently picked up. One for a smaller Executive pen, and a larger one for a Majestic Jr.

After a couple of evenings gluing in all the stars, I thought I had the bigger one for the Maj. Jr. in pretty good shape. all the stars pressed in well, albeit a little tough, and was ready for the glue up. The smaller block for the executive was a bit tougher as the kept cracking the body when I'd insert them, even with the tube inside for support. So I figured it was going to be messy just due to the cracks I had to keep gluing together so the whole thing didn't fall apart during assembly.

On another evening the strips went together much easier and without incident and even trimmed well, or so I thought...

Last night I had everything glued up and ready to turn when I got home from work this evening. WOOHOO!!! I'm finally going to get me some Stars & Stripes pens!
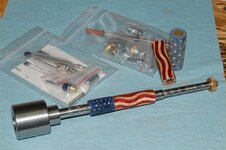
UpAndCommingStarsNStrips.jpg

Well the post-turning and finishing results left me fairly disappointed. The smaller executive had several stars in the upper part of the blue section that apparently didn't go in as deep as I thought, and so I ended up with several empty, glue-filled star holes, with only a bubble or two to show any filler in them. The gap between the blue section and the strips didn't close up as good as I'd hoped. The glue started setting up as I pressed the parts together and I almost didn't get them touching. I thought I did at the time, but evidently not. And the cracked areas show up quite noticeably as well. I went ahead and assembled it since the kit wasn't too pricey and figured I'd keep it around for my own "patriotic beater pen" since I couldn't bring myself to sell it to anyone looking like it does.
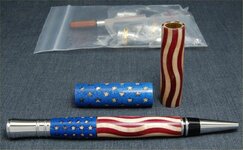
Disappointing results2.jpg
And for the for Majestic Jr. body, the same thing happened with some stars not going in deep enough and ending up with some empty holes (at least the body on that one didn't crack!). But in the end, there's enough empty holes all the way around the top that I'm not even going to consider assembling this pen - Instead I'll get another S&S kit and set of tubes and give it another try.

But before I try again, what can I do to keep this from happening again, and to ensure I get the stars pressed in good enough to have proper penetration through the body? I pressed pretty hard on the above body, fearing breaking something as it was.

What tips can some of you who's done this successfully give me?

Thanks for reading and any help you can offer.
 
Signed-In Members Don't See This Ad

workinforwood

Member
Joined
Mar 1, 2007
Messages
8,173
Location
Eaton Rapids, Michigan, USA.
I have not made one of these..but if I did, I would use 30 min epoxy to glue in the parts. this way you have some working time to get them positioned. and then I would use big fat rubber bands and wrap the pen. the bands would become a clamp, not just holding the parts, but pulling them into the pen. then of course the rubber bands would easily just spin off with a chisel.

If you are not happy with the stars, or they are just too much work to deal with..go to crafts supply usa and get a can of clear inlace. Now you can mix up some inlace and dye it white with a few drops of oil base paint or some white pearl powder or mica powder and fill the holes with that instead. then you will most definitely get perfect stars. some kits I hear don't come with stars anyhow, just holes you have to fill. I'm not a laser kit expert.
 

woodgraver

Member
Joined
Nov 8, 2010
Messages
262
Location
Federal Way, WA
I've made quite a few of these kits...and learned a few things along the way. The first thing I do is to soak the stars in water and insert them without any glue. The water softens them up and a big magnifying glass ensures I have them aligned. I then coat the inside and outside with CA blue the next day when the water has reduced. Aligning the barrells square is critical, but if you use a colored black or white epoxy to glue the tubes in, that can hide minor misalignments. When it is time to turn I hand sand the stars as they spin on the mandrel, then once I'm sure there aren't any sticking up, I cheat! I pull out a sioux sander with a 3" disc on it. While the pen is tirning on the lathe, I have the sander going full speed and have found it to work quickly with 80 grit pads until I get down to very close to the final size. I like to hand sand from there with increasing grits. If a star pops out, I fill it with white dyed 5 min epoxy and come back later and finish sanding the blank. Some kits are better than others, but with a little practice, trial and error, I think you will get to the point where you turn them out perfectly time after time.
 

joefyffe

Passed Away Aug 19, 2018
In Memoriam
Joined
Mar 29, 2010
Messages
1,316
Location
Indianapolis (almost Zionsville) Indiana
Dave: Are you using Lazerlines or Kallenshaan? I use the Lazerlines from Constant and really haven't had much trouble with fit. Instead of rubberbands, I use fly tying thread, in a fly tying bobbin. I put the parts together, with tube in, wrap tightly with the thread, remove the tube, assuming all parts are tight, and hit with thin ca. After a couple or three applications of the thin ca, I 'carefully' re-drill the blank (to clean up the inside where some may have pushed slightly through.and use epoxy to seat the tube. If there are large gaps between the parts, you may wish to use a application of med ca or you may find the epoxy oozing up between the parts which will allow the tube to shine unless of course it has been blacked. If you choose to try this, bobbins can be picked up at gander mountain, Fly Masters on Allisonville Rd. or with you being in Lebanon the closest I'm aware of would be Wildcat Creek Outfitters at 106th. and Zionsville Rd in Zionsville. You will want # 210 fly tying thread. 3-0 and 6-0 are too light. Hope this helps! I have one or two of mine displayed on my website.
 
Last edited:

Texatdurango

Member
Joined
Apr 23, 2007
Messages
4,649
Location
Show Low, Arizona
Well, I've done a few dozen of these and feel comfortable with them.

Kallenshaan has some pretty good instructions for his kits. First, you dilute some yellow wood glue with a bit of water, making the glue very runny. Then poke the little stars with an exacto knife and dip them in the diluted glue then insert the little suckers one by one into the star shaped holes.

Glue all the little stars in place and set aside to dry, THEN clean out the inside of the blank and glue in the tube.

I have a suspicion that if you are putting the tube in first then gluing in the stars, you might be creating a tiny air pocket behind the star and building up a bit of pressure in the star cavity thus not allowing the little star to completely fit in where it is supposed to.

When I put the blank on the lathe I first sand the stars smooth with the barrel so as not to take a chance on catching some of the tiny star points with the cutting tool.

This works perfectly with Ken's kits, I can't speak to other kits so don't know how tight the stars fit. Perhaps someone who has done both kits can comment on the fit of the stars.
 

PenMan1

Member
Joined
Jul 8, 2009
Messages
6,380
Location
Eatonton, Georgia
For the empty "star" holes, fill each one with spackle. Then CA finish. I will frequently use spackle rather than installing all the wooden stars. Not only is the spackling method much faster and more controllable, IMHO, it makes a pen with much more "pop".

Often, regardless of which company's product you use, the little wooden stars end up looking "yellow" or "faded". The spackle stars are very bight and all end up at the same level without "bumps or dips".
 

Rangertrek

Member
Joined
Sep 10, 2008
Messages
2,104
Location
Bossier City, Louisiana, USA
First, Andy, thanks for the tip on using spackle, great idea.
I have done a few of those kits from slim size to larger.
I have found that soaking the stars in water with a bit of 'dish soap' will let them slip in a little easier. The soap acts as a lubricant and does not not effect the materials.
I have used kits from Constant and Kallenshan with only a few minor fit problems.
 

witz1976

Member
Joined
Jun 28, 2009
Messages
2,144
Location
Bucksport, Maine, USA
Last time I did this type of assembly, I actually inserted them all dry with a tube in, but not glued, wrapping them with blue painter's tape as I went. Once they were all in and wrapped up, I rolled it like a rolling pin with a little bit of pressure to seat all the stars. Slid out the tube and coated the inside with thin CA. Took off the tape and soaked the outside with thin CA and then turned.
 

tim self

Member
Joined
Oct 2, 2008
Messages
2,150
Location
Atoka, Oklahoma
One more thing I've noticed with the stars, regardless of supplier. They are smaller on one side than the other. Only slightly but enough to make it harder to insert the star. Flipped over and it normally slides right in. And blackening the tubes is a great help.
 

Texatdurango

Member
Joined
Apr 23, 2007
Messages
4,649
Location
Show Low, Arizona
From an ease of construction standpoint I guess the idea of using spackle or some other compound is OK but I sorta like the idea of telling someone that the stars are solid maple and were individually, painstakenly, lovinly layed in one-by-one so their pen consists of 68 individual pieces of wood............ something they could pass along to their friends when they show it off!
 

76winger

Member
Joined
Aug 30, 2009
Messages
2,784
Location
Lebanon Indiana
Thanks for several ideas to try on my next attempts everyone! I like the idea of white acrylic or spackle fillers as alternatives and will probably give those a try at some point in the future.

For both pens, I put the stars in dry, with the tube slid in place to reinforce the body during assembly and no glue applied until everything was together (except the one that cracked on me). And in both, there was a smaller white side of the stars that was inserted first, facing the tube. What I noticed was quite a bit of effort was required to get the stars in, especially on the larger Majestic Jr. part.

The instructions I got (I think I downloaded them from the Laserlinz website) suggested soaking in warm water with just a little dishwashing liquid added, but I was afraid of that staining the wood or adversely affecting glue adhesion, so I opted not to temp fate with the process.

The Majestic Jr kit was from Laserlinz and the Executive kit came from PSI (I don't know who makes the kits for them). Regardless, I don't fault the maker of the kits as it's a learning curve with anything new like this and I just want to ensure I learn from my mistakes so I don't end up with the same results again.

Thanks for your offer to make it right Constant, I don't hold you repsonsible and don't expect anyone to pay for my learning experience. But I will accept the offer to PM you to see what we can work out to get me another round of kits to try.

Thanks to everyone for all your great suggestions!
 

dplloyd

Member
Joined
Jul 24, 2010
Messages
152
Location
Pearland, TX
Lot's of good ideas here. Think I'll try some of them.

I had a problem with the red bleeding into the white while sanding. Posted the dilema here and got good feedback. I have since become more skilled with my skew. This really helps and sand the blank starting with finer grit as a result. Going slower with the sanding and cleaning the sand dust often has really helped. Finish with CA.

Good Luck with your next kits.
 

76winger

Member
Joined
Aug 30, 2009
Messages
2,784
Location
Lebanon Indiana
Lot's of good ideas here. Think I'll try some of them.

I had a problem with the red bleeding into the white while sanding. Posted the dilema here and got good feedback. I have since become more skilled with my skew. This really helps and sand the blank starting with finer grit as a result. Going slower with the sanding and cleaning the sand dust often has really helped. Finish with CA.

Good Luck with your next kits.

I had absolutely no problem turning them with my skew (my tool of choice), and between sanding and applying the CA finish, the parts got good blasts of air from the air compressor.
 
Last edited:

ssajn

Local Chapter Leader
Joined
Feb 3, 2008
Messages
1,034
Location
Milwaukee, Wi, USA.
The first flag kit I made I swore was going to be my last. I did it dry. I thought the same as you that water and soap couldn't be a good thing. Mine cracked in several places also. Since then I've made several dozen and found that it works best if you do use the water and soap. After inserting the stars it's dry wrap the outside with painters or masking tape, flood the inside with thin ca and let dry. After gluing the tubes in (I use medium ca) and trimming I mount on the lathe and turn using a sharp skew. After I've turned the tape off and the stars are level with the blue and BEFORE ANY SANDING I flood the outside with thin ca. Then turn as normal.
 

mick

Member
Joined
Mar 13, 2005
Messages
2,608
Location
Decatur AL, USA
From an ease of construction standpoint I guess the idea of using spackle or some other compound is OK but I sorta like the idea of telling someone that the stars are solid maple and were individually, painstakenly, lovinly layed in one-by-one so their pen consists of 68 individual pieces of wood............ something they could pass along to their friends when they show it off!

DITTO!

Another tip I'll pass along.
After you place 3 or 4 glue soaked stars in the holes I use a medium sized transfer punch and roll it across the stars until they are seated as deep as they will go.( with the tube inserted, but not glued) Once they are all in and you remove the tube to clean you can examine the blank from the inside and see if all the stars are seated deep enough. I done both Ken's and Constant's kits and never had one that wouldn't seat completely into the cut out.
 

hewunch

Member
Joined
Aug 5, 2008
Messages
4,660
Location
Albany, GA
From an ease of construction standpoint I guess the idea of using spackle or some other compound is OK but I sorta like the idea of telling someone that the stars are solid maple and were individually, painstakenly, lovinly layed in one-by-one so their pen consists of 68 individual pieces of wood............ something they could pass along to their friends when they show it off!

68 huh? 50 stars, 1 field, 14 stripes. I get 65. And really the red stripes are connected so it is 58. So George what am I missing?
 

76winger

Member
Joined
Aug 30, 2009
Messages
2,784
Location
Lebanon Indiana
From an ease of construction standpoint I guess the idea of using spackle or some other compound is OK but I sorta like the idea of telling someone that the stars are solid maple and were individually, painstakenly, lovinly layed in one-by-one so their pen consists of 68 individual pieces of wood............ something they could pass along to their friends when they show it off!

68 huh? 50 stars, 1 field, 14 stripes. I get 65. And really the red stripes are connected so it is 58. So George what am I missing?

Well, after I broke my field on the smaller pen into 3 pieces, I had 68... :wink:
 

Padre

Member
Joined
Dec 2, 2009
Messages
1,841
I have tried 2 kits with absolutely horrible results. I had two kits for the Sierra. I got all the stars in, but there is no way, no how that that kit was going to fit on ANY sierra tube. I tried the Sierra, the Sierra Click, Elegant Beauty, etc. Both of my kits completely blew apart when I was trying to sand them down to size to somehow fit on the tubes.

I have had lots of success with Constant's other kits (roses, hummingbird, medical, praying hands, etc.) but not these. Just not meant to be I guess.
 
Last edited:

76winger

Member
Joined
Aug 30, 2009
Messages
2,784
Location
Lebanon Indiana
I have tried 2 kits with absolutely horrible results. I had two kits for the Sierra. I got all the stars in, but there is no way, no how that that kit was going to fit on ANY sierra tube. I tried the Sierra, the Sierra Click, Elegant Beauty, etc. Both of my kits completely blew apart when I was trying to sand them down to size to somehow fit on the tubes.

I have had lots of success with Constant's other kits (roses, hummingbird, medical, praying hands, etc.) but not these. Just not meant to be I guess.

Did the body slide on the tube before gluing anything up? If not, I'm guessing you might have got a kit for a different tube size (for instance. 3/8 vs 27/64). The particular one I used here was for a 3/8" tube, which is smaller than the Sierras and Gatsbys, etc. tubes.
 

PenMan1

Member
Joined
Jul 8, 2009
Messages
6,380
Location
Eatonton, Georgia
Spackling for those that do 3 of these in a day. Soap, water, maple wood and adult beverages for those that make 3 in a week. The spackling is just for time saving and making sale pens with brighter stars.

Each person has their own methods. But, when you chip out a couple of stars, the spackling is a much easier fix than trying to add a new star to a glue gummed hole two sizes too small. The way I discovered spackling was on a "fix". I realized how much brighter the spackle was and had to tint it with a little yellow to make it match.
 

76winger

Member
Joined
Aug 30, 2009
Messages
2,784
Location
Lebanon Indiana
Spackling for those that do 3 of these in a day. Soap, water, maple wood and adult beverages for those that make 3 in a week. The spackling is just for time saving and making sale pens with brighter stars.

OK Andy, now you've got my attention!

given no turning after the adult beverages...
 

turningfish

Member
Joined
Jan 21, 2011
Messages
29
Location
Ct.
I've only done two of them . They were from Kallenshaan Woods. I followed their instructions using thinned yellow glue and had no problems. Those stars are cut at a bevel so make sure you stick them in small side first. Stabbing them with the tip of n ex-acto knife worked best for me. Sand stars flush to avoid tear out, final shape with a skew or carbide tool, sand , apply finish, and done. I used Jr. Gent kits.
 
Last edited:

turningfish

Member
Joined
Jan 21, 2011
Messages
29
Location
Ct.
If you have to use white spackle something is very wrong. Step back and evaluate the problem. If you did everything right, talk to the vendor . Might be a problem with the kit.
 

PenMan1

Member
Joined
Jul 8, 2009
Messages
6,380
Location
Eatonton, Georgia
If you have to use white spackle something is very wrong. Step back and evaluate the problem. If you did everything right, talk to the vendor . Might be a problem with the kit.


I don't HAVE to use spackling, I CHOOSE to use spakling. It cuts the assembly time by one hour and makes the stars white rather than off white. It also allows me to re-dye the blue and red barrels to give them more "pop" and reduced the faded look.

It's just another way to do things. Not the right way, not the wrong way, just my way. I have better luck selling the "brighter" looking pens.

Respectfully submitted.
 

76winger

Member
Joined
Aug 30, 2009
Messages
2,784
Location
Lebanon Indiana
And I'll certainly be taking a lot of this good advise and putting it to use on my second attempts. Can't wait to report back on how it went!
 
Top Bottom