Damascus Linen

Signed-In Members Don't See This Ad
See more from Displaced Canadian

Joined
Aug 5, 2009
Messages
3,229
Location
Millersburg, OR
This is a blank I made last week. It's made of linen and epoxy. Interesting/difficult/cool blank to work with. Learned a lot from the first one and implemented those lessons in the second one. All comments or questions welcome. Thanks for looking.
 

Attachments

  • Linen 1.JPG
    Linen 1.JPG
    188.8 KB · Views: 487
  • Linen 2.JPG
    Linen 2.JPG
    199.4 KB · Views: 415
  • Linen 3.JPG
    Linen 3.JPG
    208.1 KB · Views: 518
Signed-In Members Don't See This Ad

SDB777

Member
Joined
Feb 6, 2010
Messages
6,620
Location
Cabot, Arkansas USA
Multiple layers of difference coloring soaked linen, or are you just pouring expoy on the multiple layers and then squishing it together?

Either way, nicely done, and that is some outside of the box type thinking!!!


Scott
 
Joined
Aug 5, 2009
Messages
3,229
Location
Millersburg, OR
It is done by glueing layers together them squishing them together. This process was talked about by another member in another thread. I have one in the vise now and some of it may end up in the bash prizes I'll be sending out.
 

ctubbs

Member
Joined
Sep 12, 2010
Messages
3,588
Location
Murray, Kentucky
Great job Chris. I read that thread and looked up more info on line. It was carefully placed in my 'Hey, let's try this someday' pile. You just pushed much closer to the top. Great pen and thanks for showing.
Charles
 

Phunky_2003

Member
Joined
May 18, 2009
Messages
1,470
Location
Bonham Texas
Very nice was it hard to turn? I have seen this done for knife handles but is very nice as a pen. Thanks for sharing

I made one and showed it in the casting contest during the bash. I used a gouge and had to sharpen several times. Swapped the gouge for my pen pro and even that I had to change the cutter side.
 
Joined
Aug 5, 2009
Messages
3,229
Location
Millersburg, OR
Asking for my secret casting epoxy is like asking for my secret baked bean recipe, Libby's :biggrin:
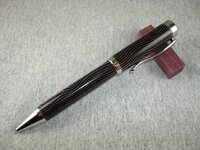
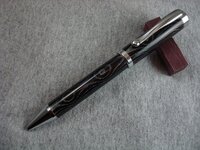
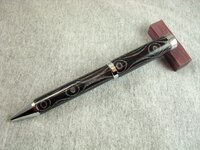
I used Castin' Craft easy cast clear casting epoxy from Michael's. You want something with a long working time because the fabric seems to make it cure faster. First I tried the 5 min. stuff and nearly had a "thermal event" in my shop. Also when you pick a cloth for the blank understand that it will turn out a LOT darker than it looks dry. The blank in the picture was made from a deep purple cloth and the light color was white.
Easier to turn than tru stone, started with a Woodchuck, finished with a skew. Did a CA finish. felt too soft and got dirty too fast without it. Had to drill, let cool, and drill again for the tubes to fit. Not sure how much pressure is necessary to clamp with. The first one I used a 5 ton jack, the second I used a vise and didn't squeeze quite as hard and was fine. The third I used slightly less pressure on the grunt scale and we will see how it turns out. I'm thinking if I leave more epoxy in the blank it might have a harder finish before the CA.
As mentioned it is a Atrax ballpoint which just might be the kit by which all other ballpoint kits are judged. IMHO. Got to get back to work now.
 

Haynie

Member
Joined
May 20, 2011
Messages
3,516
Location
Page Arizona
There is a big difference between this and the last one posted. Really shows the differences in the process. Looks like a seriously messy process though.
 
Joined
Aug 5, 2009
Messages
3,229
Location
Millersburg, OR
Quick rundown on the process,
I use a cutting board to work on to keep the mess down. I build the blank on a piece of wax paper. Clamp the wax paper down to the table to keep it from moving. Cut your fabric into 2"X5 1/2" strips. That blank has about 60 layers. Using a 2" brush coat the top side of a piece of fabric and put it in the center of the wax paper. Coat another piece and lay it on top of the first piece. You only need to coat one side. Do this 58 more times. About 1/2 way through press the stack gently to help remove any air. When all the pieces are coated wrap the wax paper around the blank and place it in a form just slightly larger than the blank to help contain the mess when you press it. Press the blank until it is hand tight. Cut a few slits to let out the air, some of the epoxy will escape so cover anything you don't want to get covered in epoxy. Wait 24 hours and remove. When you cut it into blank size it is VERY dusty consider yourselves warned. Hope this helps.
 
Last edited:
Top Bottom