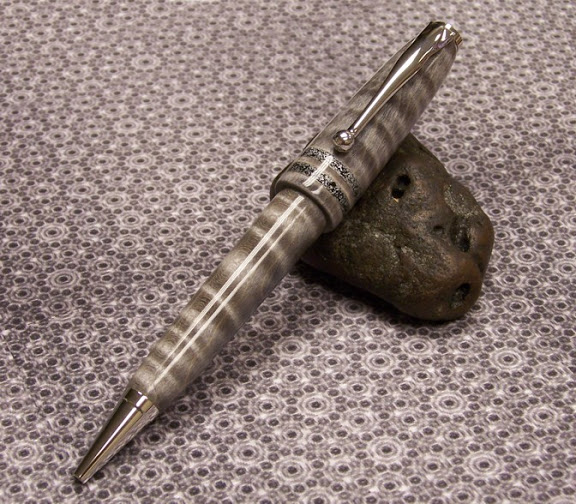
Curly Maple

Signed-In Members Don't See This Ad
See more from Drstrangefart

Drstrangefart

Member
Joined
Sep 15, 2010
Messages
4,258
Location
Woodstock, Ga. U.S.A.
65470_113623148697759_100001502242963_97302_1615363_n.jpg

My first shot at curly maple. It was harder to work with than I anticipated. Did a lot of cleanup with the skew and sandpaper. Also finally got the high gloss finish just right.
 
Signed-In Members Don't See This Ad

Skye

Member
Joined
Jan 3, 2006
Messages
3,487
Location
Rock Hill, SC
If I can be critical, I think you may have a few rough spots in the finish. Just to the left of the ball of the clip, half way down. See the way the highlight breaks-continues-breaks-continues, that's an inconsistency in the finish.
 

Drstrangefart

Member
Joined
Sep 15, 2010
Messages
4,258
Location
Woodstock, Ga. U.S.A.
If I can be critical, I think you may have a few rough spots in the finish. Just to the left of the ball of the clip, half way down. See the way the highlight breaks-continues-breaks-continues, that's an inconsistency in the finish.

Fair enough. I thought it was just the wood itself doing that. The striping showed up with the first coat of thin. But, next shot at curly maple I will definitely keep an eye on the finish. Maybe then I'll have enough practice to not be guessing the entire time.
 

Skye

Member
Joined
Jan 3, 2006
Messages
3,487
Location
Rock Hill, SC
CA finishes are odd things. When you're in the zone it seems like you can't mess it up if you tried. Then, something happens and you can't get it right. Kinda like the shanks in golf lol
 

Drstrangefart

Member
Joined
Sep 15, 2010
Messages
4,258
Location
Woodstock, Ga. U.S.A.
CA finishes are odd things. When you're in the zone it seems like you can't mess it up if you tried. Then, something happens and you can't get it right. Kinda like the shanks in golf lol

Yes, sir. Where I'm at right now, I've turned maybe 15 or 20 pens in my life, and "In the zone" is the exception, not the rule right now.
 

PAPenman

Member
Joined
Sep 16, 2010
Messages
59
Location
Hawley PA
In the zone for me is apply a rice grain size strip of med CA to a paper towel and wipe it back and forth 7 times (each direction counts as 1) on one blank, do the second piece and walk away so you're not tempted to hit it again too quick. 6-8 coats produces a nice finish.
 

Drstrangefart

Member
Joined
Sep 15, 2010
Messages
4,258
Location
Woodstock, Ga. U.S.A.
In the zone for me is apply a rice grain size strip of med CA to a paper towel and wipe it back and forth 7 times (each direction counts as 1) on one blank, do the second piece and walk away so you're not tempted to hit it again too quick. 6-8 coats produces a nice finish.

Interesting. I've been holding a dry paper towel against the bottom of the barrel, and dripping medium on making one pass that leaves a beautiful coat, provided you didn't hesitate or glob out. A hair dryer makes small ripples and blobs go away. I'll usually do 4 or 5 of those. I've only turned a few pens so far, so this has been my first good run with no supervision or anyone there to help rescue my mistakes. The finish didn't get highlighted so well in that pic. It is super smooth, the breaks in color are the wood's reaction to the thin CA. I checked it out, and the finish is intact and glass smooth. Also, I should probably turn the flash OFF. And add cross sanding on the bare wood AND with the micromesh.
 

Skye

Member
Joined
Jan 3, 2006
Messages
3,487
Location
Rock Hill, SC
You just got to be careful that your paper towel doesn't accelerate the drying of the CA. If so the two could become one lol

There should be a meet coming up in Atlanta soon. Hook up with those numbskulls and I'm sure you can talk one of them into walking you through it step by step.
 

Skye

Member
Joined
Jan 3, 2006
Messages
3,487
Location
Rock Hill, SC
And not to bust your chops but the CA is mightier than the curl. There's no reason for curl to keep the reflection from being continuous I wouldn't think. Here's a VERY curly piece I did and you can see the reflection from the light is consistent the length of the pen.

grey6.jpg
 

Drstrangefart

Member
Joined
Sep 15, 2010
Messages
4,258
Location
Woodstock, Ga. U.S.A.
You just got to be careful that your paper towel doesn't accelerate the drying of the CA. If so the two could become one lol

There should be a meet coming up in Atlanta soon. Hook up with those numbskulls and I'm sure you can talk one of them into walking you through it step by step.

My biggest problem is the paper towel gluing itself to my hand. That kinda hurts. The CA dries slow enough that I can get the job done. I usually need to hit it with a hair dryer to dry it out.
 

Drstrangefart

Member
Joined
Sep 15, 2010
Messages
4,258
Location
Woodstock, Ga. U.S.A.
And not to bust your chops but the CA is mightier than the curl. There's no reason for curl to keep the reflection from being continuous I wouldn't think. Here's a VERY curly piece I did and you can see the reflection from the light is consistent the length of the pen.

grey6.jpg


Here it looks like your finish is shinier than mine. Details like that show my lack of hours on the work.
 

Skye

Member
Joined
Jan 3, 2006
Messages
3,487
Location
Rock Hill, SC
If you're using a hair dryer, you may want to get a squirt bottle of CA accelerator. You can get it at hobby stores that sell RC car parts if there's not a Woodcraft near you.

For me, roughly my steps are:

Seal with a layer of thin CA.
Fold paper towel the lenght of one blank.
Squirt a bead of medium CA on the end of the paper towel.
Touch the bead to one blank from the underside with the lathe on low.
Wiggle it a little side to side then take it away.
Let it dry or hit it with accelerator if I'm feeling brave
Sand LIGHTLY with MM, a low grade, maybe #2 with the lathe turned halfway up.
Turn the lathe off and sand horizontally until the whole blank is consistently ashy.
Wipe down with a clean paper towel.
Apply another coat, repeat.
Maybe apply another and repeat.
Work my way through the MM using accelerator as a lubricant.
Cross sand through the first half of the MM set.

That's about it.
 

Drstrangefart

Member
Joined
Sep 15, 2010
Messages
4,258
Location
Woodstock, Ga. U.S.A.
If you're using a hair dryer, you may want to get a squirt bottle of CA accelerator. You can get it at hobby stores that sell RC car parts if there's not a Woodcraft near you.

For me, roughly my steps are:

Seal with a layer of thin CA.
Fold paper towel the lenght of one blank.
Squirt a bead of medium CA on the end of the paper towel.
Touch the bead to one blank from the underside with the lathe on low.
Wiggle it a little side to side then take it away.
Let it dry or hit it with accelerator if I'm feeling brave
Sand LIGHTLY with MM, a low grade, maybe #2 with the lathe turned halfway up.
Turn the lathe off and sand horizontally until the whole blank is consistently ashy.
Wipe down with a clean paper towel.
Apply another coat, repeat.
Maybe apply another and repeat.
Work my way through the MM using accelerator as a lubricant.
Cross sand through the first half of the MM set.

That's about it.

I used accelerant before, didn't like it too much. Mostly wasn't sure what to expect, and I was being overstimulated trying to get the thick coats of medium CA. The hair dryer does a good job of spreadint areas that are too thick out, covering mistakes. Once I get comfortable with my process I'm gonna work on something more like the one listed above. I'm still quite happy with most of my results, as they are improving with every pen I turn. As a matter of fact, let me go check to see if my cherry burl's 3rd layer of medium is dry.......
 

Gary Beasley

Member
Joined
Sep 18, 2009
Messages
1,326
Location
Marietta, Ga. USA
If I can be critical, I think you may have a few rough spots in the finish. Just to the left of the ball of the clip, half way down. See the way the highlight breaks-continues-breaks-continues, that's an inconsistency in the finish.

It looks that way but curly maple on a small pen body does that quite often. Holding it in your hand and turning it side to side and watching the wood shimmer will tell the whole story.
 

Gary Zakian

Member
Joined
Jan 18, 2010
Messages
92
Location
Bloomington, Indiana
Re: paper towels sticking to your fingers - try folding the paper towel in half, and inserting a piece of wax paper that is just smaller than the dimensions of the paper towel between the layers of the paper towel. This should prevent CA leakage and much pain. DAMHIKT.
 

phillywood

Member
Joined
May 10, 2010
Messages
2,067
Location
San Antonio, TX, 78250, USA
the design of your pen is way out of proportion. top is Ok, but he bottom doesn't compliment the top. Have you tried to hold the pen in your hands and see how it feels?
skye mentioned about the CA finish. the best way you can practice is to take whole bunch of blanks and don't drill them and try to round them center to center on the lathe and then apply CA finish until you are satisfied with the finish. and, CA only takes maybe 3 Sec. on one path and same on the way returning, longer than that will leave spots and ridges, I had to learn it the hard way ,but i have a good teacher whom pens are always admired here on IAP.
Best of luck.
 

Drstrangefart

Member
Joined
Sep 15, 2010
Messages
4,258
Location
Woodstock, Ga. U.S.A.
the design of your pen is way out of proportion. top is Ok, but he bottom doesn't compliment the top. Have you tried to hold the pen in your hands and see how it feels?
skye mentioned about the CA finish. the best way you can practice is to take whole bunch of blanks and don't drill them and try to round them center to center on the lathe and then apply CA finish until you are satisfied with the finish. and, CA only takes maybe 3 Sec. on one path and same on the way returning, longer than that will leave spots and ridges, I had to learn it the hard way ,but i have a good teacher whom pens are always admired here on IAP.
Best of luck.


Actually, I showed it off in a public forum a few hours ago, and everyone loved it. I know the proportion is off, that's a result of the wood trying to tear away and doing a LOT of cleanup with sandpaper. I think my gouce may have been sharpened at the wrong angle. My fault. I'm gonna try to fix that.
 

bitshird

Member
Joined
Aug 27, 2007
Messages
10,236
Location
Adamsville, TN, USA.
Actually, I showed it off in a public forum a few hours ago, and everyone loved it. I know the proportion is off, that's a result of the wood trying to tear away and doing a LOT of cleanup with sandpaper. I think my gouce may have been sharpened at the wrong angle. My fault. I'm gonna try to fix that.


Take a look on You Tube for gouge and Skew sharpening, there are lots of short videos, a dull toll sucks to turn with. Do you have a bench grinder or even better a belt sander?
 

jttheclockman

Member
Joined
Feb 22, 2005
Messages
19,148
Location
NJ, USA.
the design of your pen is way out of proportion. top is Ok, but he bottom doesn't compliment the top. Have you tried to hold the pen in your hands and see how it feels?
skye mentioned about the CA finish. the best way you can practice is to take whole bunch of blanks and don't drill them and try to round them center to center on the lathe and then apply CA finish until you are satisfied with the finish. and, CA only takes maybe 3 Sec. on one path and same on the way returning, longer than that will leave spots and ridges, I had to learn it the hard way ,but i have a good teacher whom pens are always admired here on IAP.
Best of luck.


Actually, I showed it off in a public forum a few hours ago, and everyone loved it. I know the proportion is off, that's a result of the wood trying to tear away and doing a LOT of cleanup with sandpaper. I think my gouce may have been sharpened at the wrong angle. My fault. I'm gonna try to fix that.


I know beginners are into this big an bulky bulges but do yourself a favor and do a straight shaped pen and notice the huge difference in both the look and the finish you can achieve. When doing bulges like that the consistancy is hard to accomplish and frankly they look odd. Give it a try on your next one.

If your finger is sticking to the towel you need to fold the towel in half and 2 swipes on the pen and walk away. Do not try to keep going back and forth on the pen. Not needed. Time to improve and step up:)
 

Drstrangefart

Member
Joined
Sep 15, 2010
Messages
4,258
Location
Woodstock, Ga. U.S.A.
the design of your pen is way out of proportion. top is Ok, but he bottom doesn't compliment the top. Have you tried to hold the pen in your hands and see how it feels?
skye mentioned about the CA finish. the best way you can practice is to take whole bunch of blanks and don't drill them and try to round them center to center on the lathe and then apply CA finish until you are satisfied with the finish. and, CA only takes maybe 3 Sec. on one path and same on the way returning, longer than that will leave spots and ridges, I had to learn it the hard way ,but i have a good teacher whom pens are always admired here on IAP.
Best of luck.


Actually, I showed it off in a public forum a few hours ago, and everyone loved it. I know the proportion is off, that's a result of the wood trying to tear away and doing a LOT of cleanup with sandpaper. I think my gouce may have been sharpened at the wrong angle. My fault. I'm gonna try to fix that.


I know beginners are into this big an bulky bulges but do yourself a favor and do a straight shaped pen and notice the huge difference in both the look and the finish you can achieve. When doing bulges like that the consistancy is hard to accomplish and frankly they look odd. Give it a try on your next one.

If your finger is sticking to the towel you need to fold the towel in half and 2 swipes on the pen and walk away. Do not try to keep going back and forth on the pen. Not needed. Time to improve and step up:)

I usually only use one swipe with the towel. An old Star Trek gaming card in the middle of the paper towel helps keep my fingers CA free. One of the main reasons I stick with the fat body and odd curves is due to the OH COOL reaction I get from most people who suddenly want to buy one. I like the funky shapes, but they are for sale, and my target market also likes those. The bulges DO make it hard to micromesh without going through to wood on the first couple of grits.
 

phillywood

Member
Joined
May 10, 2010
Messages
2,067
Location
San Antonio, TX, 78250, USA
Allan, I hope my comment didn't turn you off doing this. In a pic. that was the first thing that got my attention. In my opinion when you look at a piece of art the proportion and the flow of the art object also expresses how well the artist's vision has come to life on the object. But, now that you say your customers like it then that's a different story. You have to cater to your customer base. Of, course I am not that experienced like some of the veteran turners here, it was just an observation and comparing with what I have seen on IAP during the time I have been on here. Best of luck to you and happy turning.
 

paramount Pen

Member
Joined
Jan 23, 2010
Messages
139
Location
1015 Church St. Vidor, Texas
C A glue

If you're using a hair dryer, you may want to get a squirt bottle of CA accelerator. You can get it at hobby stores that sell RC car parts if there's not a Woodcraft near you.

For me, roughly my steps are:

Seal with a layer of thin CA.
Fold paper towel the lenght of one blank.
Squirt a bead of medium CA on the end of the paper towel.
Touch the bead to one blank from the underside with the lathe on low.
Wiggle it a little side to side then take it away.
Let it dry or hit it with accelerator if I'm feeling brave
Sand LIGHTLY with MM, a low grade, maybe #2 with the lathe turned halfway up.
Turn the lathe off and sand horizontally until the whole blank is consistently ashy.
Wipe down with a clean paper towel.
Apply another coat, repeat.
Maybe apply another and repeat.
Work my way through the MM using accelerator as a lubricant.
Cross sand through the first half of the MM set.

That's about it.

I used accelerant before, didn't like it too much. Mostly wasn't sure what to expect, and I was being overstimulated trying to get the thick coats of medium CA. The hair dryer does a good job of spreadint areas that are too thick out, covering mistakes. Once I get comfortable with my process I'm gonna work on something more like the one listed above. I'm still quite happy with most of my results, as they are improving with every pen I turn. As a matter of fact, let me go check to see if my cherry burl's 3rd layer of medium is dry.......

Use an aerasol accelerant or get a disposable aerasol can from ebay to put the liquid accelerant in and don't get no closer than 12 -18 inches away and you won't have any problems.
 

Drstrangefart

Member
Joined
Sep 15, 2010
Messages
4,258
Location
Woodstock, Ga. U.S.A.
Allan, I hope my comment didn't turn you off doing this. In a pic. that was the first thing that got my attention. In my opinion when you look at a piece of art the proportion and the flow of the art object also expresses how well the artist's vision has come to life on the object. But, now that you say your customers like it then that's a different story. You have to cater to your customer base. Of, course I am not that experienced like some of the veteran turners here, it was just an observation and comparing with what I have seen on IAP during the time I have been on here. Best of luck to you and happy turning.

Dude, it's totally cool. Everyone has their own philosophy and I will listen to them all without taking it too personally. My vision for that pen kinda got diminished after sanding out all of the tearaways and realizing I had lost a lot of material. As it was my only curly maple blank, I figured I should probably finish it and call it a day. I happen to like the shaped bodies as well, so it works out. I can turn the narrower straight bodies all day. They just seem a bit dull.
 

jttheclockman

Member
Joined
Feb 22, 2005
Messages
19,148
Location
NJ, USA.
/quote]

Dude, it's totally cool. Everyone has their own philosophy and I will listen to them all without taking it too personally. My vision for that pen kinda got diminished after sanding out all of the tearaways and realizing I had lost a lot of material. As it was my only curly maple blank, I figured I should probably finish it and call it a day. I happen to like the shaped bodies as well, so it works out. I can turn the narrower straight bodies all day. They just seem a bit dull.[/quote]


All well and good if you like making them like that and they sell well. Go for it. But at some time you will want to step up and do some fine pieces of work using some exotic woods or other materials and they will outsell those styles for sure.

You say a straight body pen is dull then take it to another level and use better blanks, do a little closed end turning or add some segmentation. That will step up a straight bodied pen. The asking price will rise with it also.

Anyway good luck with your turnings and your sales. Just take these as suggestions and do whatever you want with them. You got them cheap 2¢
 

Drstrangefart

Member
Joined
Sep 15, 2010
Messages
4,258
Location
Woodstock, Ga. U.S.A.
/quote]

Dude, it's totally cool. Everyone has their own philosophy and I will listen to them all without taking it too personally. My vision for that pen kinda got diminished after sanding out all of the tearaways and realizing I had lost a lot of material. As it was my only curly maple blank, I figured I should probably finish it and call it a day. I happen to like the shaped bodies as well, so it works out. I can turn the narrower straight bodies all day. They just seem a bit dull.


All well and good if you like making them like that and they sell well. Go for it. But at some time you will want to step up and do some fine pieces of work using some exotic woods or other materials and they will outsell those styles for sure.

You say a straight body pen is dull then take it to another level and use better blanks, do a little closed end turning or add some segmentation. That will step up a straight bodied pen. The asking price will rise with it also.

Anyway good luck with your turnings and your sales. Just take these as suggestions and do whatever you want with them. You got them cheap 2¢[/quote]


That is indeed the plan. I've had the turning rig in the basement for about 2 weeks now. I am literally just getting started. The next thing to do is get myself set up for bullet kits. Those are surefire attention getters in West Georgia.
 
Top Bottom