You are using an out of date browser. It may not display this or other websites correctly.
You should upgrade or use an alternative browser.
You should upgrade or use an alternative browser.
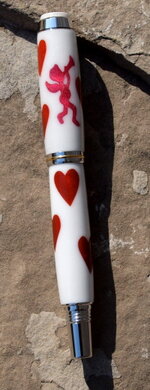
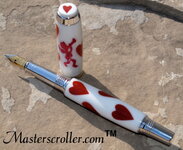
Cupid 360
- Thread starter workinforwood
- Start date
Signed-In Members Don't See This Ad
See more from workinforwood
Perhaps it was your matching boxer shorts that elicited that comment! :biggrin::biggrin:
I think the pen is pretty cool.
Jim why did you revive this old thread??? I bet you wanted to post in the new one. Sometimes age creaps in in weird ways:biggrin::biggrin:
Sorry John !! It just appeared on my PC and I answered it without looking at the dates. It was probable that fat fingers had something to with the thread. Don't we get smarter with age ??? Jim S
Signed-In Members Don't See This Ad
wizard
Member
Jeff, Your wife has gotta be kidding!! It's beautiful!! Ask her to look at again on Valentine's Day...Doc
Phunky_2003
Member
I dont think its tacky at all. I think it is pretty nice. I would carry it and be proud. Did she say she would like it more with less hearts or something maybe? Maybe just the cupid on cap and hearts on the body?
David Keller
Member
...My wife says it's tacky. :frown:
Perhaps it was your matching boxer shorts that elicited that comment!
I think the pen is pretty cool.
workinforwood
Member
Who knows with her. She says she doesn't like bigger pens and she isn't into cupids or hearts I am guessing.
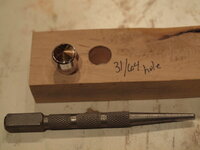
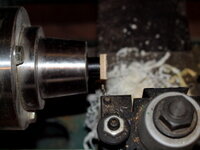
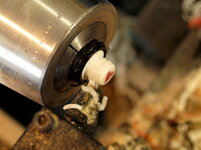
Here's my finial button.
Drill a hole, take a punch and whack the pin to remove the old button.
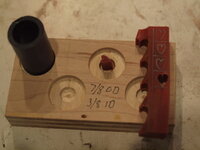
Forestner bit..drill a shallow hole to fit the pvc pipe, and another shallow 3/8 hole in the center of that. Cut a heart out that is smaller than 3/8 and glue in center of middle hole, then glue the pvc into place.
Pour in resin, pressurize to 60 lbs...let sit for 5-6 hrs, because it is such a small pour it needs a lot more time to set up and cure.
Cut pipe pieces around the plywood.
Mount pipe into chuck, part off the plywood. Spin the blank round to be the same OD as the old button.
Polish and wet sand the button.
Part off the button.
Rough up inside the top of the finial and glue in new button with epoxy.
Attachments
ToddMR
Member
Very cool looking pen! I think it looks really good. Not too much in my opinion at all.
ThomJ
Member
Boy I kniow exactly what lady to give that too if you are having problems with the wife liking cupid. That is a great looking pen Jeff
LarryDNJR
Member
Very Nice Jeff. Not something I'd personally carry around but I can see it definitely is a great pen and someone will be happy to have it somewhere.  You never cease to amaze me with your works!
Stick it in the oven for 30 minutes at 150 - works for PR.:wink:My wife says it's tacky. :frown:
Jim15
Member
That's another awesome pen.
Toni
Member
LOVE the pen Jeff~!!! Love hearts its perfect just the way it is!! I dont think its tacky your wife is probably used to your more manly stuff. Great design!!!
bitshird
Member
Jeff are you sure was she talking about the pen? :glasses-cool: :biggrin:
plantman
Member
You just can't beat Jeff's blanks !!! However if you want to expand your horizon,s, these are several ways this can be done without the expense of a CNC machine. First would be Jeff's use of a scroll saw. He has a great piece on how to inlay a gecko into a blank. Second would be Toni's way of laying polymer Clay onto your tube. Good luck with that one !! Third wound be to cast in two stages as suggested above using decals or stickers between layers. First cast your white layer and turn it down under size, apply your decals, and cast your second clear layer over them. Or, just build up the top layer with CA. Whatever you decide to try, as long as you keep your design small, you don't have to worry about to much distortion on the curved surface. I have tried all of these methods, and they all work with enough practice to some degree or another. I'm no Toni or Jeff however !! Jim S
jttheclockman
Member
You just can't beat Jeff's blanks !!! However if you want to expand your horizon,s, these are several ways this can be done without the expense of a CNC machine. First would be Jeff's use of a scroll saw. He has a great piece on how to inlay a gecko into a blank. Second would be Toni's way of laying polymer Clay onto your tube. Good luck with that one !! Third wound be to cast in two stages as suggested above using decals or stickers between layers. First cast your white layer and turn it down under size, apply your decals, and cast your second clear layer over them. Or, just build up the top layer with CA. Whatever you decide to try, as long as you keep your design small, you don't have to worry about to much distortion on the curved surface. I have tried all of these methods, and they all work with enough practice to some degree or another. I'm no Toni or Jeff however !! Jim S
Jim why did you revive this old thread???
plantman
Member
You just can't beat Jeff's blanks !!! However if you want to expand your horizon,s, these are several ways this can be done without the expense of a CNC machine. First would be Jeff's use of a scroll saw. He has a great piece on how to inlay a gecko into a blank. Second would be Toni's way of laying polymer Clay onto your tube. Good luck with that one !! Third wound be to cast in two stages as suggested above using decals or stickers between layers. First cast your white layer and turn it down under size, apply your decals, and cast your second clear layer over them. Or, just build up the top layer with CA. Whatever you decide to try, as long as you keep your design small, you don't have to worry about to much distortion on the curved surface. I have tried all of these methods, and they all work with enough practice to some degree or another. I'm no Toni or Jeff however !! Jim S
Jim why did you revive this old thread???I bet you wanted to post in the new one. Sometimes age creaps in in weird ways:biggrin::biggrin:
Sorry John !! It just appeared on my PC
Last edited:

