Cuban Pen Kit - Padauk

Signed-In Members Don't See This Ad
See more from MrFrost

MrFrost

Member
Joined
Feb 10, 2017
Messages
42
Location
Elgin, IL
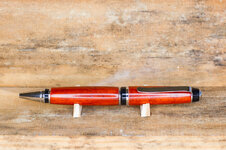
Ok, finally starting to gain a little confidence, this was pen number 7 for me total, I just started turning pens two months ago, and haven't had much shop time due to winter. Had a nice day yesterday so I got out there and made this pen. Still need to work on getting smooth transitions to the bushings, as I left these a tad bit thick. I'll get there, lol.

Sanded to 600 grit, then applied six coats of medium CA. Then wet sanded with all grits of micro mesh. Then did satin and gloss polishes.

Also threw together a makeshift pen display for taking photos of finished pens.

Rockler Cuban Kit
Padauk Blank
 

Attachments

  • rsz_new_pen_31917-1.jpg
    rsz_new_pen_31917-1.jpg
    721.7 KB · Views: 378
Signed-In Members Don't See This Ad

jttheclockman

Member
Joined
Feb 22, 2005
Messages
19,132
Location
NJ, USA.
Yes just a tad under turned but the overall shape is spot on. That wood will darken on you some over the years. Keep up the good work. Thanks for showing.
 

Eldermike

Member
Joined
Mar 13, 2017
Messages
92
Yes I also noted the underturning and under finished the top barrel where it meets the center band. I like to use 6-7 coats of thin ca for wood finishes. You will be a master I'm no time.


Sent from my iPhone using Penturners.org mobile app
 

MrFrost

Member
Joined
Feb 10, 2017
Messages
42
Location
Elgin, IL
Yes I also noted the underturning and under finished the top barrel where it meets the center band. I like to use 6-7 coats of thin ca for wood finishes. You will be a master I'm no time.


Sent from my iPhone using Penturners.org mobile app

Thank you. The under finished area that you see is from another mistake, the CA build up on the finishing bushing required some light sanding to remove excess CA. I did a HORRIBLE job removing the dried CA glue from the blank and sanding the actual blank and edge.

I gotta figure out what I am doing wrong to cause such a build up of CA where the blank meets the finishing bushings, because this is becoming a common occurrence for me.
 

Eldermike

Member
Joined
Mar 13, 2017
Messages
92
I like to put on more thin coats of ca and let the first and second coat air dry. Followed by several more using an accelerator between coated. Remember to put the metal bushings back on the piece when sanding - So you keep the edges crisp and you can get right to the bushing for great final fit and finish. If you don't like the looks of the finished product you can always tool/sand it off before assembly. Look at you tube for ca finish vids every one has a different technique. Practice will make perfection.


Sent from my iPhone using Penturners.org mobile app
 

OZturner

Member
Joined
Aug 5, 2013
Messages
6,663
Location
Sydney. NSW. Australia
Nice Pen, Ryan, you are getting there,
Practice with any piece of Scrap wood, drill it to the diameter of your Mandrel, and you can use any (One Blank) Pen Kit Bushings, by reversing them when fitting to the Mandrel (as the Blank has no Tube).
You put the Turn Too Diameter toward the Blank.
Then Practice Turning to the Diameters of the Bushings.
Then as you seem to like to put plenty of CA, then Practice Slightly "Over Turning and Finishing", so that your CA can build up to the Required Diameter.
It is all about Practice and Confidence, you will find after some time, your Muscle Memory will improve your turning, and your Eye Memory will also assist.
Great Result so far, I look forward to your future posts.
Congratulations,
Brian.
 
Top Bottom