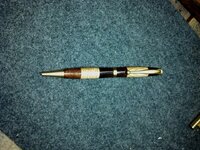
Tried a cross cut Walnut comfort set last week. The grains were interesting. Someday I'l do different kits but I'll learn as I go. I'm not in business to sell pens, just find this hoby theraputic......to a point. Any suggestions on what to do differently will be appreciated.

You are using an out of date browser. It may not display this or other websites correctly.
You should upgrade or use an alternative browser.
You should upgrade or use an alternative browser.
Cross Cut Experiment
- Thread starter vakmere
- Start date
Signed-In Members Don't See This Ad
See more from vakmere


Yes, and that is the 45° cut which is know as the "Diagonal cut":wink:
Some woods become very fragile when they are cut in angles, particularly the cross cut, I had some that almost snap just for looking at them in the wrong way...!:biggrin: It may be a bit of an exaggeration but, what it means is quite real.
Some people just don't like to turn anything but straight cut or with the grain woods, unless is a burl, that has no grain direction...!
It is also true that, woods with "rays" formations, such as the she-oaks, bull-oaks, Holly-Oaks, and many others, finding the ray direction and cut it at about 60°, it will provide one of the most interesting patterns possible, it doesn't affect the way the wood turns but enhances the channels of the rays like the eye channels in some burls...!
Cheers
George


Signed-In Members Don't See This Ad
NittanyLion
Member
Look very nice. I always like to get rid of the rubber piece on these kits. The benefit is the wider center band vs. the normal slimline kits. Just cut your lower blank the full length of the tube.
plantman
Member
End grain is always very interesting to work with. Nice looking pens. I go along with Steve, and discard the rubber piece. By the time you have your pen assembled, it's picked up dust, discolored, and can't be cleaned. Not using it also gives you more blank to show off and balances out the preporshions of the pen better. Jim S
denniszoomy
Member
You also might try cutting it on an angel so the grain is neither horizontal or vertical.
Dennis
Dennis
Nice looking pens, good fit and finish. I go along with the others in not using the rubber grip unless you have some body who wants it.
robutacion
Member
You also might try cutting it on an angel so the grain is neither horizontal or vertical.
Dennis
Yes, and that is the 45° cut which is know as the "Diagonal cut":wink:
Some woods become very fragile when they are cut in angles, particularly the cross cut, I had some that almost snap just for looking at them in the wrong way...!:biggrin: It may be a bit of an exaggeration but, what it means is quite real.
Some people just don't like to turn anything but straight cut or with the grain woods, unless is a burl, that has no grain direction...!
It is also true that, woods with "rays" formations, such as the she-oaks, bull-oaks, Holly-Oaks, and many others, finding the ray direction and cut it at about 60°, it will provide one of the most interesting patterns possible, it doesn't affect the way the wood turns but enhances the channels of the rays like the eye channels in some burls...!
Cheers
George
Last edited:
mikespenturningz
Member
I like this hardware with and without the rubber front. I have made them both ways and like them both ways. Nice job on these it is hard to get that the right diameter where the rubber meets the wood. You did a great job mating the two.
plantman
Member
When doing end grain woods cut from 15 degrees to 60 degrees , I will follow this method. First I stabilize the blank and let dry. Next I wrap the blank in duct tape or any nylon reinforced packing tape. Reason for this is to keep your blank together in case it should split on the grain line as you drill. Your grain is running at an angle, and you are drilling in a straight line. After drilling run some thin CA down inside the hole to glue any thin spots or cracks together on the inside. Redrill the blank. Place your blank on the lathe and coat with thin CA on the outside to glue any defects together. Turn your blank until it is round. Coat with thin CA again. Stop the lathe every 2 or 3 passes and recoat to fill any defects. When I reach just over finish size I check the blank and use thick or gap filling CA to give me a more even surface. Now I use a 6 inch fine metal file, with the lathe running fast, and go back and forth to smooth out any high or rough spots. With the lathe stopped, I hand sand lengthwise with 240 or 400 paper to remove any shiny spots reflected by an over the lathe lite. Wipe clean, and sand with 1200 finishing paper and wipe clean. Apply your finishing coats of CA, I use 8 coats of thick CA and wipe on with a soft paper towel, hitting it with accelerator every 4th coat. Now use 400 paper to remove any and all shiny spots. Wipe clean and follow with the 1200 paper and wipe clean again. You can take the polish of your choise and bring your blanks to a glass shine. Jim S
Good suggestions. I was mulling over the rubber grip however my neighbor liked the grip and he bought the set (it really wasn't for sale). Strange, maybe I'm sentimental, but I dont like to sell pens that turn out really really well because I feel I'll miss them too much.  I will try the 45 % 60 degree cuts this weekend.
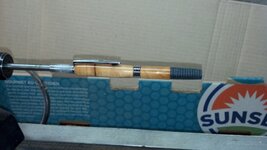
Actually turning this one was not that difficult and didn't feel like the wood was going to split apart. I have a shot of it on the lathe.
The other is of crosscut pieces I had left over from other turnings (walnut and oak ) as an experiment. That was interesting. Camera phone pixs are not very complimenteray but you get the idea.
Thanks for the suggestions, I will use those techinques you all gave and add them to my experience.
I will try the 45 % 60 degree cuts this weekend. Actually turning this one was not that difficult and didn't feel like the wood was going to split apart. I have a shot of it on the lathe.
The other is of crosscut pieces I had left over from other turnings (walnut and oak ) as an experiment. That was interesting. Camera phone pixs are not very complimenteray but you get the idea.
Thanks for the suggestions, I will use those techinques you all gave and add them to my experience.
Attachments
sbwertz
Member
I turned a peppermill out of cross cut carob last week. Fought me tooth and nail, but I won. Unfortunately, it got snapped up before I could get a picture. I like turning cross cut items. They look completely different from straight grain from the same piece.
Last edited: