Copperhead/Tru-Indian Head™ Gran Torino

Signed-In Members Don't See This Ad
See more from seamus7227

seamus7227

Member
Joined
Mar 18, 2009
Messages
6,220
Location
Wichita Falls, TX
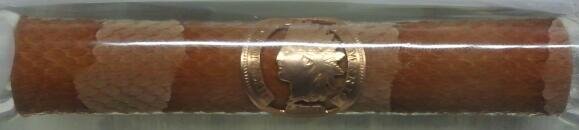
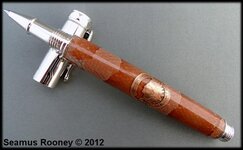
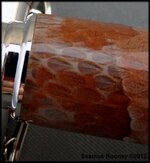
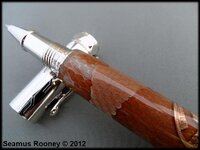
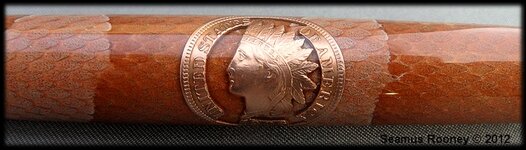
I started this thread a couple of weeks back and finally got around to completing the casting process/turning and assembling. Unfortunately, when i pressed the components into the tube(everything was squared up too), you can see by the photos that it appears a separation occurred :eek:between the skin and the resin. So the only thing i can think of that might have caused this is the plating on the components that were being pressed in, had too much plating on them. this is a first for me, usually the failures occur after you cast before you turn the blanks. Anyway, you get the overall idea of what i was trying to accomplish i hope. It was to combine the bronze penny with the copperhead snakeskin since they both have similar colors! Hope you all enjoy and as usual C & C Welcome!
 

Attachments

  • 2012-07-29 21.54.03-1.jpg
    2012-07-29 21.54.03-1.jpg
    10.3 KB · Views: 230
  • SAM_1541.jpg
    SAM_1541.jpg
    55.5 KB · Views: 421
  • SAM_1542.jpg
    SAM_1542.jpg
    41.9 KB · Views: 314
  • SAM_1543.jpg
    SAM_1543.jpg
    49.2 KB · Views: 322
  • SAM_1544.JPG
    SAM_1544.JPG
    137.7 KB · Views: 262
  • SAM_1546.JPG
    SAM_1546.JPG
    197.1 KB · Views: 379
Signed-In Members Don't See This Ad

Old Lar

Member
Joined
Dec 26, 2009
Messages
732
Location
Sturgis, SD
A great idea and nice job. I have done a few rattlesnake skins and have the separation more times than not. Usually it happens before turning but has happened while assembling the pen. If you work it out, please let me know what you did. The separation has been very frustrating.
 

Jim Burr

Banned
Joined
Feb 23, 2010
Messages
3,060
Location
Reno, Nv
If one didn't know better...looks like modeling in the skin...something other than a plating, finish, casting or failure. I have a real problem with "failure" being used here!
 

Pioneerpens

Member
Joined
Oct 11, 2009
Messages
1,673
Location
Huntington, WV
Looks awesome Seamus! I have also had that separation doing snakeskins and other castings. Most often it occurs when I press the components in. I think, in my case anyway, it's just the pressure against it.
 

seamus7227

Member
Joined
Mar 18, 2009
Messages
6,220
Location
Wichita Falls, TX
A great idea and nice job. I have done a few rattlesnake skins and have the separation more times than not. Usually it happens before turning but has happened while assembling the pen. If you work it out, please let me know what you did. The separation has been very frustrating.

What i think i should have done was to take some 220-320 grit sandpaper to the section being pressed in, and lightly sand the plating off. But it is also possible that the resin was not 100% cured on the inside of the blank. It might have been slightly soft. I wont rule that out yet till i check into it more thoroughly.

Yup... I have had that S#$T happen with feathers. Great looking pen though. What words came out of your mouth as you pressed the fitting in.:eek:

as it was happening, prolly: .......well son - of - a .........but i wouldnt have completed that saying. I really work on not saying bad words anymore. I used to cuss like a sailor, but i figured i wasnt setting a very good example to others by doing so.

Did you polish the Indian head cent, or buy a copper-red one?

The penny came to me just slightly darker, but not much, then i took the dremel wire wheel to it to shine it up a bit.

Looks awesome Seamus! I have also had that separation doing snakeskins and other castings. Most often it occurs when I press the components in. I think, in my case anyway, it's just the pressure against it.

Thanks Jennifer! My thinking here is that the resin may have been just slightly tacky right above the skin(like maybe it wasnt fully hardened.) I dont really know, but if this were the case then it would make sense because as i pressed in the component, if it were slightly larger from too much plating then it would cause expansion of the tube, which would then press into the resin . this is really difficult to describe without having an example to show in person.


Thank you for all your comments as well. I have always made it a goal of mine to master the art of snakeskin casting, Huge thanks to a good friend CaptG (Gary Nicholls) for helping me break through some of my barriers!
 

JohnU

Member
Joined
Jan 31, 2008
Messages
4,954
Location
Ottawa, Illinois
I Love it! Great idea and execution. As for the separation, been there... I feel your pain, but it didnt take anything away from that master piece!
 

Curly

Member
Joined
Nov 20, 2010
Messages
4,849
Location
Saskatoon SK., Canada.
Unfortunate that happened so close to the end of the process.

You could try to knock the component off and put a small bead of resin round the end of the blank and quickly put it in the pressure pot and see if you can push the resin in under higher than normal pressure.
 

Jjartwood

Member
Joined
Jan 30, 2011
Messages
697
Location
Chicopee,Ma
From the outside, and I'll be the first to admit that I'm somewhat out of my depth here
but the common problem is the skin moving around creating voids.
Just a couple of thoughts, When the skin is put on the tube would curing it in a vacuum
give it a tighter bond?
Or,cool the tube with the skin on it down in a fridge before pouring so pouring and pressure will allow the blank to expand into the resin?
That such a beautiful pen had a mishap like this is criminal,not to mention the work and planning that went into it.
As the pen is has failed ( only by your standards for me it would be a home run )
I'd drill a pin hole in the void area and use a hypodermic loaded with warm PR
and try to fill the void without taking the pen apart and risking more issues.
 

edstreet

Member
Joined
Aug 12, 2007
Messages
3,684
Location
No longer confused....
One of the inherent problems when working with certain material, esp when you start pressing the items on the tube diameter will EXPAND. I have been told that the 'flexible' CA would be better suited for these projects and the other aspect is the tube to hole gap.
 

thewishman

Member
Joined
Mar 9, 2006
Messages
8,182
Location
Reynoldsburg, Ohio, USA.
What a cool pen/ny, sorry that it didn't work.:frown:

I got some good advice, now I use a Dremmel-like tool to reduce the inside of the brass tube for a slide-on fit and epoxy or Locktite the parts together.
 

Dalecamino

Local Chapter Leader
Joined
Jan 2, 2008
Messages
14,572
Location
Indianapolis, In.
Such are the hazards of press fit parts. The pen is awesome. A really great concept. It's still a beautiful piece of art. Nice pen Seamus.
 

BSea

Member
Joined
Dec 28, 2009
Messages
4,628
Location
Little Rock, Arkansas
Man I hate that. But you can still use the penny right?

And I'm sure you've already thought of this, but next time you could remove some of the plating from the fitting, or from the inside of the brass tube so the parts would just slip together. The just glue the parts to the tube so there is no expansion. Not that I would have thought about this before it happened. I know I didn't when I made the pen from your quarter blank.
 

KenV

Member
Joined
Oct 28, 2005
Messages
4,720
Location
Juneau, Alaska.
A pin reamer of the appropriate size and a tiny drop of loctite is a good thing.

Used pin reamers are available from old machinists, flea-bay and pawn shops. They are tapered at the rate of 1/4 inch per foot and are a in a numbered series of sizes.

The advantage is to gently tighten with a slight even taper. Works better than the reloading reamers because the taper is longer.
 

plano_harry

Member
Joined
Jan 12, 2012
Messages
1,959
Location
Plano, TX 75093
Seamus, that is another great looking pen. Your creativity is amazing?

Anyone tried wicking some ultra thin CA in the end to see if it will hide?

Harry
 

seamus7227

Member
Joined
Mar 18, 2009
Messages
6,220
Location
Wichita Falls, TX
Seamus, that is another great looking pen. Your creativity is amazing?

Anyone tried wicking some ultra thin CA in the end to see if it will hide?

Harry

I did try this method but to no avail. Its all good, I will say this is the first time i have ever used this kit as opposed to the real Gran Torino from Arizona Silhouette. Looks like i will chalk this up to a great learning experience! Again, this is how we learn and grow right?!
 
Top Bottom