Constant's Rose Inlay on Elegant Sierra

Signed-In Members Don't See This Ad
See more from JimMc7

JimMc7

Member
Joined
May 12, 2009
Messages
731
Location
NE Oklahoma
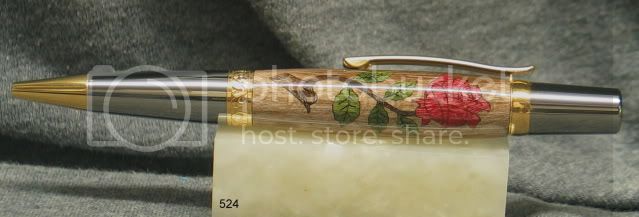
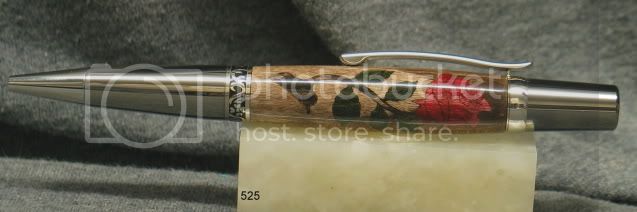
These are Constant's Rose Inlay blanks on Elegant Sierra kits. These are the red rose in light brown curly maple barrel option. I like the contrast on the blank with the lighter wood. I think my "valentines" (wife & daughter-in-law) will be happy with either, though :).

IMG_7049.jpg


IMG_7051.jpg
 
Signed-In Members Don't See This Ad

Wolfdancer

Banned
Joined
Apr 1, 2007
Messages
766
Location
Gresham, Oregon, USA.
Very very nice. I think they will be happy. Jim was it hard to do? and did you have to break the steam like constant says to do? I would really like to know why you have to do that. Thanks
 

JimMc7

Member
Joined
May 12, 2009
Messages
731
Location
NE Oklahoma
<snip> and did you have to break the steam like constant says to do? I would really like to know why you have to do that. Thanks

Rodney, I did break the stem exactly as Constant advised. With the twist in the stem to conform to the barrel, I think it would be very difficult to insert the stem in one piece. I honestly can't see the break point in the finished pen so don't think it will cause you problems. Kit wasn't difficult to assemble if you follow the directions. I mistakenly left the tube in when I applied the thin CA to the insert edges and that caused me a bit of stress :redface: but I was able to push the tube out before the CA set up (my bad -- I just forgot!).

Edit to add more info: I wet sanded with CA and some ebony dust to fill the detail as Contsant suggests on the 2nd (Black Ti) pen. I didn't do that on the the gold pen and detail looks as good IMO.
 
Last edited:

drayman

Member
Joined
Jul 29, 2007
Messages
676
Location
barnsley
jim, they are awesome. and i got a couple on the way over.:biggrin::biggrin::biggrin:
 

JimMc7

Member
Joined
May 12, 2009
Messages
731
Location
NE Oklahoma
Thanks, all, for the compliments and I hope others post theirs, too. I'd really like to see the other rose/barrel color combinations.
 

bobleibo

Member
Joined
Mar 15, 2007
Messages
2,130
Location
Utah
Jim,
Those look awesome! I am waiting for my order of these exact kits to arrive as we speak. I think I like the top one with the gold accents. Is it me or the photography, but the details on that pen seems to stand out a bit more? Did you do a CA finish? If so, how much did it darken the barrell?
Great job!
Cheers
Bob
 

JimMc7

Member
Joined
May 12, 2009
Messages
731
Location
NE Oklahoma
Jim,
Those look awesome! I am waiting for my order of these exact kits to arrive as we speak. I think I like the top one with the gold accents. Is it me or the photography, but the details on that pen seems to stand out a bit more? Did you do a CA finish? If so, how much did it darken the barrell?
Great job!
Cheers
Bob

Bob, I agree the gold accents pen shows better detail. Could just be the difference in kits but I did wet sand with CA & ebony dust on the other (which, I think, should have resulted in more contrast but again, could just be difference in original inlay detail). Both finished with CA (no BLO) and this always changes the look a bit - you can see same effect by moistening with DNA or water - not sure you can avoid the change unless you don't apply any finish.
 
Last edited:

JimMc7

Member
Joined
May 12, 2009
Messages
731
Location
NE Oklahoma
The difference in detail (particularly in the leaves) bugged me so I measured and the Black Ti pen (less detail) is 0.017" smaller in diameter than the gold trim pen (measured at same point just below the clip end). So, detail was likely same in both and I just turned off a bit too much on the black ti pen. Point is not to "over-turn" if you want to maintain the detail!
 

OKLAHOMAN

Member
Joined
May 17, 2006
Messages
10,228
Location
Costa Rica
Jim, your going to make two ladies very,very happy.. And you hit the 3 F's
Fit, Finish and Foto...........Ok my spelling leaves something to be desired but Photo sure sounds like Foto.....
 

mtgrizzly52

Member
Joined
Feb 24, 2008
Messages
326
Location
Kalispell, MT, USA.
Jim,

Those are awesome looking. I just got my 2 kits on Saturday, but to be honest, I'm a bit afraid to start working on them because they look so delicate, and I'm not sure what to do to put them together.

Where did you find instructions on how to put them together and finish?

Again, fantastic job! I hope mine come out at least half as good as yours did!

Rick (mtgrizzly52)
 

JimMc7

Member
Joined
May 12, 2009
Messages
731
Location
NE Oklahoma
<snip>Where did you find instructions on how to put them together and finish?<snip>

Rick, instructions are on Constant's web site:
http://www.lazerlinez.com/pdf%20files/Rose%20%20%20Instructions.pdf

Follow those and you shouldn't have any problems.

Only thing I might leave out when I do more is filling with brown wood dust -- yes if you have any small gaps, but not sure it's really necessary to highlight the inlay detail (more important is not to turn the blank down too much I think). I used a 6" spring clamp to press a few stubborn pieces into place (some are delicate so don't be too aggressive).

I used epoxy to glue in the tube after using the thin CA to glue in the pieces. Like Constant recommends, I sanded first with 220grit to smooth before turning with a sharp skew used like a scraper -- light cuts because I didn't want to ruin a blank either! CA finish just like any other pen but I would avoid BLO to minimize any color change.

Good luck and post or PM if you have more questions. I bet Constant would be willing to help if you gave him a call, too.
 
Last edited:
Top Bottom