
You are using an out of date browser. It may not display this or other websites correctly.
You should upgrade or use an alternative browser.
You should upgrade or use an alternative browser.
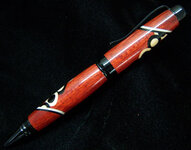
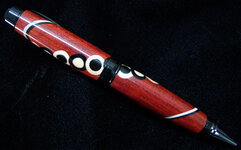
"Coming n' Going" Cigar Pen
- Thread starter akbar24601
- Start date
Signed-In Members Don't See This Ad
See more from akbar24601


Thank you all so much for your very kind words. It really means alot to me coming from all of you. I feel that all of you possess great talent and I am proud to be able to show my work along side of yours.
This piece is actually just more tedious than it is difficult. First I turn the main body to a cylinder. While still on the lathe, I index it and run a center line the entire blank at each index point. Then, measure and mark where you want your holes on the blank. I have a small drill press that I use, holding the blank in a V-block. Once you figure out the size and placement of the holes, center punch them on the blank. Having picked your drill bits, now you have to turn dowels of your selected material to the size of the bit. Now proceed drilling the blank (only to center or a little less). Then I put glue in the hole, insert the dowel and then cut it off. Just keep doing that until you have what you want.
Thanks for your interest. If you guys do one Iwould love to see the results. Happy Turning. :glasses-cool:


If you set your v-block at an angle, then you would have ovals instead of circles.

Actually, they'll come out triangle shaped with rounded corners. DAMHIKT...


Signed-In Members Don't See This Ad
TribalRR
Member
...That's it, just one today??? LOL
Very nice as usual!
Very nice as usual!
alphageek
Former Moderator
Man, I am going to have to stop opening any posts by you... I don't know what your tag is for, but my reaction to all these pens is "ack!... how did he do that!"
Beautiful pen. I can't even begin to figure out how long it would take me to do that! The circles would have been impressive enough, then I see the circle in a circle, THEN I notice the overlap so they couldn't have been all drilled then inserted as a batch!
ARGGGG... You must have WAY more patience than I do.
CaptG
Member
SHAZAAAAM, thats it, he's a wizard, lol. Nice work, again.
dntrost
Member
Yep this sucks I hate looking here also I just get depressed that there are so many show offs! :biggrin: Boy I tell you what that is an amazing pen! Please please tell us how you did it!:befuddled:
OldWrangler
Member
I'm with Dion....that's an awesome pen. Give us some idea how you did this.
thewishman
Member
Nice, creative work. You have really been doing some great work! Thanks for sharing the results - your work is inspiring.
bitshird
Member
Your work is Awesome, I truly enjoy seeing top notch work like yours.
akbar24601
Member
Yep this sucks I hate looking here also I just get depressed that there are so many show offs! :biggrin: Boy I tell you what that is an amazing pen! Please please tell us how you did it!:befuddled:
Thank you all so much for your very kind words. It really means alot to me coming from all of you. I feel that all of you possess great talent and I am proud to be able to show my work along side of yours.
This piece is actually just more tedious than it is difficult. First I turn the main body to a cylinder. While still on the lathe, I index it and run a center line the entire blank at each index point. Then, measure and mark where you want your holes on the blank. I have a small drill press that I use, holding the blank in a V-block. Once you figure out the size and placement of the holes, center punch them on the blank. Having picked your drill bits, now you have to turn dowels of your selected material to the size of the bit. Now proceed drilling the blank (only to center or a little less). Then I put glue in the hole, insert the dowel and then cut it off. Just keep doing that until you have what you want.
Thanks for your interest. If you guys do one Iwould love to see the results. Happy Turning. :glasses-cool:
hewunch
Member
Way cool. I like the look a lot.
alphageek
Former Moderator
Thanks for the notes about how you did it. I was picturing a drilling rig on the lathe while indexing. Your process makes sense and actually MIGHT be feasible to try some day.
arjudy
Member
Very cool. Great design.
broitblat
Member
That does look like fun -- and creative, and good craftmanship too!
-Barry
-Barry
VisExp
Member
I have a small drill press that I use, holding the blank in a V-block.
If you set your v-block at an angle, then you would have ovals instead of circles.
workinforwood
Member
Well done, it's very nice!
TribalRR
Member
If you set your v-block at an angle, then you would have ovals instead of circles.
Actually, they'll come out triangle shaped with rounded corners. DAMHIKT...
toolcrazy
Member
OMG, not another one. He never sleeps, he eats cheetos and coke. Never goes to work. Spends 24 hours a day 7 days a week in your shop.
And you know what else..........
I am jealous as hell...... LOL
And you have another very nice pen.
And you know what else..........
I am jealous as hell...... LOL
And you have another very nice pen.
Ligget
Member
Another fantastic pen my friend!
DSallee
Member
Great pen my friend and very cool design!
Thanks for the short tut about how you did this. I'm gonna have to put this on the top my to-do list of the many many things that I have seen done here on IAP by all you members! What a talented group we are!
Hmmm.. ya know that box of dull, uninteresting, unusable blanks in the corner of every shop here.... including mine? those would be PERFECT for the dowels and for this kinda pen!
Thanks for the idea and for sharing Steve!
Dave
jhs494
Member
Very nice! The colors work great together, and it was a perfect choice of kits!
Thanks for sharing it with us.
Thanks for sharing it with us.