
You are using an out of date browser. It may not display this or other websites correctly.
You should upgrade or use an alternative browser.
You should upgrade or use an alternative browser.
Closed Barrons
- Thread starter elody21
- Start date
Signed-In Members Don't See This Ad
See more from elody21

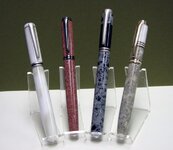
Are you talking about the white marbled one? I just turned the cap to look like the one that comes with the kit and then used epoxy to glue it in.
Alice


Signed-In Members Don't See This Ad
Jim15
Member
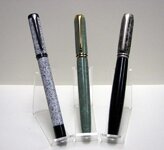
Great looking bunch of pen.
Paddy
Member
Hi Alice,
you did a good job. The pens look well done. But I personally don't like the proportions. The most are too long. You should try something close to Golden Section. Maybe try to also make a closed cap end on the longer versions.
Paddy
you did a good job. The pens look well done. But I personally don't like the proportions. The most are too long. You should try something close to Golden Section. Maybe try to also make a closed cap end on the longer versions.
Paddy
hehndc
Member
Alice:
I like how the cap turned out on the forth one on the right. nice job on all.
Steve
I like how the cap turned out on the forth one on the right. nice job on all.
Steve
Alice:
I like how the cap turned out on the forth one on the right. nice job on all.
Steve
Are you talking about the white marbled one? I just turned the cap to look like the one that comes with the kit and then used epoxy to glue it in.
Alice
I agree with you. I have been debating on taking a couple of them apart and remake the bottoms.
Because you have to glue a piece of wood to the bottom of the blanks I did the glueing all at once and wasn't really paying attention. I cut the blanks on some too long to begin with.
I was in too much of a zone and did not notice the length until later.
Duh!!!
Thanks for your input. I way actually kind of expecting someone to mention the length.
Alice
Hi Alice,
you did a good job. The pens look well done. But I personally don't like the proportions. The most are too long. You should try something close to Golden Section. Maybe try to also make a closed cap end on the longer versions.
Paddy
hewunch
Member
I like the last one on the right the best (2nd pic). I like the replaced CB. And the transition on the cap.
ZanderPommo
Member
great looking pens Alice!!
crabcreekind
Member
Very Classy!!!! I just made a satin nickel one. How do you like it?
boxerman
Member
Very nice looking pens.
Parson
Member
Is that corian? If so, how did you bond it so it doesn't show a seam?
Dalecamino
Local Chapter Leader
Wow Alice! When you get on a kick, it's a good one.:biggrin: Very nice set of pens.
It is really pretty easy.I just use med. CA
There is a step by step process one needs to take.
1.cut 2 blanks the same size 2.smooth sides up, do NOT sand
3. use denatured alcohol and a paper towel to clean all the lint off of the blanks. the alcohol also acts as an accelerator so have several spring clamps ready
4.Wear gloves,place blanks on waxed paper, apply med. CA glue liberally
5.Quickly rub the sides together making sure all surfaces are covered
6.Place spring clamps covering the entire blanks and there you have it! About 5 clamps for a regular blank. they begin to bond fairly quickly
Just let it dry for a couple of hours or over night
cut to square up on the table saw.
In very busy patterns sometimes you can see where they are glued. This is because of patterns not matching.
If done right and with most patterns no seam shows.
Alice
Is that corian? If so, how did you bond it so it doesn't show a seam?
Last edited:
Drstrangefart
Member
I like all of 'em, and the solid white one really grabs my attention.