Cherry Blossom~Closed End Experiment

Signed-In Members Don't See This Ad
See more from creativewriting

Joined
Aug 7, 2009
Messages
700
Location
Jamestown, NC
Well I wanted to try and make a closed end polymer pen and this is what happened. I was inspired by some of the beautiful handpainted asian pens that I have seen lately. I turned the core and then built the black polymer around it. The cherry blossoms are canes that I made and the branches are strands of polymer that I applied before putting on the the flowers. Everything was then baked, sanded, and finished with CA.

4658659016_7f323c48ce.jpg

4658037497_1984de31c5.jpg

4658659290_1057dfc06d.jpg
 
Signed-In Members Don't See This Ad

Mark

Member
Joined
Oct 12, 2009
Messages
2,536
Location
Pottstown PA
I my gosh. That looks amazing. That is a truly beautiful creation.

Nicely Done..
 
Last edited:

Brooks803

Member
Joined
Sep 13, 2009
Messages
5,632
Location
Aiken, South Carolina
I'd say your experiment is a sucess! Everything is so appealling to the eye. I like how you used the cherry blossoms sparingly. Awesome job. I absolutly love this pen! :biggrin:
 

ldb2000

Member
Joined
Sep 11, 2007
Messages
5,381
Location
Laurence Harbor, NJ, USA.
Ok Keith , now you are just showing off .... hee hee :biggrin:
This is the first and only Urushi Maki-e pen done the the traditional ancient polymer clay technique that I have ever seen :eek::wink::biggrin:
 

Attachments

  • awe.gif
    awe.gif
    12.6 KB · Views: 200

jskeen

Member
Joined
Oct 11, 2007
Messages
1,754
Location
Crosby, Texas, USA.
Most excellent execution on that design. I had bounced the idea of cherry blossoms off one of our other resident PC artists for a specific market, and I still bet it would be a winner. that closed end design must be a bear to roll out and get even and smooth. So what are the details on the core construction? Did you machine the nib, coupler and cap centerband? are they set directly into the pen body or are there brass tubes inside there? Any chance of a pic with the nib removed?

Cool job dude!!
 
Joined
Aug 7, 2009
Messages
700
Location
Jamestown, NC
So what are the details on the core construction? Did you machine the nib, coupler and cap centerband? are they set directly into the pen body or are there brass tubes inside there? Any chance of a pic with the nib removed?
The core is machined and is a solid body (all one piece). The same is true of the cap. There are no couplers or brass tubes. I did turn the nib section and the nib and feed are from Heritage (Lou). The body starts with a .5" rod and for the cap I start with a 5/8".

As for wrapping it wasn't that bad once you get the core turned to the dimension you need. I am a strong advocate of using a pasta machine when wrapping pens. You get a uniform thickness that makes your job much easier.
 
Joined
Aug 7, 2009
Messages
700
Location
Jamestown, NC
Thanks for all the kind words everyone. This is a work in progress!

Jeff, no need to cus:wink:!

This one is my favorites compared to the others I have made. I am becoming an advocate of less metal. The only issue I have with this pen is the clip. There is no way (yet) that I have found to attach a clip after the tube has been wrapped. I have noticed that many of the traditional asian designs are clipless and I am not sure if adding a clip would take away from the design????
 

PenMan1

Member
Joined
Jul 8, 2009
Messages
6,380
Location
Eatonton, Georgia
Keith:
It is always a pleasure to look at your work/ This one is no exception. Also, you seem to have mastered the new lathe in record time. Beautiful pen.
 
Joined
Aug 7, 2009
Messages
700
Location
Jamestown, NC
Andy, thanks for the vote of confidence. In no way is it mastered.:eek: When you only have to make the centerband look good it's easy. The rest gets covered so you don't see all the mistakes. I blew up a gear on my powerfeed this weekend:mad:. I hate plastic gears. The good thing is Little Machine Shop sells metal replacements.
 

workinforwood

Member
Joined
Mar 1, 2007
Messages
8,173
Location
Eaton Rapids, Michigan, USA.
I can't believe there isn't like 50 replies on a pen like this, so I am going to just have to tell you again that your pen is a masterpiece Keith!

Clips..yes, Clips no..it's always your call, you make the pen. To me, it should have a clip, but who is to say what a clip has to be? Sometimes a clip is more of a decoration than functional you know. I would not use a Bruce Robbins or Arriel Kullock clip for function, but just the look is all you need sometimes. There's also lots of ways to clip that pen with home made clips like wire or sheet aluminum or sheet brass on the outside or using hidden techniques and not having metal on the inside is of no concequence. It's just up to you to decide what way you want to go and then you will achieve it.
 

jskeen

Member
Joined
Oct 11, 2007
Messages
1,754
Location
Crosby, Texas, USA.
I agree with you on the clip being optional, especially for the japanese market. Sometime after we all go to bed Chris will probably log on and correct me here, but from what I recall, the clip is not nearly as prevalent on japanese pens, because they traditionally tend to be carried in a lapdesk type box, with the paper, ink ect rather than in a shirtpocket by themselves. But my memory from that far back is notoriously sketchy.
 
Joined
Aug 7, 2009
Messages
700
Location
Jamestown, NC
I can't believe there isn't like 50 replies on a pen like this, so I am going to just have to tell you again that your pen is a masterpiece Keith!
Jeff, Thanks again for your vote of confidence. I am hoping to find a way to put a hidden clip on one of these pens. The look of not having a clip is very appealing to me, but for pratical purposes a clip is a good option. My pen falls out of my chef coat all day long if it is not clipped. Some people don't appreciate a pen in their soup as much as I do:eek::wink:!
 

ldb2000

Member
Joined
Sep 11, 2007
Messages
5,381
Location
Laurence Harbor, NJ, USA.
Hi Keith , I'm still looking for a good way to add a clip on a pen like yours . So far I haven't had much luck , I have a beautiful Casin double closed end pen and really haven't liked the options I have tried so far . I hate to say it but some pens don't like getting a clip . The only solution I have come up with for these pens so far is a leather case attached to my belt or use them as desk pens only . I will keep trying and let you know if I come up with something .
 
Joined
Aug 7, 2009
Messages
700
Location
Jamestown, NC
Butch, what if I drilled a small hole and tapped it where I want the clip to go. I could make a sacrificial piece that is in place as I make the pen so nothing gets into the hole. I would have to make the clip from round stock, but I am sure it is nothing a file can't square up. Once the pen is finished the clip could screw in and a little thread locker would keep it there. I am not sure it will work, if you can make a clip from round stock, or if it will look weird but I may have to mess around a little
 

ldb2000

Member
Joined
Sep 11, 2007
Messages
5,381
Location
Laurence Harbor, NJ, USA.
I have tried that in the past . Even threaded and glued the round rod will eventually work it's way loose and then spin . You would need to flatten the end and make a flat tab and insert it into a slot . The other problem is how would the PC hold up to the stresses that the clip will put on the outside edge of the hole . I would think from my limited experience it would chip when stressed .
I have used round rod on some pens but I used a "J" hook on the end that hooked over the barrel tube and was held in place with a press fit finial .
The best solution I have come up with so far is to bolt a flat clip to the blank with tiny model railroad bolts or screws . This is how the Gisi's and several vintage pens do it , but I don't think that option would work on your pen , It just wouldn't look right on your design .
 

chriselle

Member
Joined
Sep 1, 2008
Messages
1,251
Location
Ito City, Shizuoka, Japan
I agree with you on the clip being optional, especially for the japanese market. Sometime after we all go to bed Chris will probably log on and correct me here, but from what I recall, the clip is not nearly as prevalent on japanese pens, because they traditionally tend to be carried in a lapdesk type box, with the paper, ink ect rather than in a shirtpocket by themselves. But my memory from that far back is notoriously sketchy.


Nope, I won't correct you because I don't really know the origin of clipless here in Japan. Your explanation makes sense to me. I think for the urushi and maki-e pens the clip just kinda gets in the way of the artwork. They aren't pens you typically carry around in your pocket.....messes up the whole zen thing.:wink:

Keith, this is a gorgeous pen. I really like the simplicity of clipless. The pics are great but I would love to see a close-up of your artwork. I've been working on my maki-e lately and sakura blossoms are a common theme.
 

David Keller

Member
Joined
Nov 30, 2009
Messages
1,618
Location
Enid,OK
It's a beautiful pen. I like that the blossoms are used sparingly rather than covering the entire surface... It adds a certain elegance.

As for the clips, I'm no kitless pen maker(although Butch has got me headed that way with the challenge)... Here's a thought. How about a double clip? It seems that with two small hole drilled completely through the blank, you would have the ability to use a continuous wire loop that could be molded into a clip on either side. The wires could be shaped or even twisted to add some detail. You could even drill the holes before turning the blank to simplify the process. I'm not sure I've got the kitless chutzpa to do it, but some of you guys seem to be able to do about anything.
 
Joined
Aug 7, 2009
Messages
700
Location
Jamestown, NC
Chris, thank for the compliments. This in no way compares to your Urushi!

Butch I have looked at the Gisi pens and thought one or two tiny screws in the center of the clip instead of off to the side might hold it on. What I was worried about was the look and flow of the design with a clip screwed on. I would have to cover the screws with something.

As for your round clips they look great. I would love to know how you shaped them...hint hint...or is this one of those figure it our for yourself things:biggrin:!
 
Joined
Aug 7, 2009
Messages
700
Location
Jamestown, NC
Sorry Chris I forgot to add I will try to get a close up for you. The flowers are very abstract. When I started building the cane it looked too uniform for my tastes. I wanted a handpainted look so I cut the cane into several ropes and beat them up. Each one then gave me a different look which I thought gave me a better design in the long run.
 
Signed-In Members Don't See This Ad

workinforwood

Member
Joined
Mar 1, 2007
Messages
8,173
Location
Eaton Rapids, Michigan, USA.
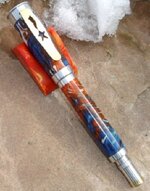
You can cut a clip from sheet metal. This is how I make some of my clips Keith. It's like maybe 1/16 thick or maybe a touch more than that in thickness. Sheet metal can be whatever..you know brass or whatever..but it has to have a bit of thickness so it won't just bend easy. You cut the clip to whatever shape you want it to be, so in my pen here, the cap is rather large because there is a 20 guage shotgun shell on top, and I cut the star ribbon into it which required a bit more room too. The styling is always up to you , but the process is real easy. Lets say your clip will be 1.25 long. Add about 3/8 in length at the top and if the clip is going to have some nice bending flow, add another 1/8-1/4 in length for that too. Put the cut clip strip in a vise 3/8 from the top <the top 3/8 of the strip is sticking straight up from the vise> and grab a regular old propane torch like a plumber would use. Heat the brass till it gets red then pound it with a hammer to 90 degrees. Then let it cool down and re position the vise again 1/8 further up and heat and pound the metal again, so the top of the clip will become a Z sort of..you know, it turned left then turned right again. If you wanted the clip to stick out a bit further than 1/8 then you just increase that distance. You cut a little slot in the pen so the clip can just squeeze in, when the clip gets in 1/4", the first bend, you pull down and now the 1/4" long piece is inside the pen facing up and parrallel with the inside of the pen. You take and spin a small wood dowel that will fit snug inside the cap. On one side of the dowel you make a flat spot. This is the side the clip is on. You drill the inside of the dowel a bit if need be to make more space and less weight in the top of the cap..not that a short piece of dowel will add much weight anyhow. You put some epoxy up into the cap then push in the dowel. The dowel will press the metal against the wall and hold the clip very securely in place. All bending of the sheet metal should be done with heat. This is how you bend it without fatiguing it. If you don't use heat, the metal breaks or becomes week. You can bend an arc or whatever on the end, heck you can make the clip way extra long and roll up the end of the clip like a tootsie roll. The width can be wide or thin..up to you. The thicker and wider, the stronger it will be of course. Clean the clip, do any fine wet sanding before you install it. I put mine in a super fine rock polisher for a couple days to soften all the edges. Always dry fit everything before final installation.
 

Attachments

  • esample1.jpg
    esample1.jpg
    62.6 KB · Views: 93
Top Bottom