Jgrden
Member
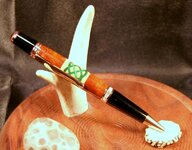
Well my first attempt at a knott failed. Ivory and Ebony but how the heck to you get those lines to match up????


John
Its all about the glue up
If you are cutting all the way through your blank you need to put the pieces back in the same order and perfectly in line. Some people just cut enough so that there is about an 1/8" piece of material left. Then when they slide the inlay material in it just fits tightly and clamp it. The aligning part is done for you then. The catch with this system is you need to be very precise with the inlay material matching the thicknes of the kerf the saw blade cuts. There are articles in the library explaining this. Also there are videos on utube that explain it well also.
The above answers are right... The short and simple answer is that your inlays must match the thickness of your blade.
Thank you,1. To make everything easier use an oversized blank (longer and thicker)
2. Do not cut all the way through the blank but be sure you cut to within 1/8" from the end.
3. Be sure your inlay material (plus glue) completely fills the cut without expanding it.
4. Practice on scrap material.
This one took me three tries and it still isn't perfect:
I noticed the deer pedicle that your pen rested on, in the photo. I have been saving them as I cut antler. I am not sure what to do with them except to make pendants. What do you do with yours?
I see. I will now try to cut without going through and then fill the voids. Whoda thunk??
I see. I will now try to cut without going through and then fill the voids. Whoda thunk??
I see. I will now try to cut without going through and then fill the voids. Whoda thunk??
One other good tip is to go to Home Depot or Lowes and get yourself a piece of aluminum angle. I use this when clamping my blanks back together because it will always give me the straight edge that is needed to keep all things lined up. I just place some wax paper between the blank and the angle to keep it from sticking to the angle.
In no time you will be changing the title of your post to PRO knots. Thanks for showing and good luck. Look forward to seeing the progress.
I need to get back to make some more of these because I have a few ideas I want to try also.
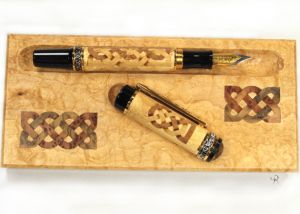
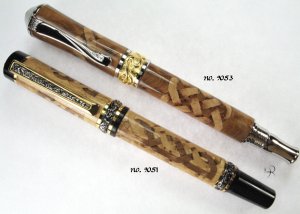
At some point you want to try something like these.
http://img.photobucket.com/albums/v233/JTTHECLOCKMAN/reheartsierra-1.jpg
http://img.photobucket.com/albums/v233/JTTHECLOCKMAN/yellowheartsierra-1.jpg

I see. I will now try to cut without going through and then fill the voids. Whoda thunk??
One other good tip is to go to Home Depot or Lowes and get yourself a piece of aluminum angle. I use this when clamping my blanks back together because it will always give me the straight edge that is needed to keep all things lined up. I just place some wax paper between the blank and the angle to keep it from sticking to the angle.
In no time you will be changing the title of your post to PRO knots. Thanks for showing and good luck. Look forward to seeing the progress.
I need to get back to make some more of these because I have a few ideas I want to try also.
At some point you want to try something like these.
http://img.photobucket.com/albums/v233/JTTHECLOCKMAN/reheartsierra-1.jpg
http://img.photobucket.com/albums/v233/JTTHECLOCKMAN/yellowheartsierra-1.jpg
Hi John,
Glad to see you got the harlequin knot to work. Haven't heard from you since those days on Penturner's Paradise. Did you ever try the "Stained Glass Windows" knot I suggested. Should be easy now with all the great acrylics available.
Or you could try this:
jttheclockman said:;1107310Hi Larry.
I have not been to that site for a long time. Did not have a good experience there thanks to a few and would rather not relive that experience. This is a more gentle site and very friendly willing to share group here for sure.
I do remember our conversations and you were the one responsible for me getting started with the knots and thank you for all the help. I try to pass some of the things on.
It is so funny you brought up the stained glass look because that is one of the things I still want to try as I just mentioned there are a few things I want to experiment with. There are a couple others too and I have a metal blank all glued up with this technique but too scared to turn it. :biggrin:
I see you posted your latest creation and still marvel at the workmanship behind these. This is taking knot making to the next level. Thanks for showing and saying HI.
"Scared to turn it"? Go for it John. It's only a chunk of metal as it sits. Could be something great!
I quit that other forum as well, same reason. Haven't done a segmented knot for quite a while. I think the harlequins were the last I did but I still think the "stained glass" idea will work with the right choice of materials.
Yea I know. I am thinking I may want to add some banding before I drill and spin it though.
") His hand carved knots are incredible pieces, not for the faint of heart.
His hand carved knots are incredible pieces, not for the faint of heart.