
BradG
Member
Hi guys.
A couple of people had asked for a few more pictures showing the different steps to one of these pens, so here's a few extra piccies as a walkthrough the making of one today.
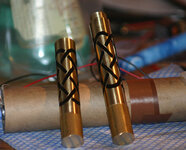
First of all i make a closed end kitless pen from brass, and applied some vinyl stickers. They then had boiling water poured over them to adhere the vinyl to the metal thoroughly.

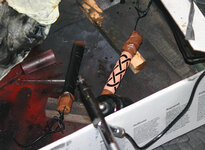
Both ends are then wrapped in electrical tape to protect them from the ferric chloride etchant. this way when i chuck them back up again on the lathe to part off the excess it hasnt erroded creating a wobble not spinning true. a piece of wire is attached to the top secured with tape, so that i can hang the piece in the tank.
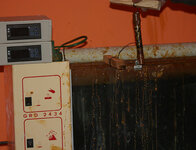
Into the Ferric chloride etchant they go, for between an hour to an hour and a half. when your solution turns black, its time to change it. mines a little overdue so this took an hour 30 mins.
This tank is heated to 30'C and has a bubble air line along the bottom for agitation. its important to hang your pens lengthwise, not sideways.. otherwise the smut from the corrosion will settle on the surface in effect protecting it, which will effect the eveness of your etch. adding some citric acid to the ferric chloride will create an edinburgh etch, where the citrus acts as a cleaning agent lifting the smut and dirt away from the surface as it corrodes.
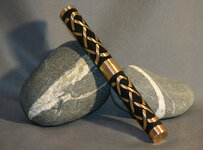
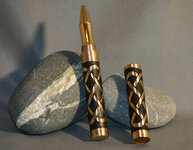
After this, they are washed and dryed, before being airbrushed for several coats of acrylic enamel.
After this the tape is removed and its mounted back on the lathe, lightly sanded to remove any adhesive from the vinyl, and are parted off.

A couple of people had asked for a few more pictures showing the different steps to one of these pens, so here's a few extra piccies as a walkthrough the making of one today.
First of all i make a closed end kitless pen from brass, and applied some vinyl stickers. They then had boiling water poured over them to adhere the vinyl to the metal thoroughly.
Both ends are then wrapped in electrical tape to protect them from the ferric chloride etchant. this way when i chuck them back up again on the lathe to part off the excess it hasnt erroded creating a wobble not spinning true. a piece of wire is attached to the top secured with tape, so that i can hang the piece in the tank.
Into the Ferric chloride etchant they go, for between an hour to an hour and a half. when your solution turns black, its time to change it. mines a little overdue so this took an hour 30 mins.
This tank is heated to 30'C and has a bubble air line along the bottom for agitation. its important to hang your pens lengthwise, not sideways.. otherwise the smut from the corrosion will settle on the surface in effect protecting it, which will effect the eveness of your etch. adding some citric acid to the ferric chloride will create an edinburgh etch, where the citrus acts as a cleaning agent lifting the smut and dirt away from the surface as it corrodes.
After this, they are washed and dryed, before being airbrushed for several coats of acrylic enamel.
After this the tape is removed and its mounted back on the lathe, lightly sanded to remove any adhesive from the vinyl, and are parted off.
Attachments

Last edited:
")