Cauldron Born

Signed-In Members Don't See This Ad
See more from Russianwolf

Russianwolf

Member
Joined
Jul 13, 2007
Messages
5,690
Location
Martinsburg, WV, USA.
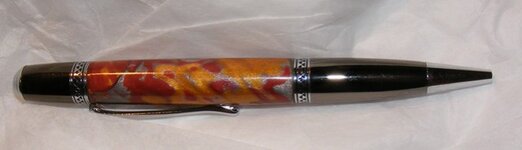
Was working with the Polymer Clays again and I have one that I can show from this batch ready. Couple more may be finished tomorrow.

This is "Cauldron Born", a mix of Copper, Silver and Gold (For some reason the Copper doesn't look metallic, but the gold and silver do) with a spray lacquer finish. Still not perfect, but I'm still playing.
 

Attachments

  • cauldron born.jpg
    cauldron born.jpg
    29.5 KB · Views: 763
Signed-In Members Don't See This Ad

Wheaties

Member
Joined
May 8, 2009
Messages
714
Location
Omaha, NE
Pretty cool! I think I will stay away from that stuff. This hobby already gets enough of my $$$ as is. :eek:
 

mickr

Member
Joined
Apr 22, 2009
Messages
1,181
Location
wilderness
this is something nice & new for most of us..thank you for sharing your experience..they look good
 

leehljp

Member Liaison
Joined
Feb 6, 2005
Messages
9,329
Location
Tunica, Mississippi,
I like what I see! I wish I had access to some of the different kinds of clay. But even if I did, I don't have time to work with it for now.

Keep making them. Thanks for posting it!
 

Daniel

Member
Joined
Jan 1, 2004
Messages
5,921
Location
Reno, NV, USA.
I have seen Polymer clay sort of come and go on the forums over the years. but this is a really nice application of them. The clay does not get a lot of press but from what I have seen it is a pretty easy and not all that expensive material. You did a nice job with this one Mike.
 

Russianwolf

Member
Joined
Jul 13, 2007
Messages
5,690
Location
Martinsburg, WV, USA.
I have seen Polymer clay sort of come and go on the forums over the years. but this is a really nice application of them. The clay does not get a lot of press but from what I have seen it is a pretty easy and not all that expensive material. You did a nice job with this one Mike.

Yeah, its definitely not a new idea, but technologies in the clays have changed over the years. So I'm not having some of the issues that others have in the past. The main think I'm working on right now is a good finish to put on them, which the lacquer seems to work great. I'll be dipping some later today I hope.

The material is very easy to work with, just have to make sure your work area is clean so you don't pick up hairs and other contaminates that might distract. Last night I worked with 2.5 ounces of clay, just over 1 package at $2.50 regular price. I made 4 pens and still have leftover clay.
 

Russianwolf

Member
Joined
Jul 13, 2007
Messages
5,690
Location
Martinsburg, WV, USA.
How is this done, do you have to actually have to fire the clay, or do you just form it on there and lacquer it????

Charles, its a low fire clay, 275 degrees, so you can do the firing in a toaster over. I paid a whopping $19 for a new one for this (they don't recommend using one that will be used for food also). Once fired, its pretty hard but not as hard as pottery clay. You can dent it with a fingernail, but it pops back out in a couple minutes.
 

Rmartin

Member
Joined
Jan 14, 2007
Messages
1,263
Location
Columbus, Ga, USA.
I've seen the clay work before, but this is the nicest I've seen!

I don't know much about this, so forgive me, but do you turn this after it's "fired" ?
 

nava1uni

Member
Joined
Mar 30, 2008
Messages
4,936
Location
San Francisco, CA, USA.
What kind of clay are you using? Sculpey or fimo? I have also use one called Permo that looks like porcelain when it is fired, but is still workable. You mentioned that you can indent it with your finger nail. I have only had that happen is the clay is undercooked or it is mixed with too much softener. There are a couple of really good books on working with polymer clays. I checked them out of the library.
 

Russianwolf

Member
Joined
Jul 13, 2007
Messages
5,690
Location
Martinsburg, WV, USA.
this is Sculpy's Premo clay. Direction say 275 degrees for 30 minutes per 1/4 inch thickness. And everything I've read says increasing the temp is bad (causes discoloration), but increasing the length of firing is okay. So I've been cooking them a little longer.

I do make the material thicker than final dimensions then turn after firing.
 

Fishrule

Member
Joined
Oct 16, 2009
Messages
46
Location
Colorado Springs, CO
When I first saw "lacquer" I thought: spray-on. But dipping? This is a new concept to me, but then again, this is all new to me as I'm really just getting started. I searched for "lacquer" in the forum overall but found no really helpful tips or threads. If you're dipping, how do you keep the inside of the brass tube clean? How do you prevent drips or runs? Help! :eek:
 
Last edited:

el_d

Member
Joined
Apr 26, 2007
Messages
3,368
Location
Lockhart, Tx, USA.
Nice work Mike, Looks very promising......

Do you need to scuff the brass tube and apply the clay or Drill for the tube and Glue? How is it "attached" to the tube.
 
Joined
Aug 7, 2009
Messages
700
Location
Jamestown, NC
The main think I'm working on right now is a good finish to put on them, which the lacquer seems to work great. I'll be dipping some later today I hope.

Mike, I have been using a CA and it works great. Be careful with that lacquers because some will react with the clay over time. It may be fine now, but it will slowly soften the clay. There are some finishes made just for clay, but the one most of us use is Flecto Varathane Diamond Finish (I think it is now owned by future). This has provided the best results other then the CA. If you put thin coats on the clay and then fire it back in the toaster oven at 150 or so it works even better. Thicker coats or ones that don't bond well will peel in a couple of months.

Nice work. Keep it up. It is nice to have someone else using this stuff.
 

Smokey7385

Member
Joined
Dec 14, 2006
Messages
140
Location
Topeka, KS
When I first saw "lacquer" I thought: spray-on. But dipping? This is a new concept to me, but then again, this is all new to me as I'm really just getting started. I searched for "lacquer" in the forum overall but found no really helpful tips or threads. If you're dipping, how do you keep the inside of the brass tube clean? How do you prevent drips or runs? Help! :eek:

Not sure if this it the method used on these pens, but here is what I know about the process.

When I was into bow hunting much more than now I made my own arrows and dipped them in lacquer. I used a product called Gasket Lacquer. The process is to put the lacquer into a container with a lid that has a large hole in it and a gasket under the lid that has a small hole. You insert the item to be dipped into the container until covered and pull out with one smooth motion. The gasket squeegees the excess lacquer of and the item is almost totally dry when removed due to the fast drying properties of the lacquer and due to the excess being squeegieed off. Repeat the process after just a couple minutes of dry time to
 

Russianwolf

Member
Joined
Jul 13, 2007
Messages
5,690
Location
Martinsburg, WV, USA.
So far, I haven.'t noticed any degradation using Deft lacquer. I have a couple sample pieces in my shop that I'm observing to make sure that I like the aged effects.

For dipping a pen, in't not too hard and there are tutorials out there I know.

1) turn the pen slightly smaller than the desired dimensions (similar to CA since both finished build on top of the wood).
2) with the bushings still in place, dip the pen in lacquer and hang to dry. If you don't keep the bushings on you will get a bead around the bottom as the lacquer flows. With the bushings in place, the bead forms on the bushing and the level on the blank remains even.
3) let dry to touch at least.
4) use a sharp razor to score the intersection of the bushing and the blank and separate the two. You don't have to do this, but the scoring will decrease the chances of the lacquer chipping along the joint and making you start over.
5)let sit for at least a for days to cure well before handling too much. Lacquer need time to fully cure, when first dry it will remain soft and you can transfer fingerprints to it permanently.
 
Top Bottom