CA..?? Lacquer..?? nah! URUSHI..Ya!!

Signed-In Members Don't See This Ad
See more from chriselle

chriselle

Member
Joined
Sep 1, 2008
Messages
1,251
Location
Ito City, Shizuoka, Japan
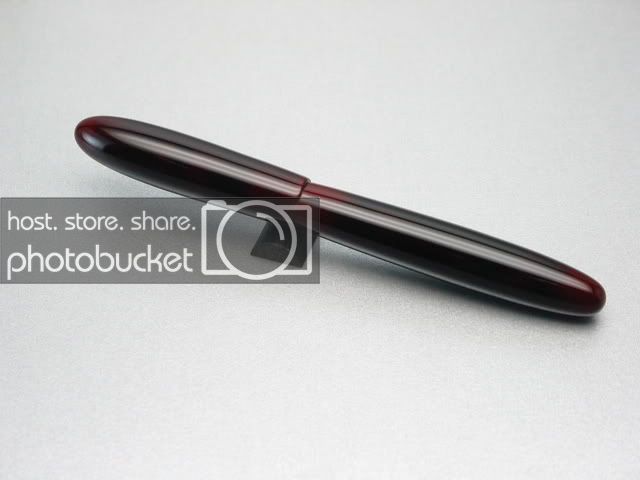
Just kidding..but this is what an Urushi finish can look like on a simple pen. The base of the pen is Japanese sakura and then there are a "number" of layers of different shades of hon-urushi and polished with sumi and the "bambi" system...(powdered antler). The Jr. Gent parts were just an experiment until I get turning my own threads. Let me know what you think.

Urushi3.jpg

Urushi1.jpg

Urushi2.jpg
 
Signed-In Members Don't See This Ad

Jim Smith

Member
Joined
Jul 27, 2008
Messages
1,962
Location
Lakeland, FL
I really like both the design and the finish on that pen. The super simple yet elegant design goes perfectly with the beautiful finish that is not too shiney or plastic looking, more like glossy satin. Beautiful job!

Jim Smith
 

OKLAHOMAN

Member
Joined
May 17, 2006
Messages
10,228
Location
Costa Rica
Chris, that's most likely the nicest finish I've seen here. How long in terms of time did the finish take.
 

leehljp

Member Liaison
Joined
Feb 6, 2005
Messages
9,326
Location
Tunica, Mississippi,
You are definitely at the right place to learn that craft! :biggrin: I hadn't heard of polishing with sumi, but then I am not in that line or work. That is a nice idea. What does your hands look like? :rolleyes:

GREAT LOOKING PEN! GREAT JOB!

I will bet you this: Your pen sales is about to increase with that kind of finish. You will soon need an apprentice! If people here only knew the price you could get here for that pen, there would be more attempts at learning that art. Who ever your teacher is, tell him he has a great student! :wink:
 
Last edited:

Rarest wood

Member
Joined
Oct 22, 2008
Messages
340
Location
Alnwick, Northumberland
looking at the pen makes me want to reach out and touch it. The subdued satin softeness and depth really makes the pen glow. that is one of the best pens ive seen on the IAP you should be so pleased with that it has spririt.
 
Last edited:

marcruby

Member
Joined
Feb 22, 2008
Messages
1,175
Location
Warren, Michigan, USA.
Nice work. I was just looking over some descriptions of what goes into a urushi finish and it seems like a very time consuming and painstaking finish. Which says a lot about the talent it takes to make a pen like that. I read that Urushiol is the ingredient that makes poison ivy a poison.

Applause!

Marc
 
Last edited:

PTJeff

Member
Joined
Jun 13, 2007
Messages
228
Location
Berea, Ohio, USA.
Chris,
Thats a great looking finish, love the red and black combo. You can't just get that stuff on the shelves here in the states.
Can't wait to see more examples of this finish
 

chriselle

Member
Joined
Sep 1, 2008
Messages
1,251
Location
Ito City, Shizuoka, Japan
Chris, that's most likely the nicest finish I've seen here. How long in terms of time did the finish take.

Thank you for the kind words.

It takes about 3 weeks to a month to get to this kind of depth. You could get away with fewer coats (less time) if you are going for a more simple one color scheme. I've developed a way to airbrush the urushi which cuts the time to more than half. Urushi is extremely dangerous to be spraying but I have made a down-draft booth that captures "most" of the overspray. Also, a good respirator and no exposed skin are a pre-requisite but I don't react too badly actually. Once you get set up for a batch production it really isn't all that involved. The main concern is keeping the pen bodies turning after application so the urushi doesn't pool. For that purpose I have a series of fishing rod drying motors which turn at 6 RPM and just chuck the pen blanks to those for a few hours until the urushi cures a bit.
 

chriselle

Member
Joined
Sep 1, 2008
Messages
1,251
Location
Ito City, Shizuoka, Japan
You are definitely at the right place to learn that craft! :biggrin: I hadn't heard of polishing with sumi, but then I am not in that line or work. That is a nice idea. What does your hands look like? :rolleyes:

GREAT LOOKING PEN! GREAT JOB!

I will bet you this: Your pen sales is about to increase with that kind of finish. You will soon need an apprentice! If people here only knew the price you could get here for that pen, there would be more attempts at learning that art. Who ever your teacher is, tell him he has a great student! :wink:

Funny you should mention this Hank. A fellow who is somehow involved with a number of museum exhibitions wants to distribute these. He was throwing around some pretty high prices at our meeting yesterday but then again his cut is fairly substantial as well..:rolleyes: I'm afraid my old sensei would be :eek: and :frown: at the fact that I was airbrushing... Actually, I think deep down he would approve.
 

pipecrafter

Member
Joined
Oct 31, 2008
Messages
320
Location
Clayville, Rhode Island
Absolutely stunning!! I wish I had the time to experiment with that, because I had the same thought about airbrushing. Excellent job - the depth of the color is remarkable.
 

chriselle

Member
Joined
Sep 1, 2008
Messages
1,251
Location
Ito City, Shizuoka, Japan
Beautiful pen Chris, I love the depth of colour are you getting lessons on doing this finish?

Thank you Mark. I had lessons 10 or so years ago and didn't do much with it until gaining interest again within the past few years. In the spring I'm going with a buddy, who does Cashew urushi, to Ishikawa for some advanced lessons.
 

GouletPens

Member
Joined
Nov 9, 2008
Messages
1,449
Location
Ashland, VA
Wow...that seems pretty involved!! How many hours of time would you say you actually have to invest for a single pen with urushi? I've done some gilding before and there are many similar types of processes between urushi and water gilding (though, completely different chemicals and so forth).
 

LEAP

Member
Joined
Dec 22, 2006
Messages
1,938
Location
Old Orchard Beach, Maine
That is absolutely beautiful! i spent a couple of years working in Okinawa and took a few tours in lacquer ware shops. The amount of work they put into the pieces was astounding. I parted with more than a few of my hard earned dollars to bring some gifts home. Your finish is on par with anything I have seen! The other thing I was amazed at at the shops was the beautiful work they did with the most basic of lathes and tools.
 

chriselle

Member
Joined
Sep 1, 2008
Messages
1,251
Location
Ito City, Shizuoka, Japan
Wow...that seems pretty involved!! How many hours of time would you say you actually have to invest for a single pen with urushi? I've done some gilding before and there are many similar types of processes between urushi and water gilding (though, completely different chemicals and so forth).

Hey Brian, whaz up?

If you are doing one pen (like this one) then it's certainly not very practical. Granted you can skip MANY of the steps. For example, I use CA to level the grain of the wood so.... bamm....theres at least 6 or 7 steps cut out right there. I know for a fact that Namiki or Nakaya don't go through the entire process with their Urushi finishes. Of course, they use ebonite for blanks so they knock off at least 3/4 of the process in the link I posted. That said, each coat of urushi can take up to a week or so to harden up depending on a large number of factors. The only way to make urushi a viable finish for any kind of business purpose is to do it in production. I'm getting set up now to do 10 or more pens at a time. Once setup the process is really very easy.

The problem I'm having right now is with the thickness of the finish. With this pen I didn't use a center band so I didn't have to worry about the finished blanks being flush with kit parts. But my vision is to incorporate at least a center band in the design and I forsee a problem getting the finish flush with any kind of regularity. Notice on this pen I didn't use the trim ring from the Gent kit. I did intend to use it but alas the finish was too thick so I consider this pen as just a failed attempt albeit a pretty one.

For the guys who do "dip lacquer" finishes you really should look into getting a fishing "rod dryer" setup. They are the "bees knees"......Did I actually say that??:eek::biggrin:
 

GouletPens

Member
Joined
Nov 9, 2008
Messages
1,449
Location
Ashland, VA
Thanks for the info Chris. I've seen the term 'urushi' thrown around a bit but you've definitely given me more information about it than I've seen anywhere else. Have you ever tried Urushi over an acrylic? I've done that with gilding and it works quite well. If you can do it over ebonite, then why not acrylic?

I think your pen looks great. I'm not sure the center ring would really have done much for it anyway, I think it looks good as is. I'm definitely not planning on going out an starting a Urushi process myself anytime soon, but I love to be able to talk intelligently about it. I already have at least 6 different major, highly specialized very time consuming pen ventures that I would love to persue, so thanks for adding one more to my list!! At this rate, I'll die before I ever accomplish all I wish with pen turning (and I have quite a few years left!).
 

chriselle

Member
Joined
Sep 1, 2008
Messages
1,251
Location
Ito City, Shizuoka, Japan
Brian,

Urushi will stick to pretty much anything. The problem I have is all my acrylic blanks are too nice to be covering up..:biggrin: Sounds like you're staying busy....keep pushing the envelope my friend.
 

GouletPens

Member
Joined
Nov 9, 2008
Messages
1,449
Location
Ashland, VA
Brian,

Urushi will stick to pretty much anything. The problem I have is all my acrylic blanks are too nice to be covering up..:biggrin: Sounds like you're staying busy....keep pushing the envelope my friend.
Chris, you should come to my shop! I have some acrylics I thought looked good when I first started, but have since learned the truth!! My least favorite is that AWFUL looking scarlet mesh:

I must have 30-40 ugly frickin' acrlyics I'd be HONORED to cover up with Urushi!!!
 
Signed-In Members Don't See This Ad
Top Bottom